
MikroTik RouterOS is an operating system for routers. A special version of it called CHR (Cloud Hosted Router) is installed on a virtual server, and the VPS becomes a full-featured router with VPN, routing, a firewall and convenient management through a browser or the WinBox app.
There is no ready-made RouterOS template when you order a server, so we'll write the CHR image straight from Linux over the server's system. It takes about ten minutes.
All data on the server will be deleted
The RouterOS image is written to the disk over the current system, and everything that was on the server will be lost. Install MikroTik on a new server or save the files you need beforehand.
What you'll need
- A server with Ubuntu or Debian. Any plan will do, even DE-Promo, because RouterOS needs at least 256 MB of memory and 128 MB of disk space.
- An SSH connection to the server. If you haven't connected before, use our Termius guide.
1. Write down the server's network settings
After installation, RouterOS won't find out the IP address and gateway by itself, so you'll have to enter them manually. That's why you should look them up first, while Linux is still running on the server. Connect via SSH and run two commands.
# Server IP address. The mask comes after the slash,
# for example 203.0.113.10/24
ip -4 -brief address show scope global

# Gateway, this is the address after the word via,
# for example default via 203.0.113.1
ip -4 route show default
Write down the IP address and gateway, because you'll need them in step 6.
The same details are shown in the client area. Open the server list, tick the server you need and click IP addresses (IP-адреса). It shows the IP address, mask and gateway.
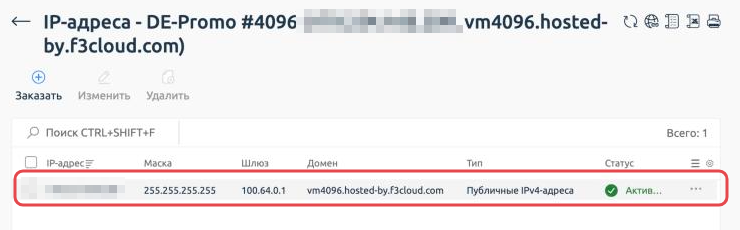
Server IP address, mask and gateway in the client area
2. Download the RouterOS image
We download the image to the /dev/shm folder. This folder lives in RAM, so the image file won't be damaged when we start overwriting the disk. Run all the commands in the same SSH window and don't close it.
# Install the tools for downloading and unpacking
apt-get update && apt-get install -y curl unzip

# Go to the folder that lives in RAM
cd /dev/shm

# Find out the number of the latest stable RouterOS 7 version
VERSION=$(curl -s https://upgrade.mikrotik.com/routeros/NEWESTa7.stable | cut -d' ' -f1)
echo $VERSION

# Download the CHR image of this version from the official MikroTik website
curl -L -o chr.img.zip https://download.mikrotik.com/routeros/$VERSION/chr-$VERSION.img.zip

# Unpack the image and delete the archive
unzip chr.img.zip && rm chr.img.zip
ls -lh
The echo $VERSION command will show the version number, for example 7.24.5, and ls -lh will show an image file of about 128 MB.
3. Write the image to the disk
First, check what the server's disk is called.
# List of disks. You need the line with the disk type, usually it's vda
lsblk
Now write the image to this disk. If the disk in lsblk isn't called vda, correct the name in the command.
# Write the RouterOS image over the system.
# Replace vda with the disk name from lsblk if it's different
dd if=chr-$VERSION.img of=/dev/vda bs=4M oflag=sync status=progress
Writing takes a few seconds. At the end, dd will report how many bytes were copied.
4. Reboot the server
The usual reboot command won't work here, because the system on the disk has already been erased. So we reboot the server directly through the kernel.
# Allow emergency kernel commands
echo 1 > /proc/sys/kernel/sysrq

# Reboot the server immediately
echo b > /proc/sysrq-trigger
The SSH window will freeze after this, which is normal. The server will boot straight into RouterOS.
5. Log in to RouterOS through the console
Until the network is set up in RouterOS, the only way in is through the console. In the client area, tick the server in the list and click VNC, and the console opens in a new tab. We describe it in more detail in the article on server management.
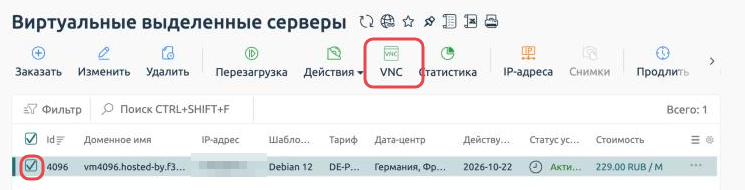
The VNC button opens the server console
- In the Login line, enter
admin. - The default password is empty, so just press Enter.
- RouterOS will ask whether to show the licence text. Press n.
- Come up with a new administrator password and enter it twice.
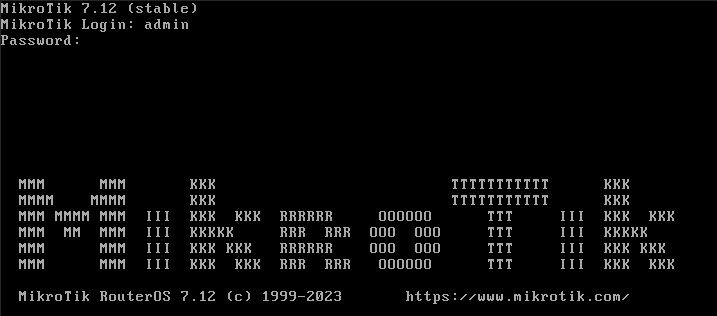
Logging in to RouterOS through the console
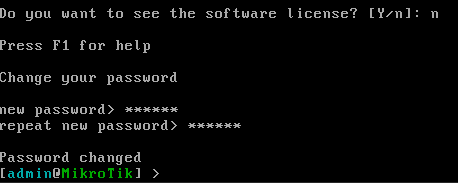
Changing the administrator password
Which password to choose
The router will be reachable from the internet, so you need a strong password of at least 12 characters with letters and numbers.
6. Set up the network
Now enter the commands below in the console. Replace 203.0.113.10 with the server's IP address and 203.0.113.1 with its gateway from step 1.
# Assign the IP address to the server. We set the /32 mask and the gateway
# address in network on purpose, so RouterOS is sure to find the gateway
/ip address add address=203.0.113.10/32 network=203.0.113.1 interface=ether1

# Send all internet traffic through the gateway
/ip route add dst-address=0.0.0.0/0 gateway=203.0.113.1

# Set DNS servers so the router can open websites by name
/ip dns set servers=1.1.1.1,8.8.8.8

# Check the connection. The replies should come back without loss
/ping mikrotik.com count=4
Long commands are easy to paste with the Paste button on the console bar. If pasting does not work, type the commands manually and check your keyboard layout, because the commands are entered in English.
7. Open the web interface
Enter http://server-IP-address in your browser and log in as admin with the password you set in step 5.
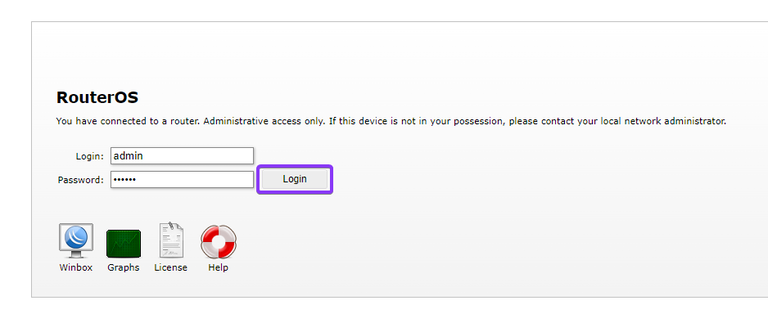
Logging in to the RouterOS web interface
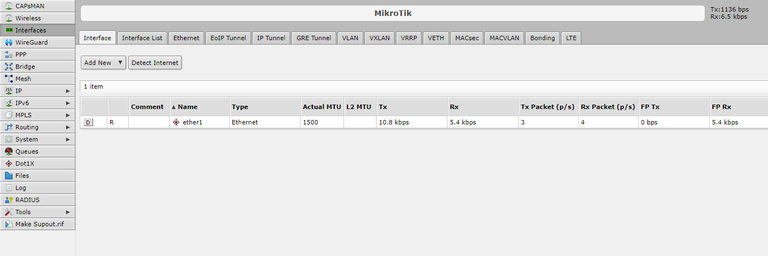
The RouterOS web interface after login
The WinBox app is another convenient way to manage the router. You can download it from the MikroTik website, and to connect you only need the server's IP address, login and password.
8. Remove the speed limit
Without a licence, CHR works for free, but the outgoing speed is limited to 1 Mbit/s per interface. That's far too little for a VPN or a proxy.
MikroTik offers a free 60-day trial.
After it, you can buy a p1 licence for speeds up to 1 Gbit/s.
If you don't buy one, the router will keep working at the same speed and will simply stop receiving updates.
- Sign up at mikrotik.com.
- In the console, run
/system license renew. - Enter the email and password of your MikroTik account, and in the level line enter
p1. - Check the result with
/system license print. The level line should showp1.
9. Secure the router
On a RouterOS server, services that aren't needed for management may be running by default. Turn off the extra ones so nobody can try to guess your password through them.
# Disable telnet, FTP and API. You can still manage the router
# through the browser, WinBox and SSH, which stay enabled
/ip service disable telnet,ftp,api,api-ssl

# See which services are still enabled
/ip service print
When you've finished the setup, save a backup of the configuration with /system backup save name=backup. The file will appear in the web interface in the Files section, and you can download it to your computer from there.
Common errors
Linux booted again after the reboot
The image wasn't written to the disk. Most often the wrong disk was given in the dd command, or the SSH window closed and the VERSION variable was lost. Connect again and repeat steps 2–4 in one window.
Boot errors or a black screen in the console
Writing was interrupted halfway, and there's no working system left on the disk. Reinstall Linux using this guide and repeat the installation from step 1.
Ping doesn't go through
Check the settings with /ip address print and /ip route print. Most often there's a typo in the IP address or gateway. You can delete a wrong entry with /ip address remove 0 or /ip route remove 0, where 0 is the line number from the list, and then add it again.
The web interface doesn't open
Open the address with http://, without the s, because secure HTTPS login is turned off by default. If that doesn't help, check with /ip service print that the www service is enabled.
Everything works, but very slowly
Most likely the router has the free licence with the 1 Mbit/s limit. Check it with /system license print and activate the trial licence as described in step 8.
I need to go back to regular Linux
Reinstall the operating system in the client area using our guide, and the server will become a regular VPS again.
Our resources
Telegram channel: https://t.me/f3cloud_news
F3 Cloud: https://f3cloud.com