
Many programs written back in the Windows 7 and Vista era rely on .NET Framework 3.5. Modern Windows ships with a newer version, 4.8 or 4.8.1, while 3.5 comes as a separate component that you have to turn on. Until it is enabled, such programs refuse to start and ask you to install .NET Framework 3.5.
The component is stored inside Windows itself, so most of the time it turns on in a couple of minutes without any download. Below are three ways to do it: through the Windows Features window on Windows 10, through Server Manager on Windows Server, and with the universal DISM command.
Which .NET version is already there
.NET Framework 4.8 is preinstalled on Windows 10 versions 1903 through 22H2 and on Windows Server 2022.
.NET Framework 4.7.2 ships with Windows Server 2019.
You still need to enable 3.5 separately, because it is not part of that branch.
Option 1. Windows Features (Windows 10)
The simplest path when you have the Windows 10 desktop in front of you.
- Open the Control Panel and, for convenience, switch the view to Small icons.
- Open Programs and Features.
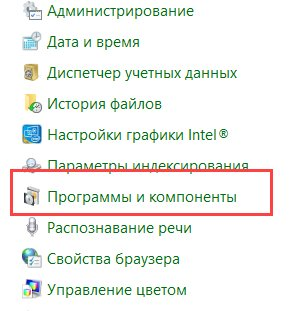
The Programs and Features section in the Control Panel
- On the left, click Turn Windows features on or off.
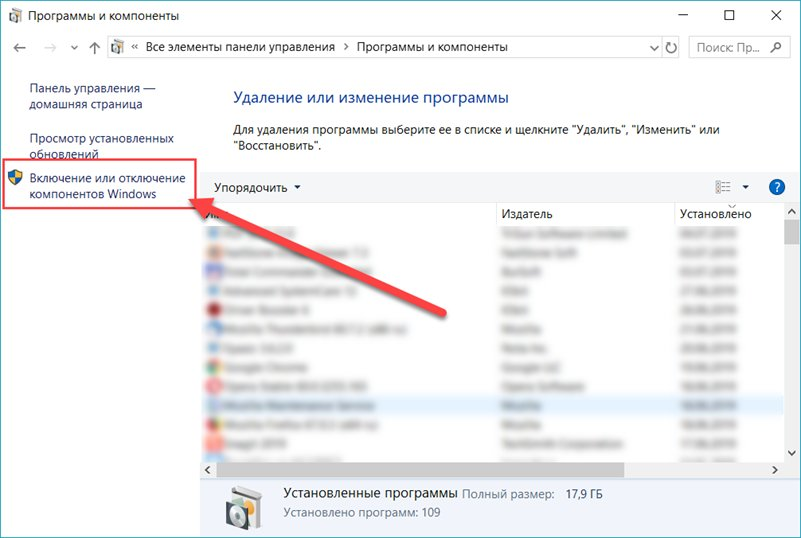
The Turn Windows features on or off link
- Tick .NET Framework 3.5 (includes .NET 2.0 and 3.0) and click OK.
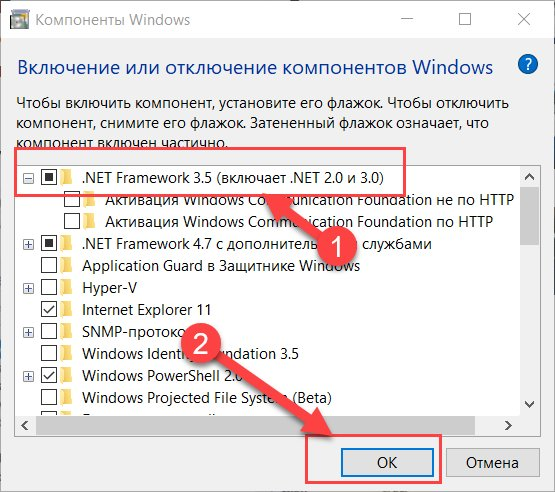
The .NET Framework 3.5 checkbox and the OK button
- When Windows offers to download the files, choose Let Windows Update download the files and wait for it to finish.
Leave the nested items unchecked
The Windows Communication Foundation Activation boxes inside .NET Framework 3.5 are only needed for developing web services. Ordinary programs do not need them.
Option 2. Server Manager (Windows Server)
On Windows Server 2016, 2019 and 2022 the component is added through the Add Roles and Features wizard.
- Open Server Manager and click Add Roles and Features.
- Reach the Features step and tick .NET Framework 3.5 Features.
- Click Install.
If the server cannot download the files from the internet, attach the Windows installation image and, on the confirmation step, click Specify an alternate source path, pointing it to the sources\sxs folder on that image.
The same thing can be done with a single PowerShell command run as administrator.
# The files are taken from Windows Update
Install-WindowsFeature -Name NET-Framework-Core

# Or from the sources\sxs folder on a mounted image, where D: is the image drive
Install-WindowsFeature -Name NET-Framework-Core -Source D:\sources\sxs
Option 3. The DISM command (Windows 10 and Server)
DISM works the same way on every Windows version and helps when the usual method throws an error. Open Command Prompt or PowerShell as administrator.
# Enable the component, files are downloaded from Windows Update
Dism /online /enable-feature /featurename:NetFx3 /All
If there is no internet or the download fails, attach the Windows installation image (ISO or DVD) and point DISM to the files. Here D: is the drive with the image.
Dism /online /enable-feature /featurename:NetFx3 /All /Source:D:\sources\sxs /LimitAccess/Allalso enables the parent features./Sourcepoints to thesources\sxsfolder of the installation image./LimitAccessstops DISM from reaching the internet and forces it to take the files from the image only.
The image must match the Windows version
The files in sources\sxs have to match the installed version of Windows. An image from a different Windows build leads to error 0x800F081F.
How to check that the component is enabled
# In the output, .NET Framework 3.5 should show State : Enabled
Dism /online /get-featureinfo /featurename:NetFx3
How to remove the component
You disable .NET Framework 3.5 the same way you enabled it: untick the box in the Windows Features window, clear .NET Framework 3.5 Features in Server Manager, or run the command.
Dism /online /disable-feature /featurename:NetFx3Check the dependencies first
If any program on the server needs .NET Framework 3.5, it will stop starting once the component is removed. Disable it only when you are sure nothing uses it anymore.
Common errors
0x800F0906 - the files could not be downloaded
Windows could not fetch the component from Windows Update. The usual causes are network, proxy or firewall problems, or the server being set to an internal WSUS update server. Check internet access or attach the installation image and run the DISM command with /Source and /LimitAccess.
0x800F081F - the files were not found
The path in /Source is wrong, the sources\sxs folder has no required files, the account has no read access, or the image is from another Windows version. Make sure the path points exactly to sources\sxs and that the image matches the installed build.
0x800F0907 - blocked by policy
A Group Policy forbids downloading files from Windows Update, and no other source is set. Attach the installation image and point to sources\sxs with /Source, or allow the download in the Specify settings for optional component installation and component repair policy.
Where to find error details
DISM writes a detailed log to C:\Windows\Logs\DISM\dism.log. If the install fails, open it and look for the lines with the error, they make the cause much easier to find.
Our resources
Telegram channel: https://t.me/f3cloud_news
Our website: https://f3cloud.com