
All server actions are gathered in the client area, on the toolbar above the server list. Here you can reboot the server, open its console, check the load, reinstall the system or boot the rescue mode. In this article we go through every button and explain when it comes in handy.
The screenshots show the client area in Russian. Next to each button and field we give its Russian name in brackets so you can find it on the screenshot.
How to select a server
Log in to the client area and open the server list in the Products/Services (Товары/Услуги) section. Tick the server you need to the left of its number, and the buttons on the toolbar above the list become active. All the actions below apply to the selected server.
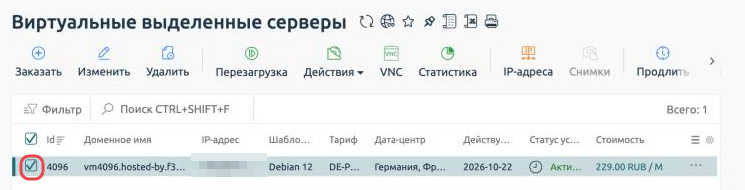
The server is selected and the control buttons are active
Here is what each button does.
- Reboot (Перезагрузка) restarts the server.
- Actions (Действия) opens a menu with OS reinstall, password change, installing software with a script and rescue mode.
- VNC opens the server console in a new browser tab.
- Statistics (Статистика) shows load charts for CPU, memory, disk and network.
- IP addresses (IP-адреса) shows the server addresses, mask, gateway and the PTR record.
- Renew (Продлить) extends the server rental.
- History (История) shows changes to the service in billing, such as a new status or expiry date.
- Instructions (Инструкция) shows the IP address, login and password issued when the server was ordered.
- Question (Вопрос) opens a support ticket with this server already filled in.
Where is the «Go to» button
Some actions used to be done in a separate server control panel opened with the «Go to» button. A separate panel is no longer needed, everything is right in the client area.
Reboot
Click Reboot and confirm with Ok. The server receives a shutdown signal, the system closes programs properly and starts again. This usually takes about a minute.
Sometimes a server hangs so badly that it no longer responds to that signal. For this case the dialog has the Perform forced reboot (Выполнить принудительную перезагрузку) checkbox. With it, the server processes are stopped at once, without waiting for the system to shut down by itself. In effect it is the same as unplugging a computer and switching it back on, so data that programs had not yet written to disk may be lost. Use this checkbox only if a normal reboot did not help.
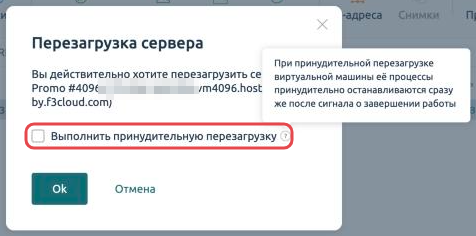
Confirming the reboot
VNC console
The VNC console shows the server screen right in the browser, as if a monitor and keyboard were plugged into it. It does not depend on SSH or the network settings inside the server, so it helps in the most unpleasant situations. For example, when you have accidentally closed the SSH port with a firewall, broken the network settings, or the server cannot boot and you need to see where it stopped.
Click VNC and the console opens in a new tab. To log in, enter the login root and the server password. The password characters are not shown as you type, that is normal.

The VNC console and its button bar
At the top of the console there is a bar with buttons.
- Ctrl+Alt+Del sends this key combination to the server.
- Paste (Вставить) pastes text from the clipboard into the console. This is handy for long passwords and commands.
- Reconnect (Переподключить) reconnects the console if the connection has dropped.
- The buttons on the right open the console full screen and collapse the bar itself if it gets in the way.
A console session lasts up to 4 hours
After 4 hours the console disconnects by itself. To continue, click VNC in the client area again.
Statistics
The Statistics button opens the server load charts. In the Period (Период) field you can choose Day, Week, Month or Year, and the Refresh (Обновить) button fetches fresh data. Above each chart you will see the current, average and maximum value for the chosen period.
- CPU (Процессор) shows the load in percent.
- Memory (Память) shows how much RAM is used out of what your plan provides.
- Disk (Диск) shows how much disk space is already used.
- Traffic (Трафик) shows the inbound and outbound speed and how much data was transferred during the period.
- Disk operations (Диск, операции) shows the number of read and write operations per second (IOPS).
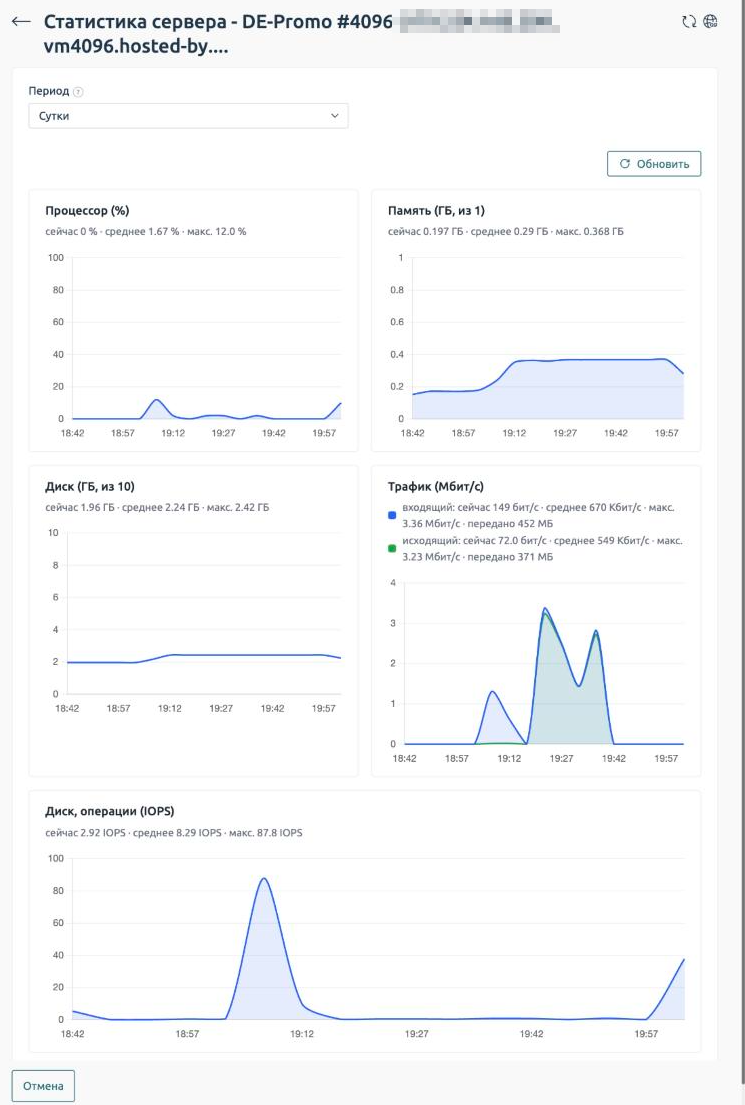
Load charts for a day
These charts help you understand why a server is slow. If the CPU stays near 100 % for hours or memory is almost full, the server is short of resources. Then it is worth finding the hungry process with the top command or moving to a more powerful plan. A sudden rise in outbound traffic that you did not expect is also a reason to be careful, because this is often how a hacked server looks when it sends spam or attacks others. If the disk is completely full, programs can no longer save data and start to crash, so it is better to free up space in advance.
IP addresses and the PTR record
The IP addresses button shows the server addresses. For each address you will see the mask, gateway and domain. The mask and gateway are needed if you configure the network on the server by hand, for example when installing MikroTik RouterOS.
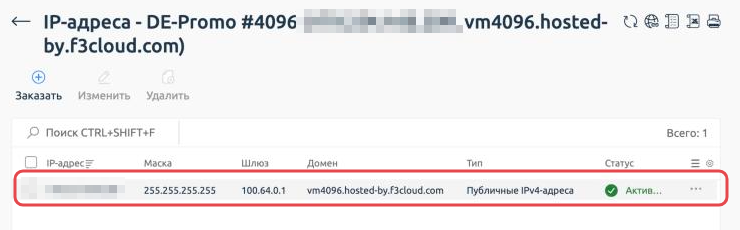
Server IP address, mask, gateway and domain
The Domain (Домен) column holds the PTR record. A normal DNS record answers the question of which IP address a domain has, while PTR works the other way round and tells which domain an IP address has. It matters most for mail servers, because mail services check the sender's PTR, and emails from a server without a correct record often end up in spam.
To change the record, tick the address, click Edit (Изменить), enter your domain in the Domain field and click Ok. The new record appears in DNS in about a minute.
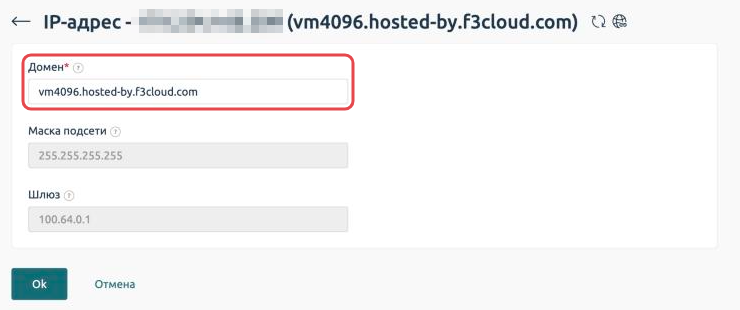
The Domain field sets the PTR record
Set up the A record first
For mail, the domain in the PTR record must point to the same IP address with a normal A record. Create it at your domain registrar before changing the PTR.
Installing software with a script
To avoid installing popular software by hand, you can run a ready-made script. Click Actions and choose Run script (Запустить скрипт).
- In the Script (Скрипт) field, choose the software you need. The list only shows scripts that suit your server's system. For Debian 12, for example, these are Django, LAMP, LEMP, Openvpn, Redmine, Teamspeak, Tomcat, Wireguard VPN, ispmanager and proxmox.
- Tick I understand the script will change the server system (Понимаю, что скрипт изменит систему на сервере).
- Click Ok.

The script form

Scripts for Debian 12
The script runs as root and usually installs the software in 3–10 minutes. The server stays available the whole time.
Run scripts on a clean server
A script may overwrite settings that already exist on the server, for example the web server or firewall configuration. It is best to run it right after ordering or reinstalling the OS.
Rescue mode
Rescue mode is needed when the server has stopped booting. The cause may be a mistake in the /etc/fstab file, a broken bootloader, a full disk or an unlucky kernel update. Normally such a system cannot be fixed from the inside, because it simply does not start. Rescue mode solves this problem. The server boots not from its own disk but from a separate small rescue system, and from there you can attach the server disk, find the mistake and fix it. The disk itself is not changed until you start working with it by hand.
How to turn it on
- Click Actions and choose Rescue mode (Rescue-режим). The form shows that the mode is currently Off (Выключен).
- Tick I confirm the switch (Подтверждаю переключение) and click Ok.
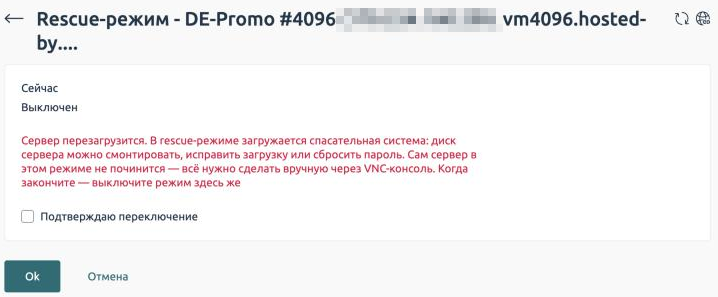
Turning rescue mode on
The server reboots straight into the Tiny Core Linux rescue system. Open the console with the VNC button, you are logged in as root automatically.
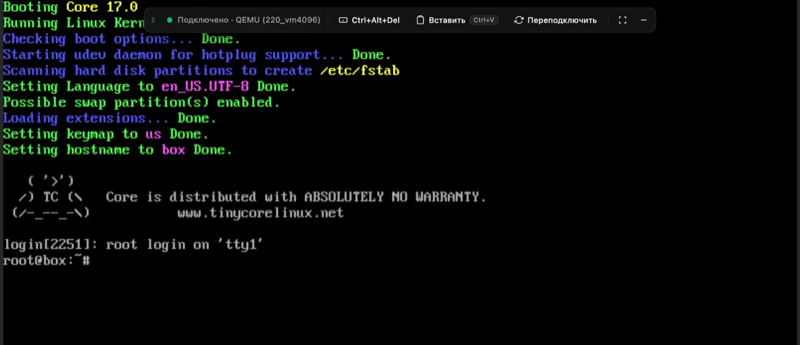
The rescue system in the VNC console
How to attach the server disk
See which partitions are on the disk and mount the main system partition to the /mnt folder.
# List of disks and partitions, the main partition is usually the largest
cat /proc/partitions

# Mount the system partition to the /mnt folder.
# On Debian 12 it is vda2, on other systems the name may differ
mount /dev/vda2 /mnt
Now the server files are in the /mnt folder. For example, the server's /etc/fstab file is at /mnt/etc/fstab. From here you can also copy important data if you decide to reinstall the system.
How to turn it off
When you are done, open Actions → Rescue mode again. The form shows that the mode is On (Включён). Tick I confirm the switch and click Ok. The server reboots and starts from its own disk as usual.
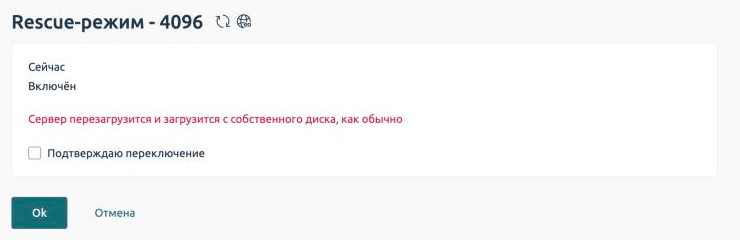
Turning rescue mode off
The server does not fix itself in rescue mode
Rescue mode only gives you access to the disk, and the fixes have to be made by hand in the VNC console. While the mode is on, your sites and programs do not work, so remember to turn it off when you are done.
If something went wrong
The message «The operation is already in progress. Try again in a few seconds»
Another action is already running on the server, or the button was pressed too often. Wait half a minute and try again. The VNC console can be opened no more than five times a minute, after that you also need to wait a little.
Nothing opened after clicking VNC
The console opens in a new tab, and the browser may have blocked it as a pop-up. Allow my.f3cloud.com to open pop-ups and click VNC again.
The message «Please confirm the operation»
Running a script and switching rescue mode need confirmation. Tick the checkbox in the form and click Ok again.
The message «VMmanager did not perform the action»
The server management system did not complete the action on the first try. It has been queued and will be retried automatically, and if that fails too, billing will create a support task. There is no need to click the button again.
The message «The action failed»
Billing has already created a support task, and we will get in touch with you. If the matter is urgent, write to us with the Question button.
Our resources
Telegram channel: https://t.me/f3cloud_news
F3 Cloud: https://f3cloud.com