

3X-UI – A guide to installing and using the panel
Brief description of 3X-UI
3X-UI – a modern open-source web panel for convenient management of Xray-core that moves routine administration tasks into a familiar web dashboard and reduces the time spent on maintaining services.
This solution simplifies operation – it centralises the management of connections, user accounting and analytics, and gives quick access to configurations and logs, so that providers, system administrators and advanced users can launch and maintain services without unnecessary effort.
You will find a detailed list of functions and capabilities below – in the “3X-UI panel features” section.
Before putting it into operation, it is recommended to check the access settings and set up regular backups of the configurations.
3X-UI panel features
- Support for popular protocols – VMess, VLESS, Trojan, Shadowsocks, WireGuard, SOCKS, HTTP, etc.
- Multilingual interface – Russian, English, 中文, español and others, including one-click switching.
- User and quota management – creating/deleting accounts, traffic limits, expiry dates, blocking and priorities.
- Automatic SSL issuance and renewal – integration with Let’s Encrypt and support for your own certificates.
- Reality transport support – configurations for bypassing blocks and secure traffic transfer.
- Real-time monitoring and statistics – traffic, active connections, charts, logs and data export.
- Docker integration – ready-made images and deployment via Docker / Docker-Compose.
- Full-featured web interface – all administration tasks are performed through the GUI (no console work required).
Manual installation
To install 3X-UI, run the following command:
bash <(curl -Ls https://raw.githubusercontent.com/mhsanaei/3x-ui/master/install.sh)During installation:
- when prompted for the panel parameters, choose
yto enable protection; - use a non-standard port to access the web interface.
Installing a specific version
To install the panel version you need, specify its number in the installation command. For example, for version v1.7.9:
VERSION=v1.7.9 && bash <(curl -Ls "https://raw.githubusercontent.com/mhsanaei/3x-ui/$VERSION/install.sh") $VERSION1. Installation via Docker
bash <(curl -sSL https://get.docker.com)
git clone https://github.com/mhsanaei/3x-ui.git
cd 3x-ui
docker compose up -d
Alternative option:
docker run -itd \
  -e XRAY_VMESS_AEAD_FORCED=false \
  -v $PWD/db/:/etc/x-ui/ \
  -v $PWD/cert/:/root/cert/ \
  --network=host \
  --restart=unless-stopped \
  --name 3x-ui \
  ghcr.io/mhsanaei/3x-ui:latest
Setting up SSL certificates
3x-ui offers several ways to set up an SSL certificate.
Method 1. Setting up an SSL certificate via ACME in the 3X-UI panel.
- Make sure your domain points to the server correctly (the A record in DNS is configured properly).
- Run the following command in the terminal:
x-ui
Then select “SSL certificate management”. - The following actions are available in the menu that opens:
- Get SSL – issue a new certificate.
- Revoke SSL – delete an existing certificate.
- Force renewal – renew the certificate manually.
- Show domains – display a list of available certificates.
- Set panel certificate paths – specify the paths to the certificate files that the control panel will use.
Method 2. Setting up an SSL certificate via Certbot.
apt install certbot -y
certbot certonly --standalone --agree-tos --register-unsafely-without-email -d yourdomain.com
certbot renew --dry-run
Replace yourdomain.com with your domain.
Logging in to the web panel
After installation, run:
x-uiSelect item 10 to view the current panel settings: URL, login and password.
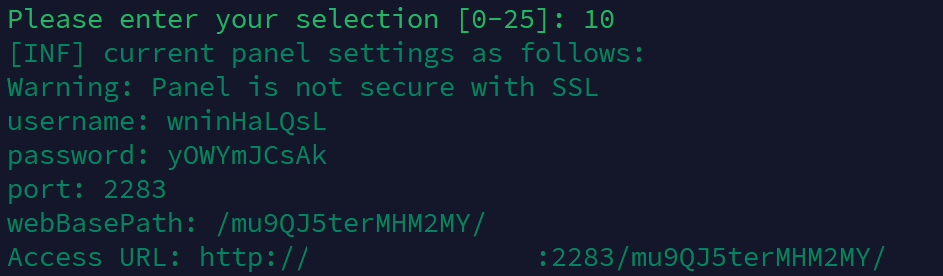
Open the link from Access URL and log in with the details you received.
Setting up connections (Inbounds)
Creating a connection
- Go to the Inbounds section.
- Click Add inbound.
- Enter any name in the Remark field.
- Select a protocol (VMess, VLESS, Trojan, ShadowSocks or WireGuard).
- Save the settings.
Setting up protocols
VLESS + Reality
(recommended for bypassing blocks)
In the Security type field, select Reality.
Set uTLS –
chrome.In the Dest field, enter a value, for example:
dl.google.com:443In the SNI field, enter a value, for example:
dl.google.comClick Get New Cert to generate random keys automatically.
Click Create to save and create the connection.
Setting up limits
For each connection, you can set:
- a traffic limit (GB);
- a validity period (in days);
- an IP limit (simultaneous connections);
- automatic disconnection when the limit is exceeded.
Managing users
- In the Inbounds section, click
+next to the connection. - Select Add Client.
- Enter a name, limits, a unique ID and a validity period.
.png)
Connecting clients
Windows, macOS, Linux
Recommended clients:
- V2RayTun (Windows, Linux, macOS)
- Hiddify (Windows, Linux, macOS)
- Happ (Windows)
To connect:
- In the 3X-UI panel, click the user's QR code.
- Copy the configuration or scan the QR code with a VPN client.
- Import the configuration and connect.
Android and iOS
Recommended clients:
- V2RayTun
- Happ
- Hiddify
To connect:
- Install the app.
- Scan the QR code or import the configuration.
- Establish the connection.
Monitoring and statistics
The panel displays:
- total traffic volume;
- traffic usage per user;
- connection statuses;
- validity period and status of accounts;
- IP addresses of connections.
Updating 3X-UI
bash <(curl -Ls https://raw.githubusercontent.com/mhsanaei/3x-ui/master/install.sh)For Docker:
cd 3x-ui
docker compose down
docker compose pull 3x-ui
docker compose up -d
Troubleshooting
Default parameters:
- panel port:
2053 - database:
/etc/x-ui/x-ui.db - Xray configuration:
/usr/local/x-ui/bin/config.json
Additional features
- blocking of ads and IP addresses;
- traffic routing (Google, Netflix, Spotify, OpenAI) through WARP;
- WARP support is built in, starting from version
v2.1.0.
.png)
Simply enable the option you need in the control panel.