
A Git server of your own is useful when you do not want to hand your code to someone else's service, or when a project needs its own access rules. Gitea is a lightweight open-source program that turns a VPS into such a server. It stores repositories, shows them in the browser, manages accounts and permissions, and on top of that offers issues and pull requests. At the same time it takes only 100 to 160 MB of memory on the server. In this article we will run Gitea in Docker, go through the initial setup, create an administrator and a repository, connect over HTTP and over SSH, close registration, add a colleague, set up backups and look at updating. We repeated every step on a test server with Debian 12, and the Gitea version at the time of testing was 28.2.0.
How a Git server on Gitea works
Git itself does not need a special server. Every copy of a project on your computer already holds the whole history of changes, and after git clone the git log command shows all the earlier commits. The server only has to be a shared place where participants send their changes and pick up other people's. Gitea creates exactly such a place. It keeps repositories in a folder on disk, maintains the list of users, decides who may read and who may write, and also draws the web pages with code, history and issues. Information about users and repositories is stored in a database, and in our setup it is an ordinary SQLite file inside the same folder, so a separate database server is not needed.
You can reach Gitea in two ways. The first goes over HTTP to port 3000, like an ordinary page in the browser. Every operation requires a login and password, and as long as the address starts with http:// and not https://, they travel over the network unencrypted. We checked this on the test server. While git push was running, we recorded the traffic with the tcpdump program, and the Authorization: Basic header with the login data was visible in the stream in plain text. The second way goes over SSH. You create a pair of keys once, add the public part to your Gitea profile, the private part stays on your computer, and from then on Git confirms your identity with the key, without a password. For this, Gitea's own SSH server runs inside the container on the container's port 22. Port 22 of the VPS itself is already taken by your SSH login, so we will publish the container's port under the number 2222, and Git will need to connect to exactly that one.
The rest depends on where Gitea keeps its data. Everything that changes during work lies in one folder, /opt/gitea/data. There you will find the settings file app.ini, the gitea.db database, the repositories themselves in the git/repositories folder and the SSH server keys in the ssh folder. The container itself stores nothing important. It can be deleted and created again from the image, and the data will stay in place. So updating Gitea comes down to changing the image, and a backup comes down to saving the data from this folder. SQLite is enough for a small team, and we will work with it. For a server with a large number of users, the official Gitea documentation describes a variant with PostgreSQL.
Why version 28 and not 1.27
In older instructions you will come across Gitea tags like 1.27. The last release with that numbering was 1.27.3, and the next one came out as 28.0.0. Version 28.2.0 was current at the time of our testing, and that is exactly the one we used.
What you need
- A server with Debian 12 or Ubuntu 24.04, for example the DE-RZ9-1 plan. Gitea hardly loads the server at all. On ours the container with SQLite took from 100 to 160 MB of memory at different times, and the image took about 260 MB of disk space. The space for repositories depends on your projects. If you do not have a server yet, order one using the guide.
- Docker and Docker Compose. How to install them is described in the article about Docker. We had Docker 29.9.2 and Compose 5.6.1.
- An SSH connection, for example via Termius. Commands on the server are run as
root. - Free ports 3000 and 2222. Port 22 stays reserved for your login to the server.
- Git on your computer. We tested with Git 2.39.5.
Step 1. Run Gitea in Docker
Create a folder for Gitea and a Compose file. This folder will hold both the file itself and all the data.
mkdir -p /opt/gitea
cd /opt/gitea
nano docker-compose.yml
Paste the configuration below into the file. Save it with Ctrl + O, then Enter, and exit the editor with Ctrl + X.
services:
  gitea:
    image: docker.gitea.com/gitea:28.2.0
    container_name: gitea
    restart: always
    environment:
      - USER_UID=1000
      - USER_GID=1000
    volumes:
      - ./data:/data
    ports:
      - "3000:3000"
      - "2222:22"
Here is what it all means.
imagepoints to the official Gitea image. The version number is written explicitly, so the update happens when you decide to do it.USER_UIDandUSER_GIDset the user that Gitea runs as inside the container. According to the documentation, the default is 1000../data:/datamounts thedatafolder next to the file. The database, repositories and settings will end up in it."3000:3000"opens the web interface, and"2222:22"opens Gitea's SSH server on port 2222.restart: alwaysmakes Docker start the container after the server reboots. More about this in the article about Docker.
Start the container and look at its state.
docker compose up -d
docker compose ps --format "table {{.Name}}\t{{.Status}}\t{{.Ports}}"
The first start downloads the image. For us it took about three seconds. The list should show a gitea line with the status Up.
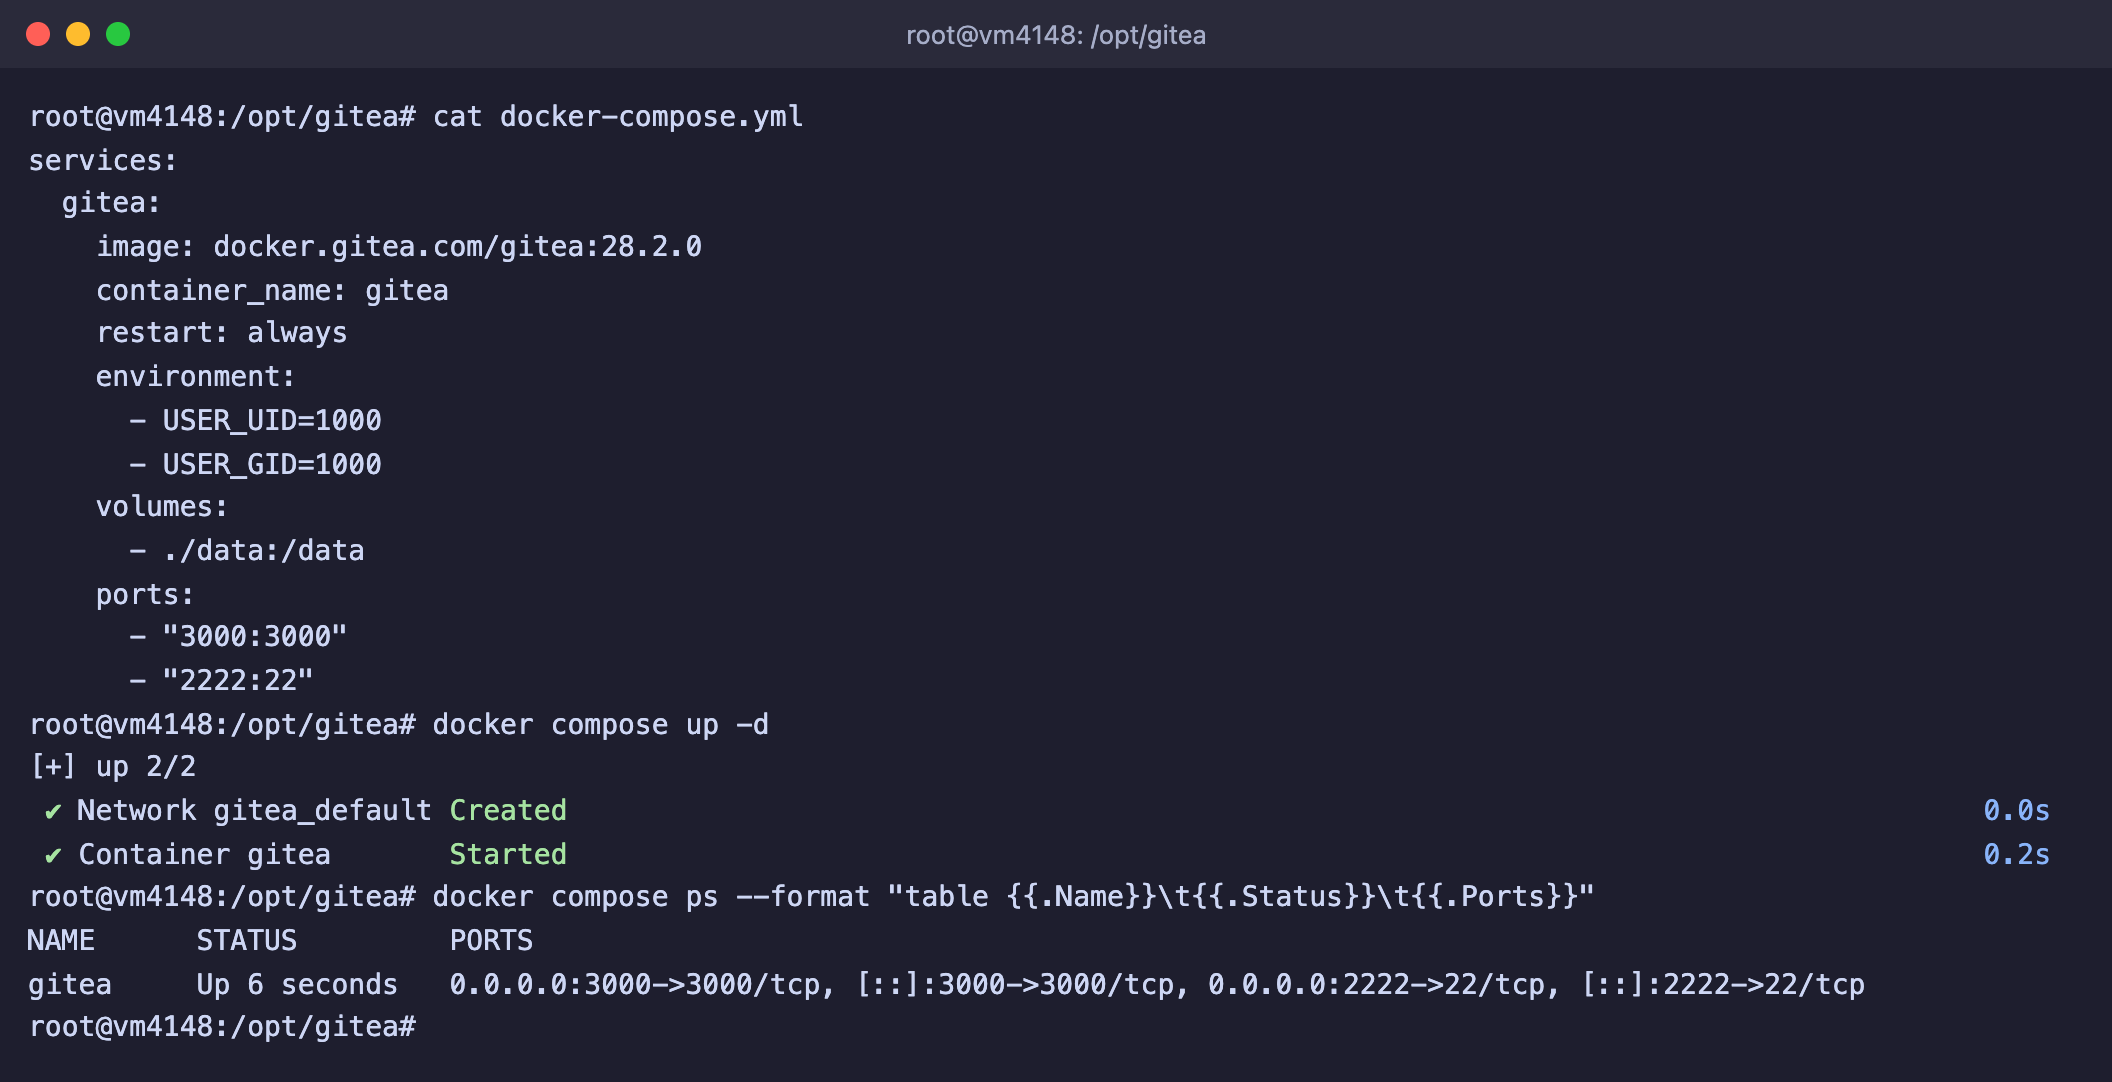
The Gitea container is running, ports 3000 and 2222 are published
Ports open without UFW
We checked from another computer that ports 3000 and 2222 respond even though UFW has no rules for them at all. Docker publishes ports with its own rules, and they take effect before the UFW rules. This is covered in detail in the article about Docker, and at the end of this article we show how to hide the web port from the internet.
Step 2. Go through the initial setup
Do not leave the setup page open
Until you click the install button, the page is available to anyone who knows the address and port, and any visitor can fill it in themselves, right down to the administrator account. Go through the setup right after starting the container.
Open http://server-IP:3000 in your browser. The Initial Configuration page will appear. Most fields are already filled in correctly, so only a few need changing.
- In the Database Settings block, keep the type SQLite3 and the path
/data/gitea/gitea.db. This is a path inside the container, and on the server the file will end up in the/opt/gitea/data/giteafolder. - In the Site Title field, enter your own name or leave it as it is.
- In the SSH Server Port field, replace 22 with 2222. This way Gitea will show in the clone addresses the port that we opened to the outside. Inside the container the SSH server still listens on 22, and Gitea takes this into account on its own.
- The Gitea Website URL field already contains the address you used to open the page, for example
http://server-IP:3000/. Check it. - Tick Only administrators can create user accounts (no self-registration). Then only a person created by the administrator will be able to register on your server.
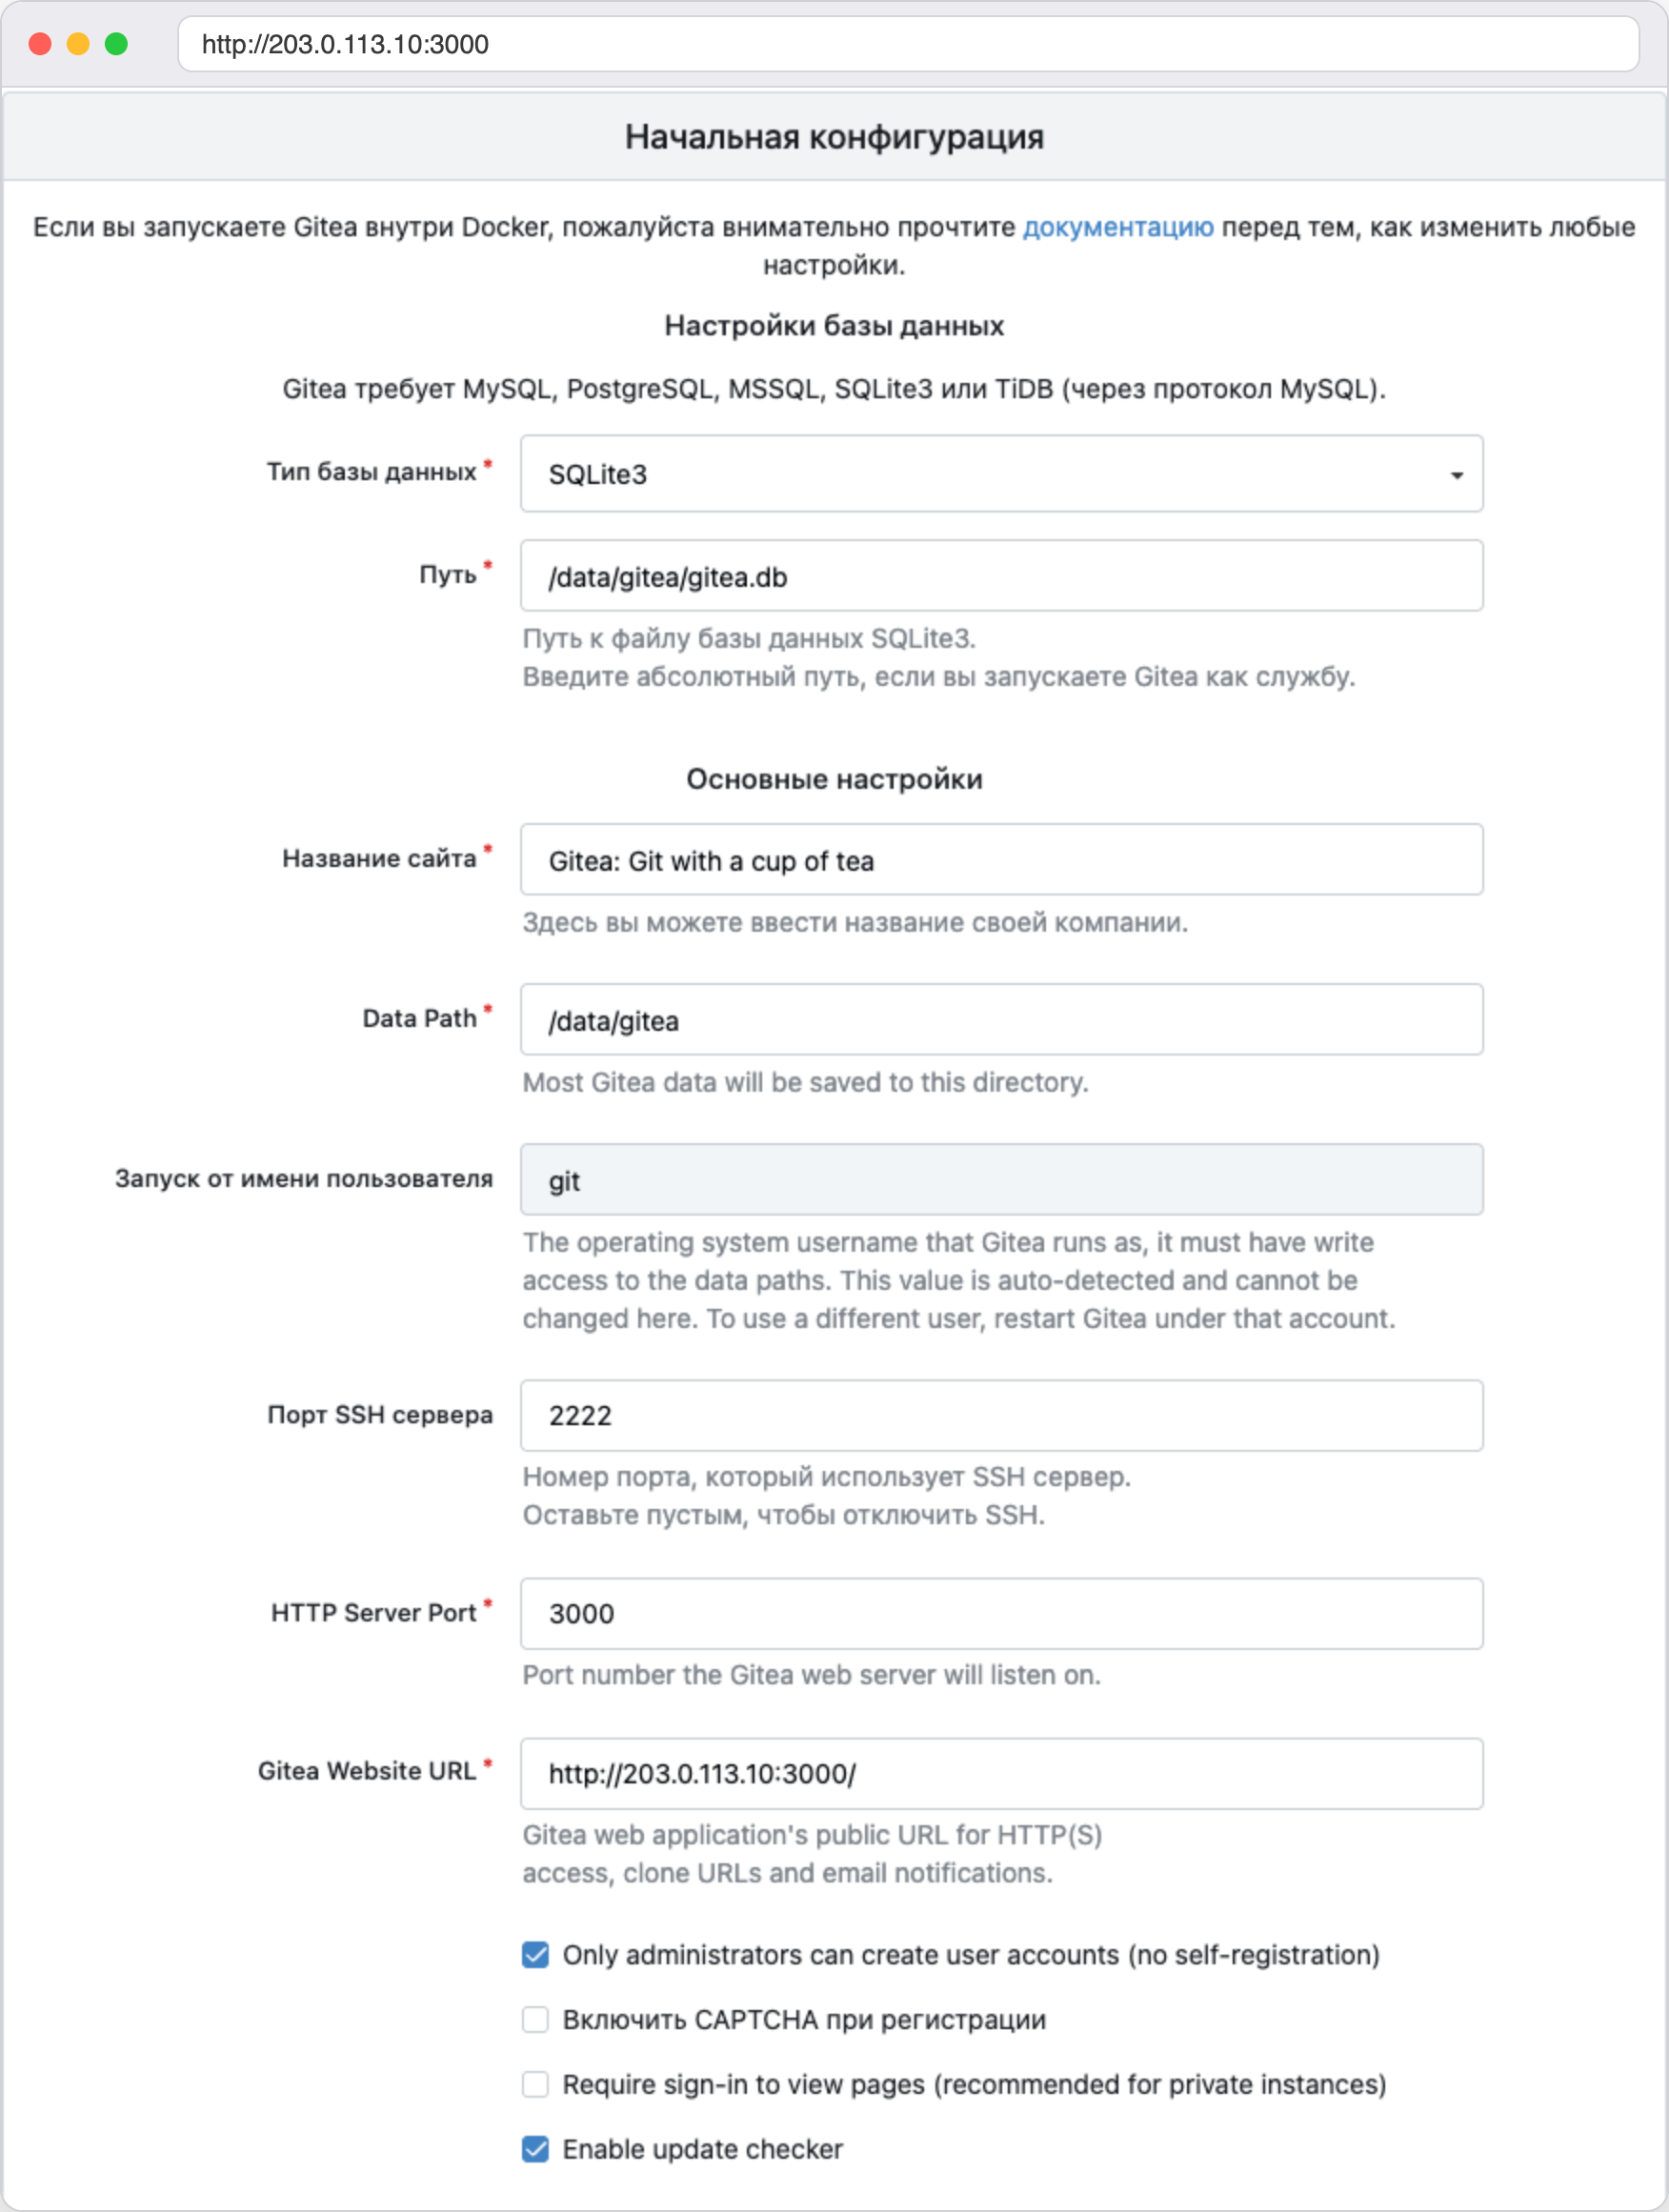
SSH port 2222 and the registration ban, everything else is left at the defaults
There are two more checkboxes nearby.
- Require sign-in to view pages hides the pages with the list of repositories from guests. We turned it on as a test, and the repository overview page sent a visitor who was not logged in to the sign-in form. It is useful if the server is only for your own people.
- Enable update checker is left at the default.
Now create the administrator.
- At the bottom of the page, expand Optional Settings and open the Administrator Account Settings block.
- Think up an Administrator Username, enter an Email Address and type the password twice. The mailbox can be any, because Gitea does not send emails until you set up mail. Choose a long and complex password. In our test the installer accepted even a three-character password, which means it will not protect you from a weak one.
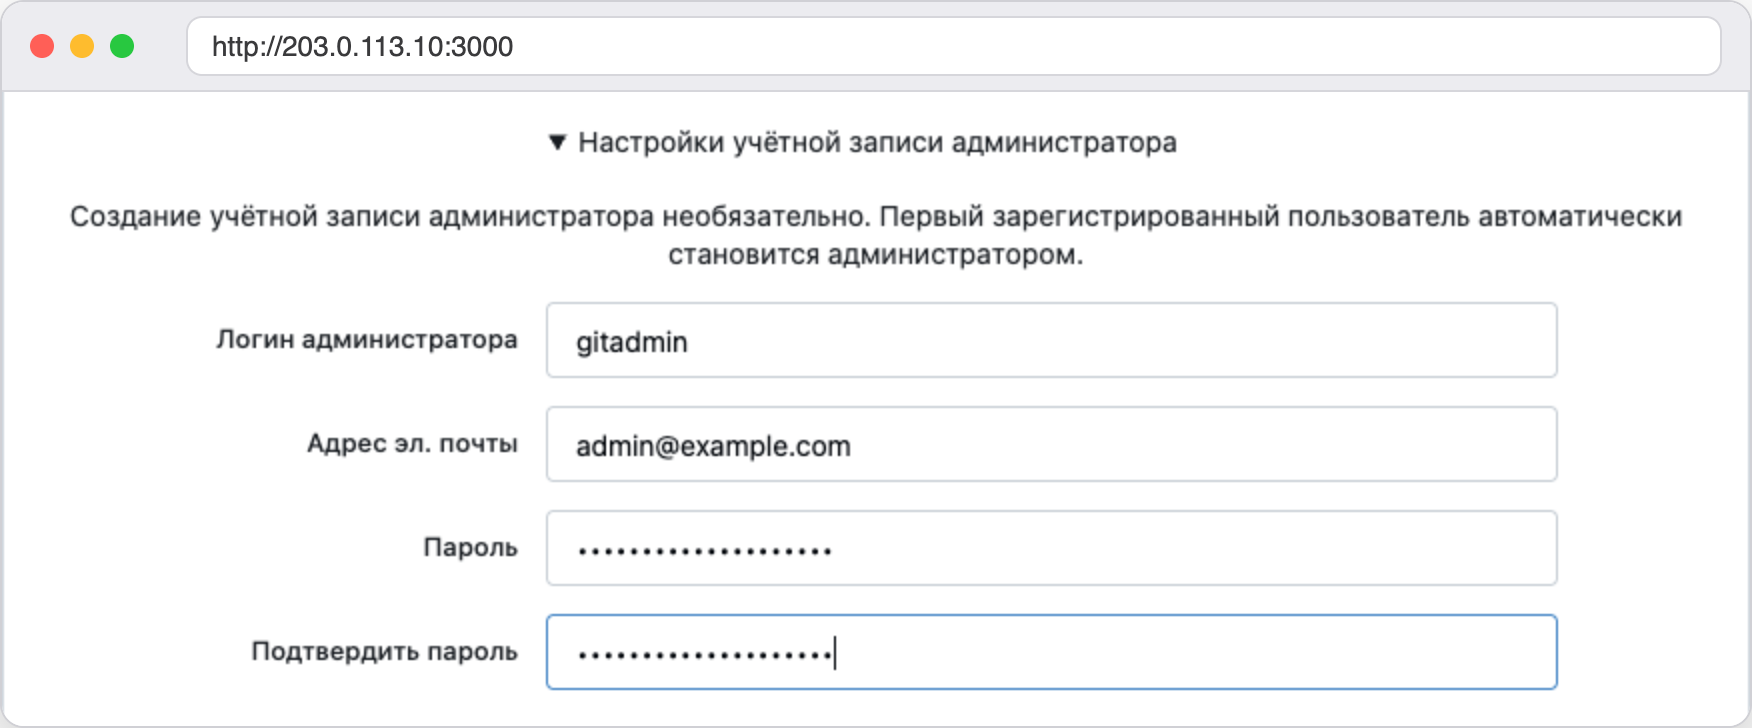
The administrator account is created right on the installation page
- Click the Install Gitea button at the bottom of the page. After a few seconds you will find yourself on a Gitea page, already signed in to your account.
The settings are written to the /opt/gitea/data/gitea/conf/app.ini file, and we will edit it from time to time later.
Step 3. Set the server address in app.ini
The setup page has no field for a domain, so Gitea wrote DOMAIN = localhost and SSH_DOMAIN = localhost into the file. We checked what this leads to. On the repository page the SSH address started with ssh://git@localhost:2222/…, and you cannot connect with it from another computer. Let us fix the two lines.
cd /opt/gitea
nano data/gitea/conf/app.ini
In the [server] block, replace localhost with the server's IP address in the DOMAIN and SSH_DOMAIN lines. Do not touch the SSH_PORT = 2222 and SSH_LISTEN_PORT = 22 lines. The first sets the port that is shown in the addresses, and the second is the SSH server port inside the container. Save the file and check the result.
grep -n -E "DOMAIN|ROOT_URL|SSH_PORT|SSH_LISTEN" data/gitea/conf/app.iniThen restart the container so that Gitea reads the file again.
docker restart gitea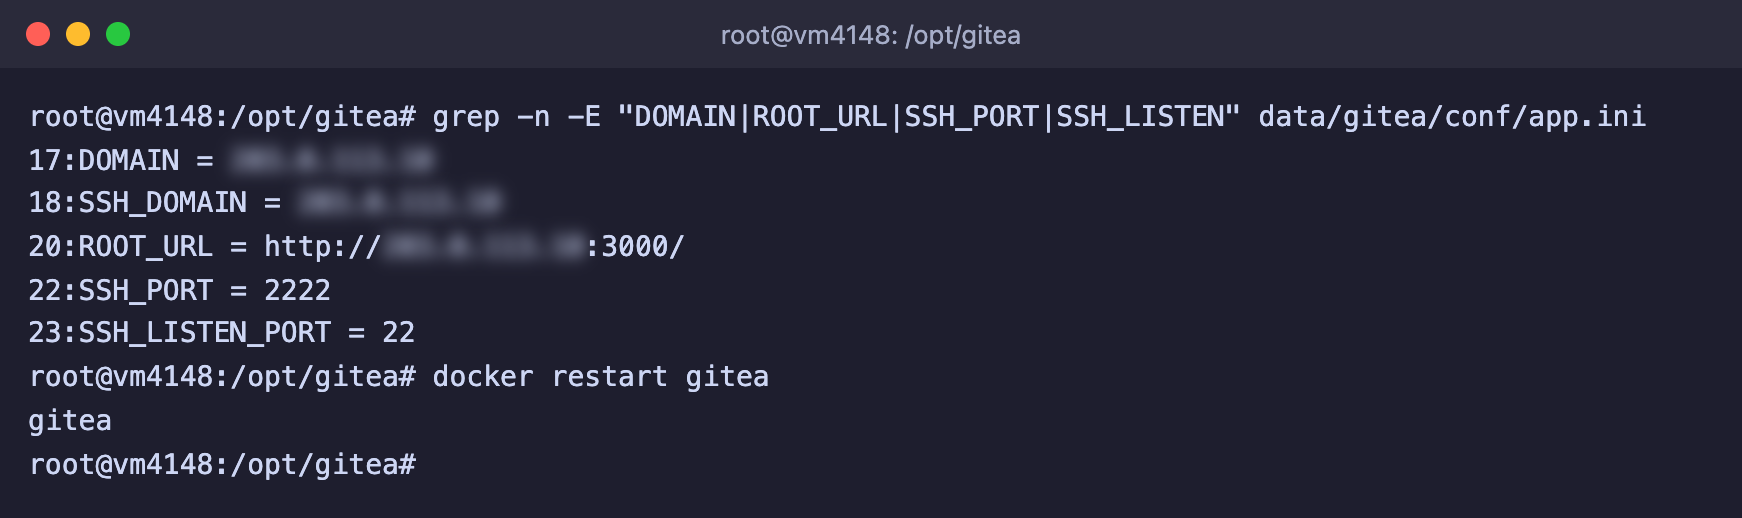
The addresses now contain the server's IP address, which is hidden in the screenshot
When the server gets a domain, you write it into the same lines and into ROOT_URL, as described in the section about the domain and HTTPS.
Step 4. Create a repository
Click the + icon in the top right corner and choose New Repository.
- In the Repository Name field, enter
my-project. - Tick Make repository private. This box is not ticked by default, and the repository would end up public.
- In the Description field, write a few words about the project if you like.
- Tick Initialize Repository. Gitea will immediately create the first commit with a README file, so there will be something to clone.
- Click Create Repository.
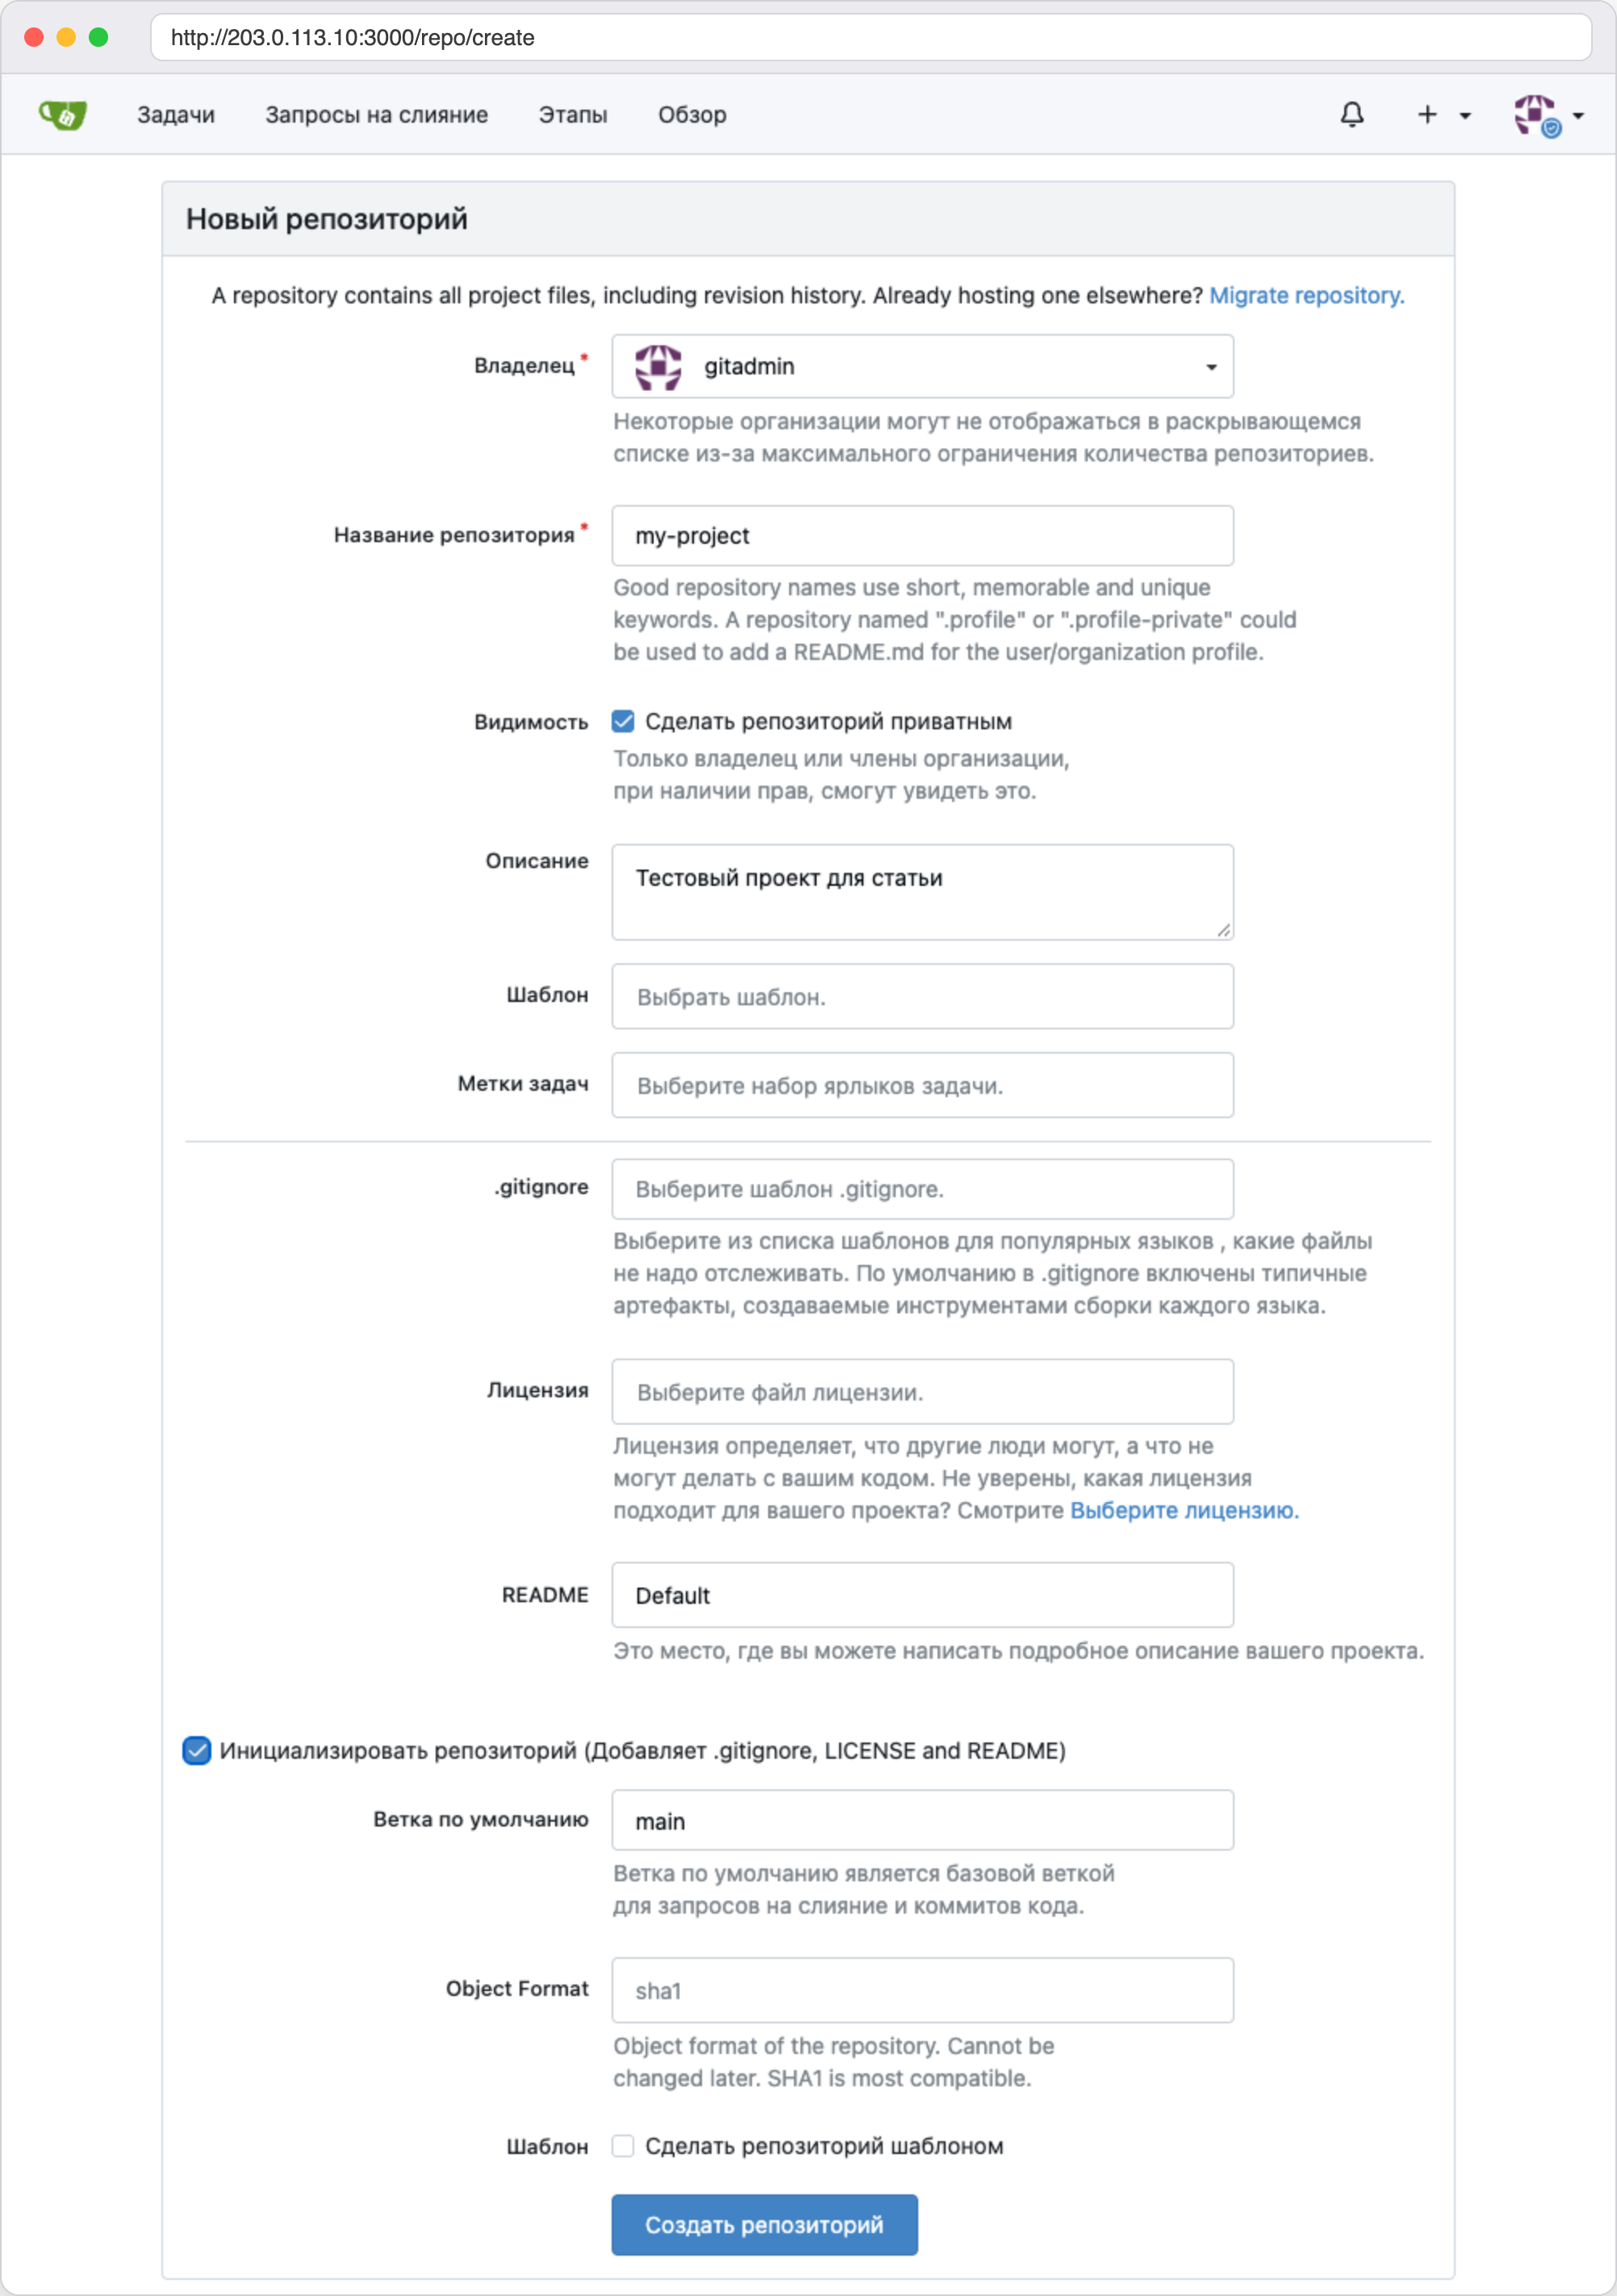
A private repository with a first commit
On the repository page, click the blue Code button. The window that opens has two tabs with clone addresses, HTTP and SSH. We will start with the first one.
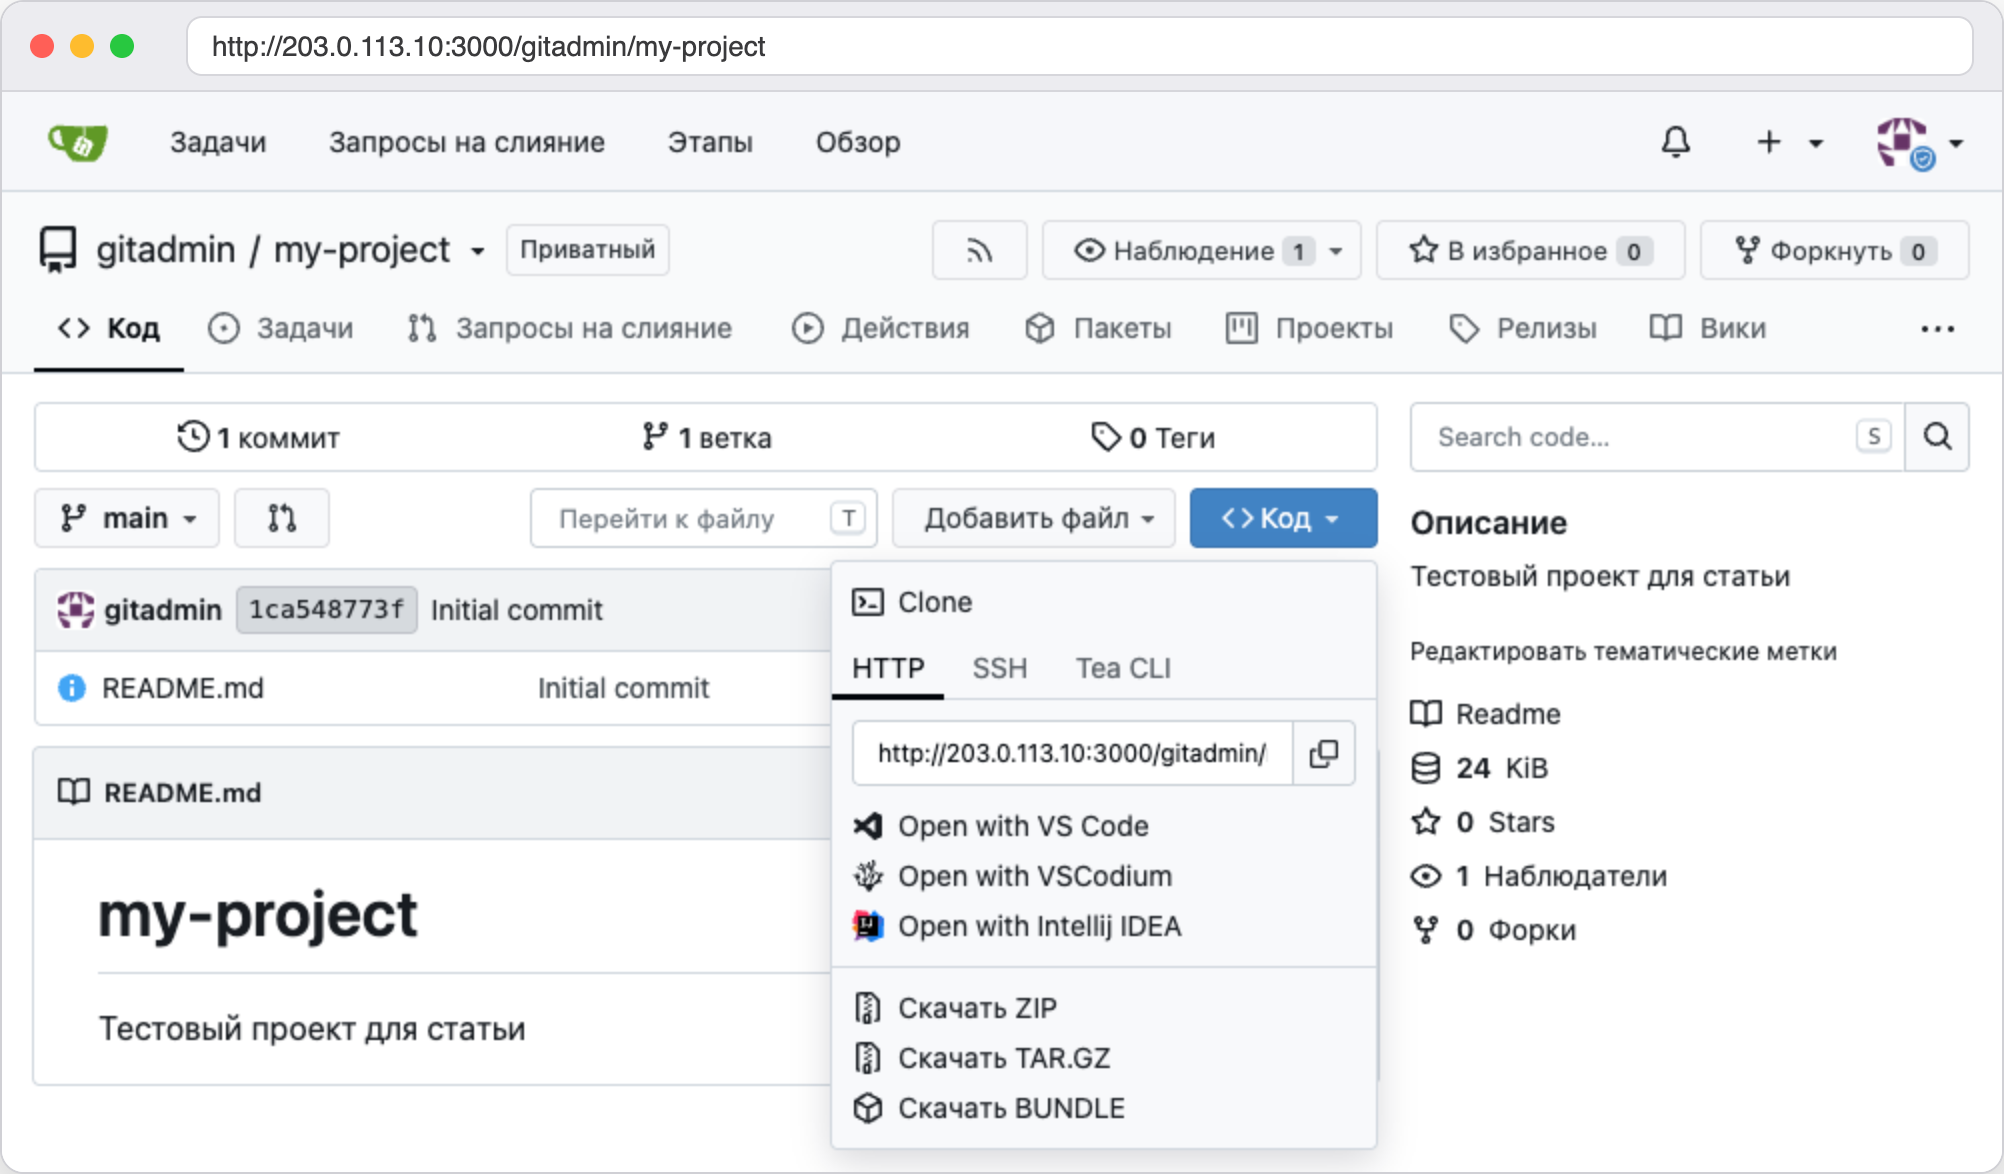
The clone address over HTTP, the server address in the screenshot is replaced
Step 5. Clone the repository and push changes over HTTP
Before the first commit, Git has to know who you are. Run these two commands once on your computer, substituting your own name and email.
git config --global user.name "Your Name"
git config --global user.email "you@example.com"
Now clone the repository, add a file to it and send the changes to the server. Take the address from the Code window. The repository is private, so Git will ask for Username and Password twice. Enter the administrator's login and password. The password is not shown as you type, and that is normal.
# Clone the repository over HTTP
git clone http://server-IP:3000/gitadmin/my-project.git
cd my-project

# Add a file and commit the change
echo "print(1)" > hello.py
git add hello.py
git commit -m "Add hello.py"

# Push the commit to the server
git push
We ran these commands on the server itself under a separate user, and on your computer the result will be the same.

Cloning and pushing over HTTP, the server address is hidden
After git push, open the repository page in the browser. The hello.py file is already there, and the history shows two commits.
The password over HTTP is not protected
An address like http://server-IP:3000 encrypts neither the password nor the code. For work on real projects, use SSH, which is described in the next step, or put a domain with HTTPS in front of Gitea.
Step 6. Connect SSH on port 2222
Over SSH, Git does not ask for a password and does not send it over the network. First you need a pair of keys. If you already have a key, you can skip the creation step, and keys are covered in more detail in the article about SSH keys.
Create a key on your computer. You can simply press Enter for all three questions, but if the key lives on a laptop, it is safer to set a passphrase.
bashssh-keygen -t ed25519 -C "me@example.com"Print the public part of the key on the screen. This is the file ending in
.pub. Do not show the private fileid_ed25519, the one without an ending, to anyone, and do not paste it anywhere.bashcat ~/.ssh/id_ed25519.pub
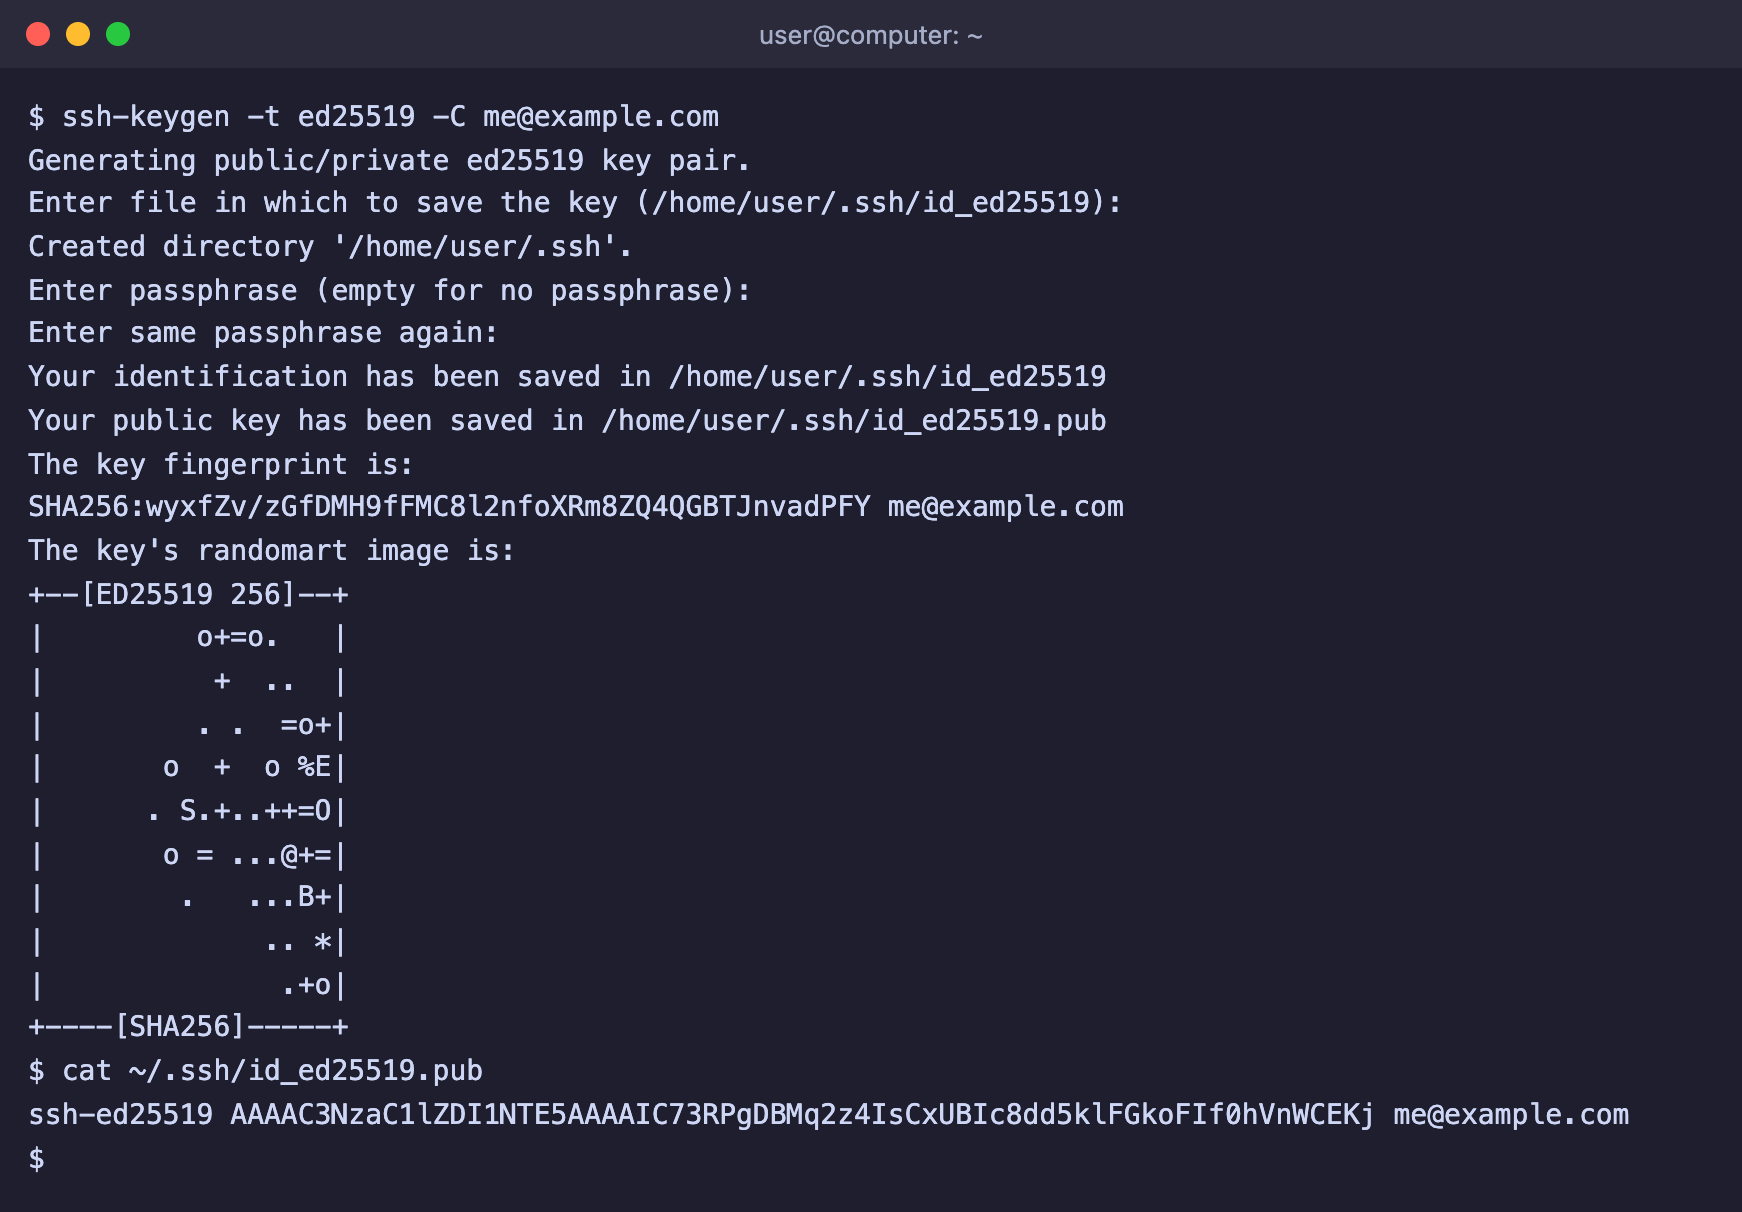
The key is created, the public part is printed on the screen
- In Gitea, open the profile menu in the top right corner, choose Settings and then SSH / GPG Keys. In the Manage SSH Keys block, click Add Key.
- In the Key Name field, enter any clear name, for example "My computer". In the Content field, paste the whole line printed by the
catcommand, fromssh-ed25519to the email at the end. - Click Add Key. Gitea will reply with a message that the key has been added.
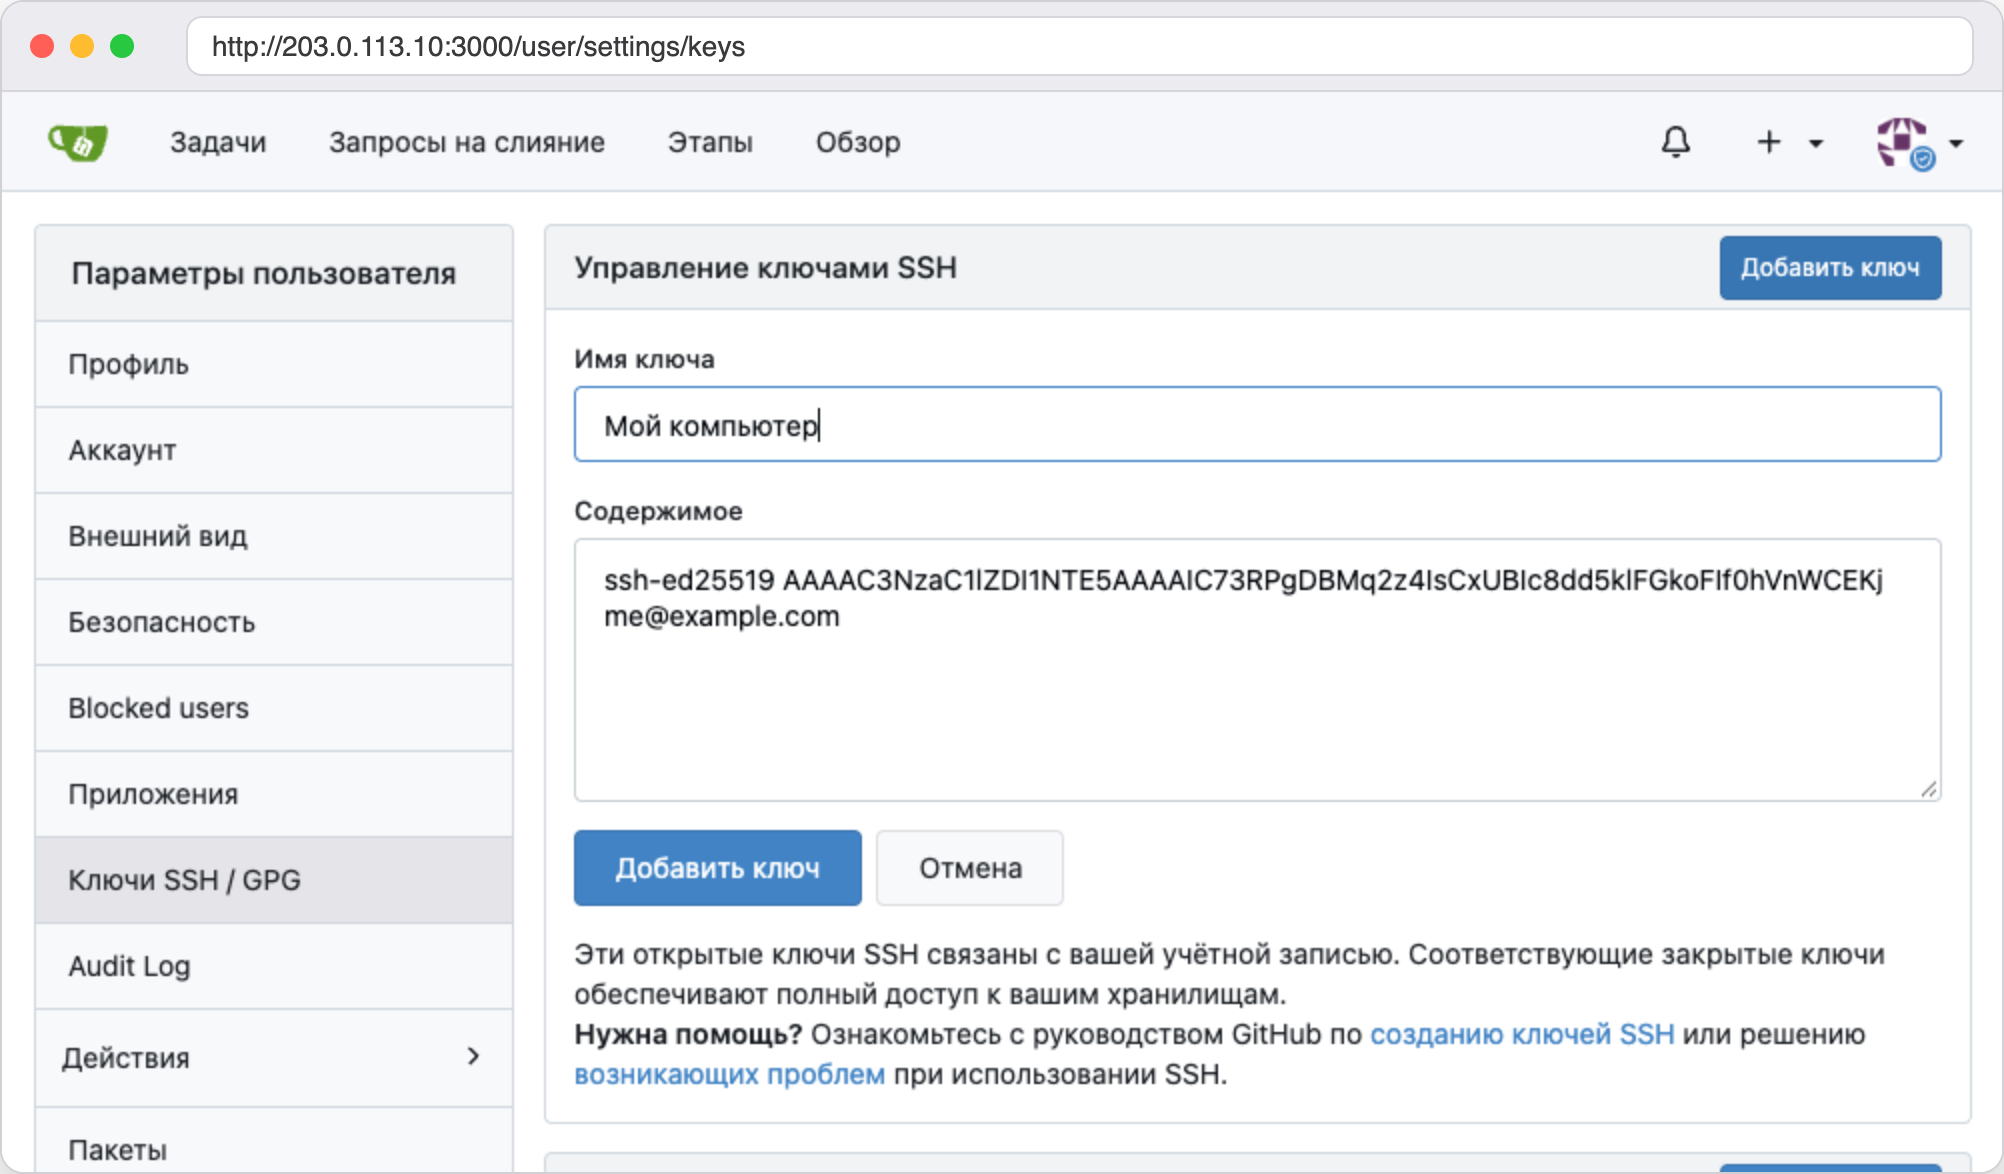
Only the public part of the key is pasted into the field
Now go back to the repository page, open the Code window and switch to the SSH tab. The address starts with ssh://git@ and contains the server's IP address and port 2222.
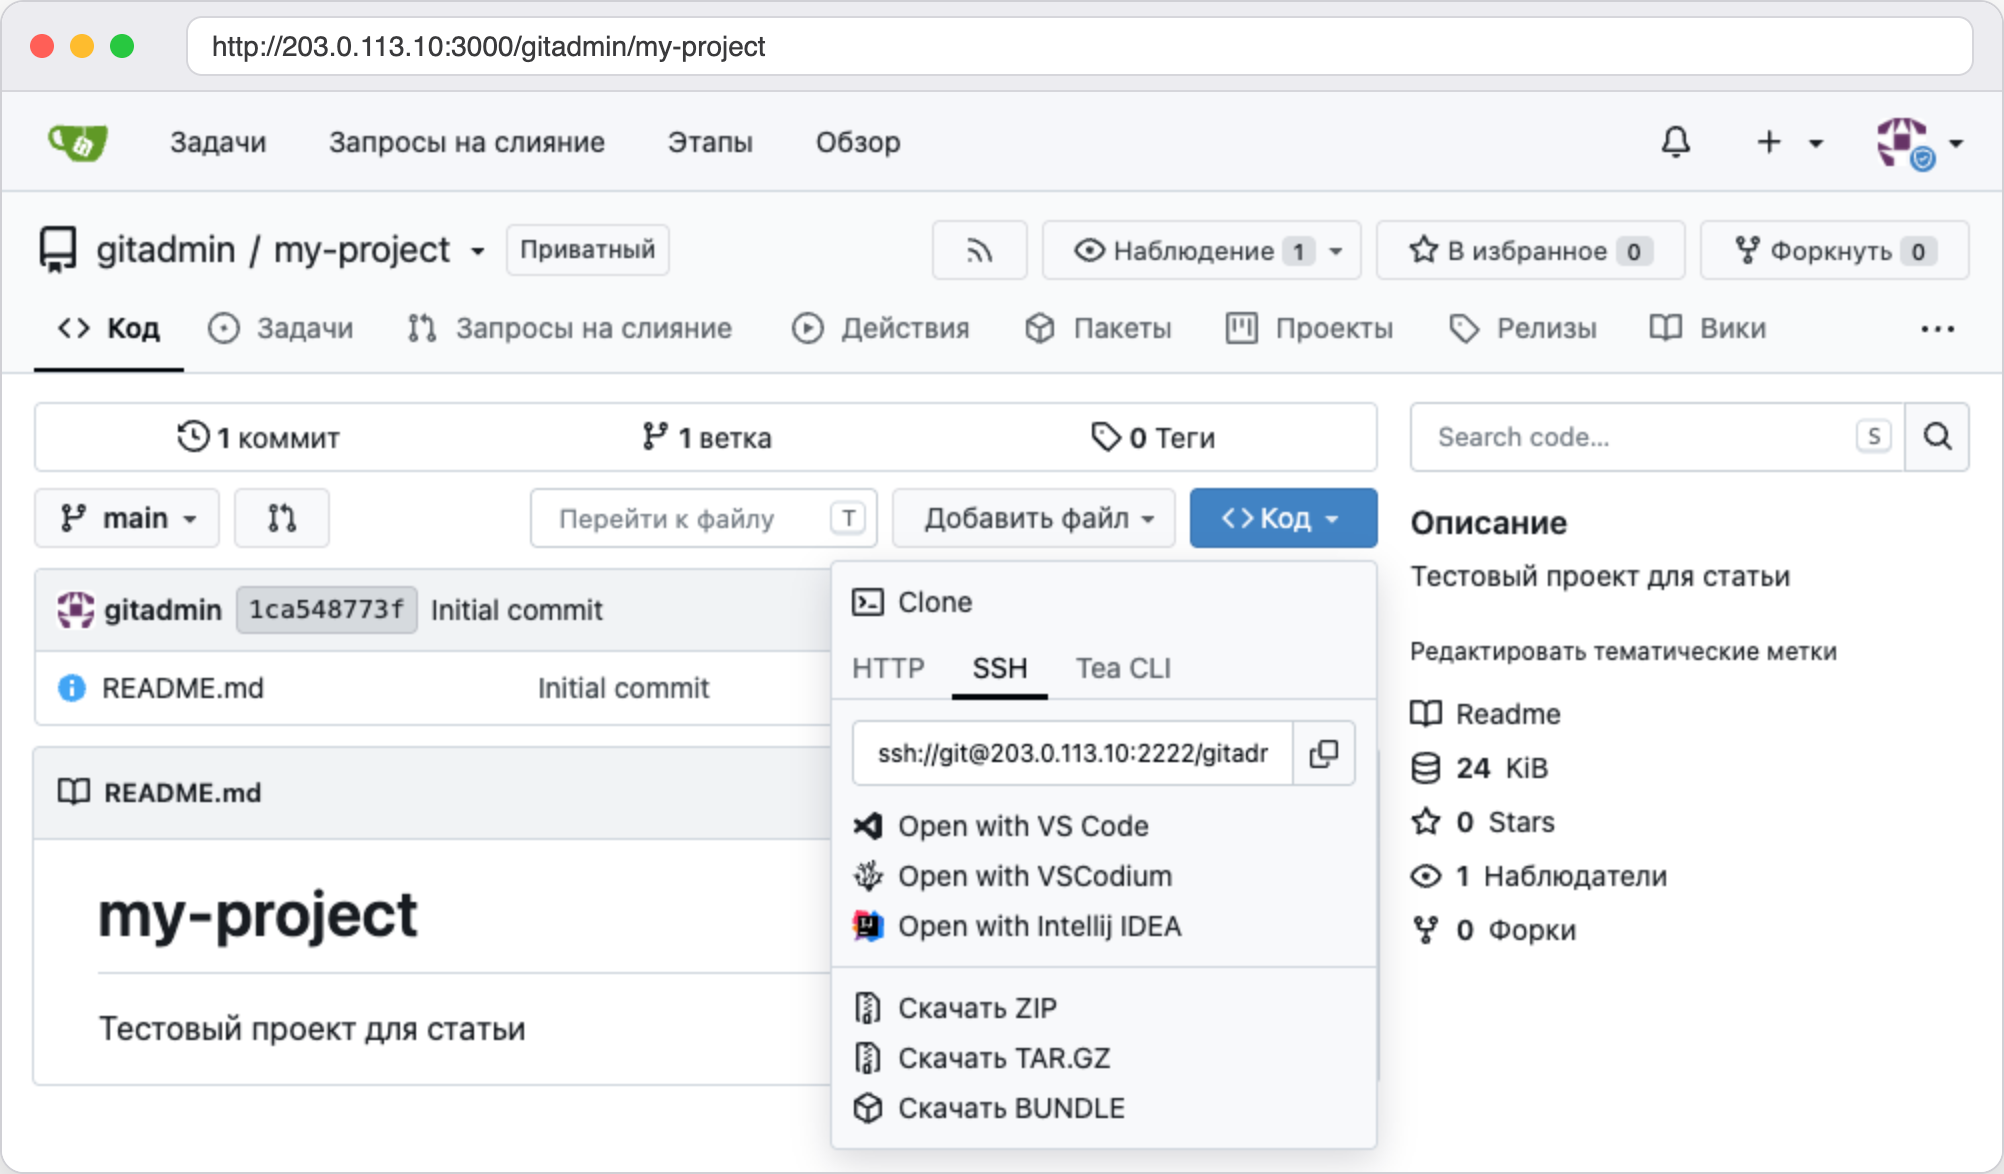
The clone address over SSH with port 2222
Clone the repository using this address. On the first connection SSH will ask whether to trust the server's key. This is a normal question on any first connection, so answer yes.
# Clone over SSH, port 2222 is part of the address
git clone ssh://git@server-IP:2222/gitadmin/my-project.git my-project-ssh
cd my-project-ssh

# Change a file and push the change
echo "SSH works" >> README.md
git commit -am "Update README"
git push
This time there was no password prompt, and hello.py from the previous step was already in the clone.

Cloning and pushing over SSH, the server address is hidden
You can also quickly check that the key is accepted without any repository. The ssh -p 2222 git@server-IP command replies with a line like Hi there, gitadmin! You've successfully authenticated with the SSH key named … and says that it gives no access to the Gitea command line. This is not a login to the server, only a check of the key.
Step 7. Add a colleague and check that registration is closed
Open http://server-IP:3000/user/sign_up in your browser without signing in to an account. If you ticked the registration ban on the installation page, Gitea will answer with the message Registration is disabled. Please contact your site administrator.
If the box was left unticked, fix the setting by hand. Open /opt/gitea/data/gitea/conf/app.ini, find the DISABLE_REGISTRATION line in the [service] block and set it to true. After docker restart gitea, registration will be closed. We switched this line both ways, and the registration page changed accordingly. The REQUIRE_SIGNIN_VIEW = true line mentioned in step 2 is turned on the same way.
Now let us add a colleague. Accounts are created by the administrator.
- Open the profile menu and choose Site Administration.
- In the left menu, open Identity & Access, then User Accounts, and click Create User Account.
- Fill in Username, Email Address and Password. It is better to leave the Require user to change password (recommended) checkbox turned on.
- Click Create User Account.
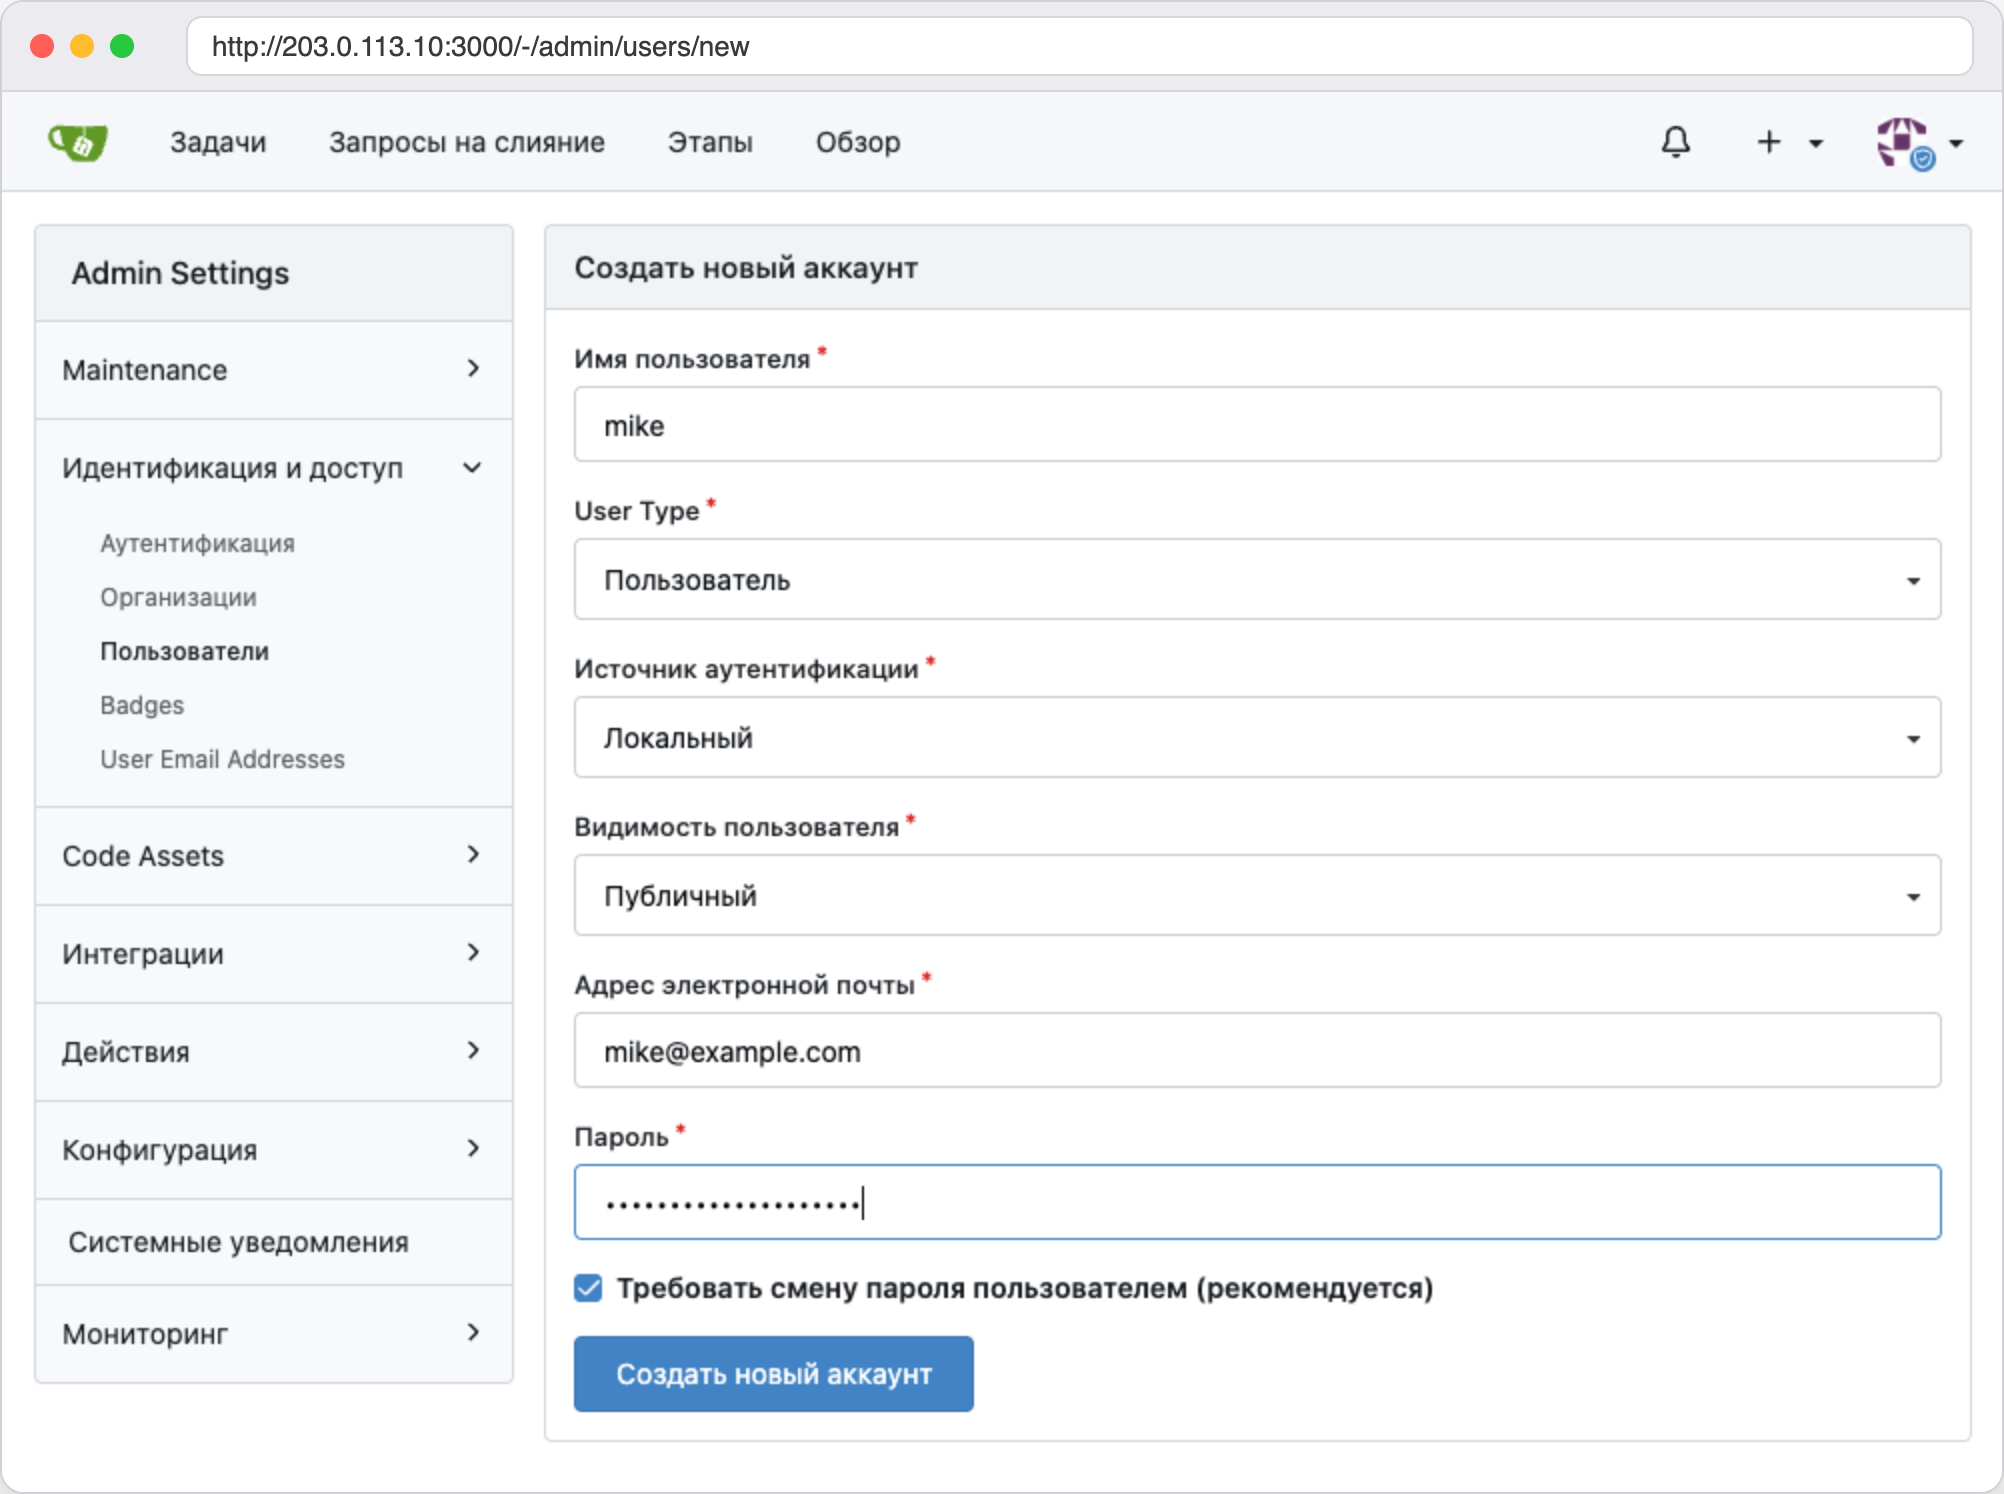
The administrator creates an account for a colleague
Give your colleague the temporary password. They need to sign in once through the browser, and Gitea itself will offer to set a new password. Until that is done, Git over HTTP answers with an error, and we got this reply on the test server.
remote: Update your password
fatal: Authentication failed for 'http://server-IP:3000/gitadmin/my-project.git/'
The new user cannot see your private repository yet. Open the repository, choose Settings in the three-dot menu, then Collaborators. Start typing the colleague's name, pick them from the suggestion and click Add Collaborator. Gitea will confirm the addition, and the access level will be Write by default.
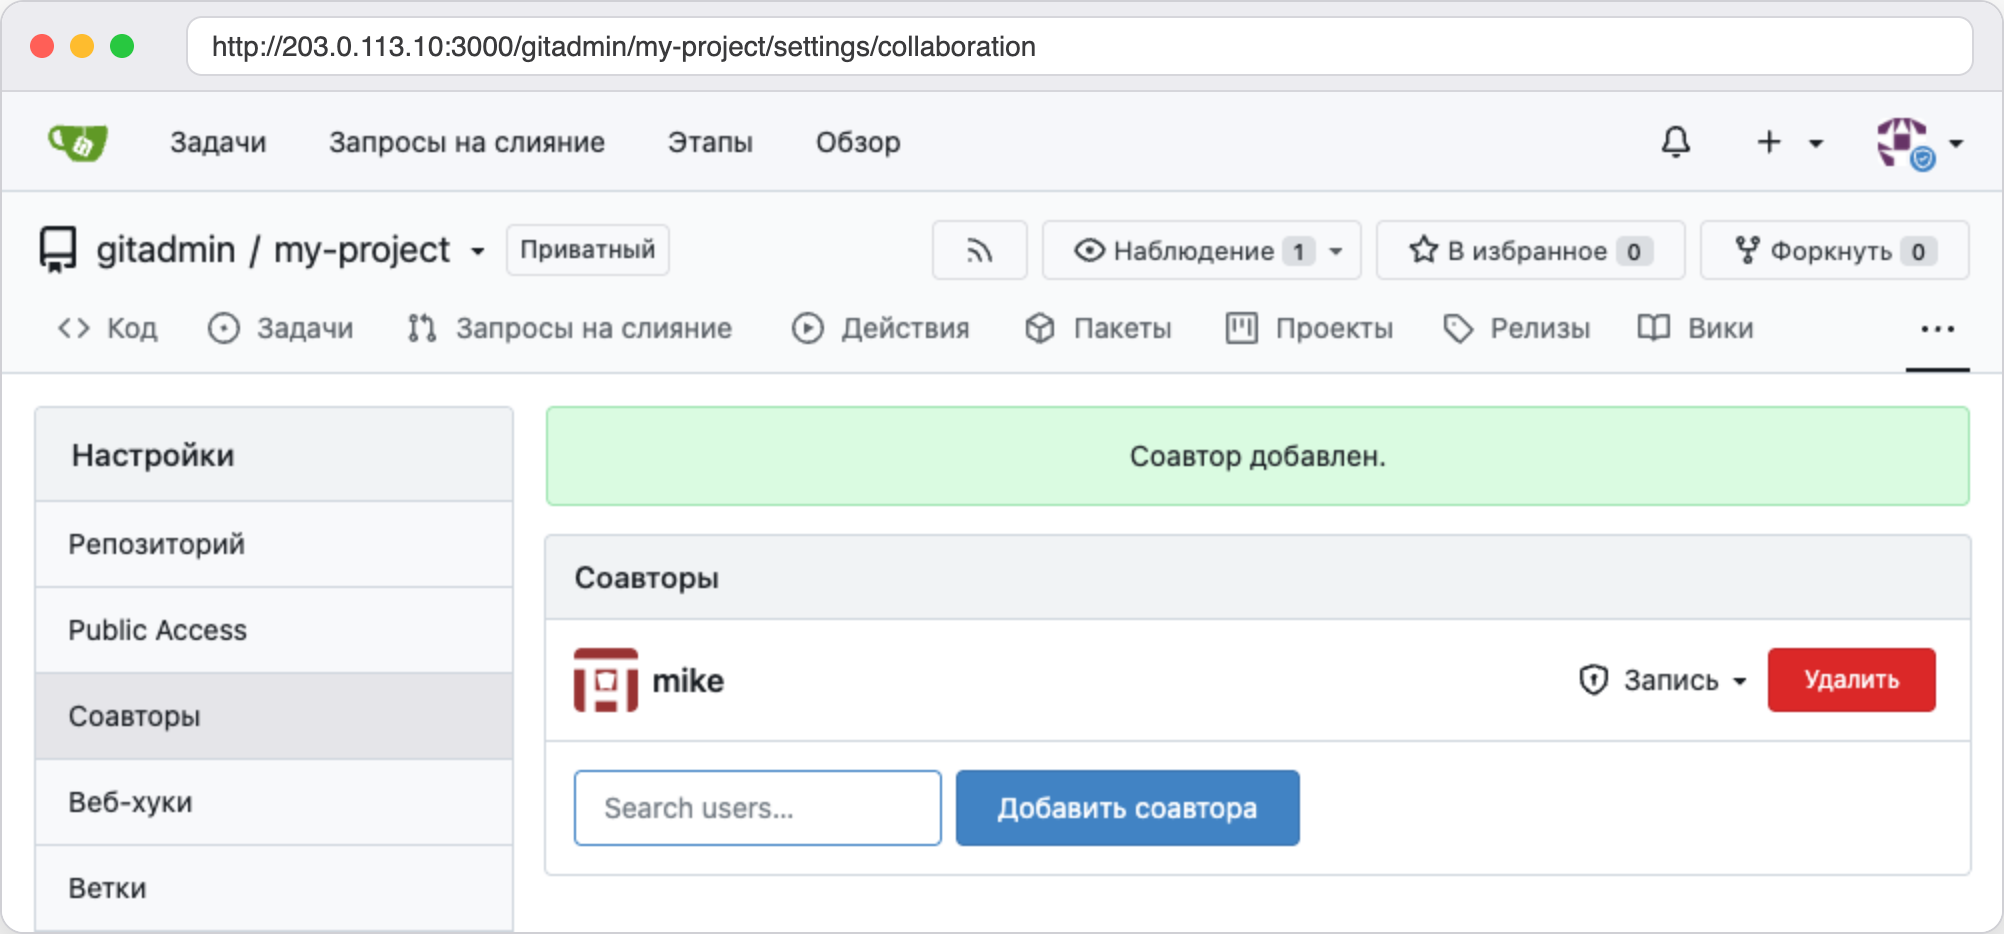
The collaborator is added and is allowed to read and write
After that we cloned the repository as the colleague and pushed a commit to it, and everything went through without errors.
Backups
Gitea has an official gitea dump command. It collects a single archive with the database, repositories and settings. The archive contains the app.ini file, the data folder with attachments and the SQLite file, the repos folder with the repositories and the gitea-db.sql file with a copy of the database. The SSH server keys are not in the archive, and we checked this. When we restored a copy on a clean container, it had different keys than the original. If the keys change, SSH will start complaining about a changed server key for everyone who has already connected to the server. That is why the script below saves the ssh folder as a separate archive.
The Gitea documentation advises stopping the service while copying so that the data is consistent. The script works on a running container, and in our test the copy restored fine. If you have a large team, run it at night.
Create the script.
nano /opt/gitea/backup.sh#!/bin/sh
# Gitea backup (the official gitea dump plus the SSH server keys)
set -e
cd /opt/gitea
STAMP=$(date +%F-%H%M)
mkdir -p backups
# Archive with the database, repositories and settings, built in /tmp inside the container
docker exec -u git -w /tmp gitea gitea dump -q -c /data/gitea/conf/app.ini -f /tmp/gitea-dump.zip
docker cp -q gitea:/tmp/gitea-dump.zip backups/gitea-dump-$STAMP.zip
docker exec gitea rm /tmp/gitea-dump.zip
# The SSH server keys are not part of the archive, so we save them separately
tar czf backups/gitea-ssh-$STAMP.tar.gz -C data ssh
# Keep the 7 latest copies
ls -1t backups/gitea-dump-*.zip | tail -n +8 | xargs -r rm
ls -1t backups/gitea-ssh-*.tar.gz | tail -n +8 | xargs -r rmThe -u git option runs the command as the user Gitea works under, and -w /tmp sets the working folder, as the documentation advises, to avoid permission errors while the archive is built. The -q option leaves only warnings in the output. Make the script executable and run it.
chmod +x /opt/gitea/backup.sh
/opt/gitea/backup.sh
ls -lh /opt/gitea/backups
On our server the script finished in less than a second.
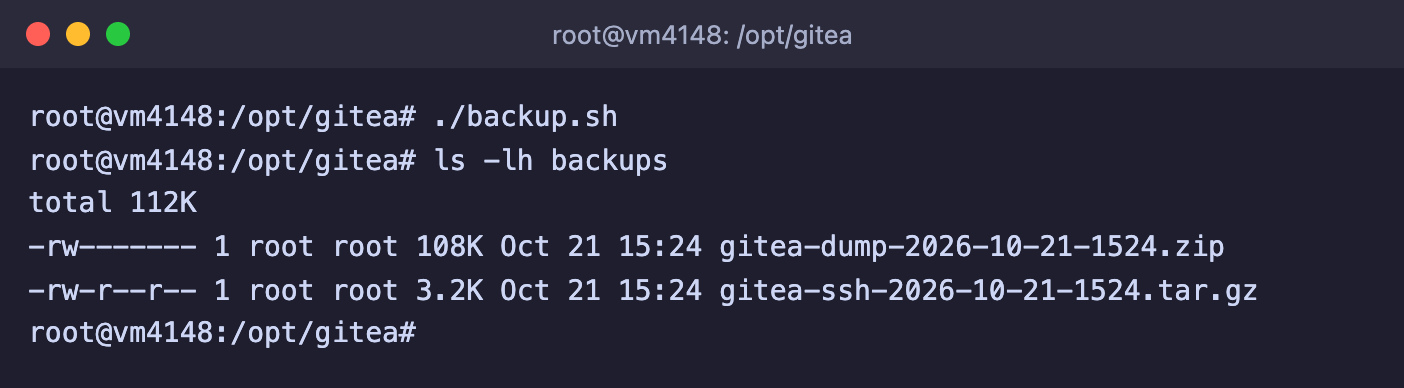
The archive with the data and a separate archive with the SSH server keys
To make the copies run by themselves, add a job to cron with the crontab -e command. The line below runs the script every night at 03:00. How the schedule works is explained in the article about cron.
0 3 * * * /opt/gitea/backup.shWe checked that the scheduler runs the script. When the job ran every minute, new archives appeared without errors. Copies on the same server will not help if the server itself is lost, so download the backups folder to your own computer from time to time, for example with the rsync command.
Restoring from a backup
We tested restoring on a separate clean container with the same configuration. The order of actions on a new server is as follows. First install Docker and create /opt/gitea/docker-compose.yml from step 1. Then, if you saved the SSH server keys, unpack them before the first start. We checked that in this case the new container has the same key fingerprint as the old one.
mkdir -p /opt/gitea/data
tar xzf gitea-ssh-DATE.tar.gz -C /opt/gitea/data
cd /opt/gitea
docker compose up -d
Copy the archive into the container and unpack the data into place. We use cp -a and not mv, because the conf folder already exists in the new container.
docker cp gitea-dump-DATE.zip gitea:/tmp/gitea-dump.zip
docker exec gitea sh -c "cd /tmp && unzip -q gitea-dump.zip -d restore && cp -a restore/data/. /data/gitea/ && cp -a restore/repos/. /data/git/repositories/ && chown -R git:git /data"
Finally, recreate the Git hooks, as the documentation advises, and restart the container.
docker exec -u git gitea gitea -c /data/gitea/conf/app.ini admin regenerate hooks
docker restart gitea
After this, the old administrator password worked, the repository history was preserved and a new commit was pushed without errors.
Updating Gitea
The Gitea version is written in docker-compose.yml, so updating takes three actions. Make a backup beforehand, because when the minor or major version changes, Gitea changes the database structure, and you can no longer go back to the old version without a copy. This is stated in the Gitea documentation. Before updating, look at the list of changes on the releases page, where incompatible changes are marked.
First make a copy and open the Compose file.
cd /opt/gitea
./backup.sh
nano docker-compose.yml
In the image line, replace the version number with the new one and save the file. Then download the image and recreate the container. The data in the data folder is not affected.
docker compose pull
docker compose up -d
We tested this order on a copy of the server, updating it from version 28.1.0 to 28.2.0. In the example in the screenshot the number is replaced with the sed command, and the result is the same as when editing in nano. After the update the API showed the new version, and the repository and the account stayed in place.
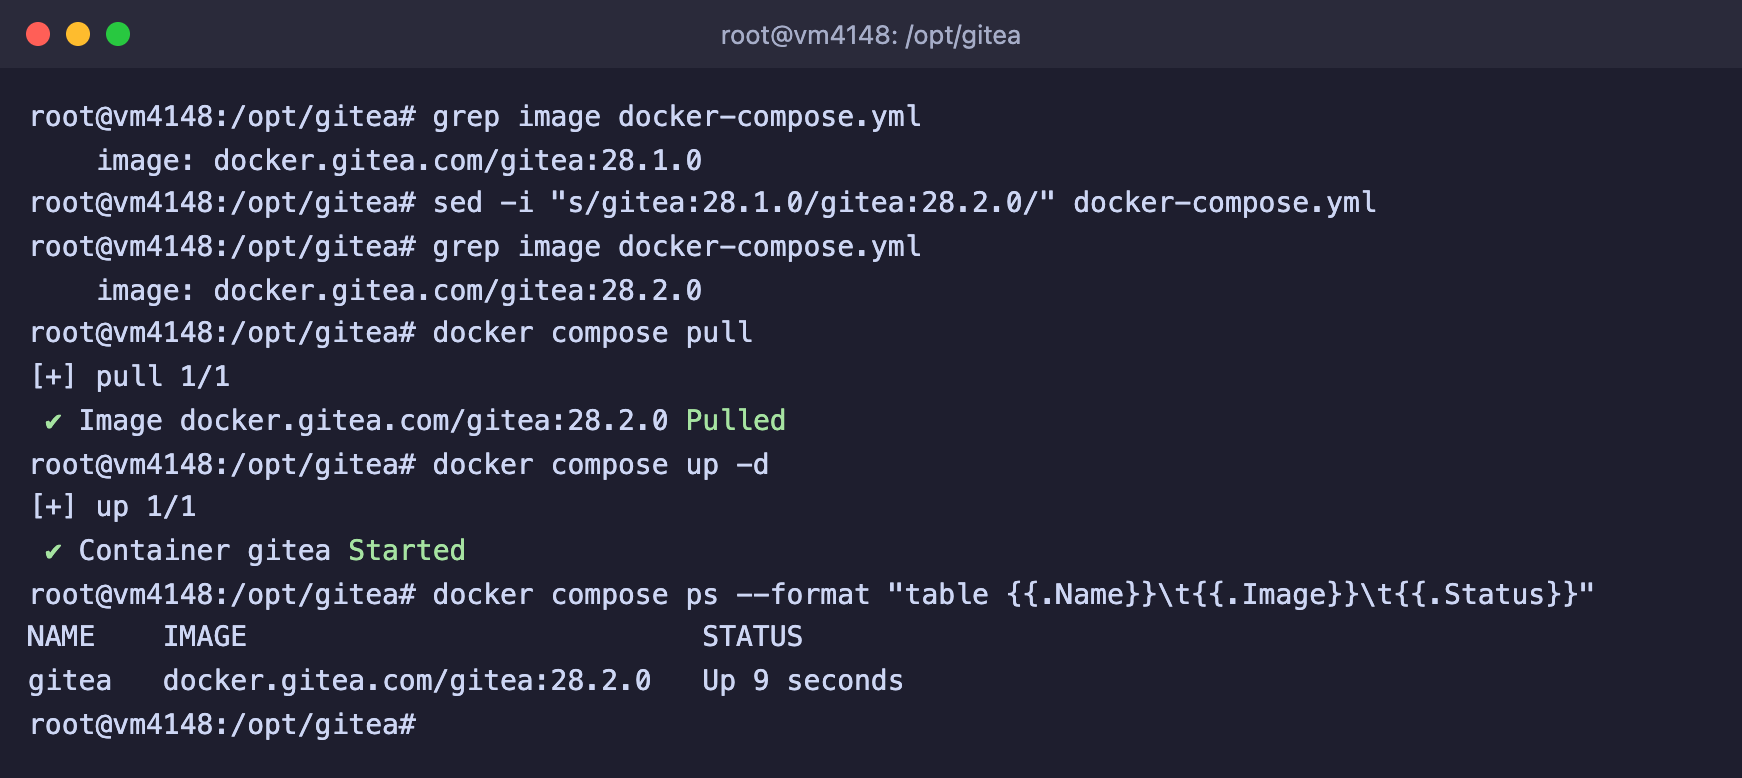
Updating from 28.1.0 to 28.2.0, the container and folder names are adjusted to match the main installation
The version is also visible in the bottom line of any Gitea page, next to the Powered by Gitea label.
Domain and HTTPS
While Gitea is open by IP address and port 3000, it has no encryption. When you need a proper address, attach a domain to the server following the article about a domain for a VPS, put the nginx web server in front of Gitea and issue a free certificate. We do not cover the nginx configuration for Gitea itself here.
In Gitea itself you then need to fix the addresses in app.ini. In the [server] block these are the ROOT_URL, DOMAIN and SSH_DOMAIN lines, and you write the domain in them instead of the IP address.
To make the web interface visible only through the web server, publish port 3000 only on the server's internal address. In the Compose file, replace the "3000:3000" line with this one.
- "127.0.0.1:3000:3000"We checked that after docker compose up -d port 3000 stops responding from outside, while on the server itself and through an SSH tunnel the page still opens. Port 2222 stays open, because it is needed for Git over SSH.
Useful commands
docker compose ps                 # container status, run it in /opt/gitea
docker logs gitea                 # Gitea log
docker restart gitea              # restart Gitea
docker compose down               # remove the container, the data in ./data stays

# List of users
docker exec -u git gitea gitea admin user list

# A new password for a user, for example if the administrator password is lost
docker exec -u git gitea gitea admin user change-password --username gitadmin --password NEW_PASSWORD --must-change-password=false

# Create an administrator from the command line
docker exec -u git gitea gitea admin user create --admin --username name --password PASSWORD --email me@example.com --must-change-password=false
A password typed on the command line ends up in the shell command history. That is why after such a change you should sign in to Gitea and set a permanent password in the profile settings.
Frequently asked questions
The SSH clone address contains localhost
The setup page wrote DOMAIN = localhost and SSH_DOMAIN = localhost into app.ini. We got the address ssh://git@localhost:2222/…. Fix both lines as shown in step 3 and restart the container.
git@server-IP: Permission denied (publickey).
The server does not know your key. We got this error when we tried to clone a repository over SSH before adding the key to Gitea.
- Make sure that the SSH / GPG Keys page in your Gitea profile holds the public part of exactly the key you connect with.
- Check that you added the contents of the file ending in
.puband not the private key. - If you have several keys, specify the right one with the
ssh -ioption.
ssh: connect to host server-IP port 2222: Connection refused
Nothing is answering on the port. We got this error when we stopped the container with the docker stop gitea command. Check the state with the docker compose ps command and start the container with the docker start gitea command. If the container is running but the connection hangs without a reply, a firewall on the way to the server is blocking the port. With HTTP in the same case, Git reports Failed to connect to server-IP port 3000 after 0 ms: Couldn't connect to server.
remote: Failed to authenticate user
The login or password is wrong. Git showed us the following two lines when we entered a wrong password.
remote: Failed to authenticate user
fatal: Authentication failed for 'http://server-IP:3000/gitadmin/my-project.git/'
Check the login and password you use for the web interface. If the password is lost, set a new one with the gitea admin user change-password command, which is in the Useful commands section.
remote: Update your password
The account has the requirement to change the password turned on, and the user has not yet signed in through the browser even once. Ask them to open Gitea in the browser, sign in and set a new password, as in step 7.
remote: Repository not found
We got this error after entering the password correctly, when the address had a typo in the repository name. On the next line Git writes fatal: repository … not found. Compare the address with what the Code window shows. The same error appears for a colleague who has not been added as a collaborator of a private repository.
Author identity unknown
Git does not know whose name to put on the commit. We got this message on the first git commit for a clean user. Run the two commands from step 5, git config --global user.name and git config --global user.email, and repeat the commit.
Registration is disabled. Please contact your site administrator.
A colleague is trying to register on their own, but registration is closed. This is by design. Create an account for them in Site Administration, as in step 7.
Our resources
Telegram channel: https://t.me/f3cloud_news
F3 Cloud: https://f3cloud.com