

Installing VLESS + TLS + XHTTP.
Advantages of XHTTP.
How XHTTP works: It imitates the behaviour of a real web browser. Traffic is split into fragments that are sent via standard HTTP requests (for example, POST or GET). The protocol also supports the HTTP/2, HTTP/1.1 protocols
To your ISP, it looks as if you are simply uploading pictures or sending data to some website via an API. Blocking this, without “breaking” half of the ordinary internet, is practically impossible.
DANGER
The XHTTP protocol currently does not support sing-box-based clients. To connect successfully, use clients running on the Xray Core version 1.8.10 or higher.
Step 1. Preparing the server and system requirements.
As a reliable infrastructure, we recommend using our servers at F3 Cloud – they fully meet the system requirements of the project and ensure perfect compatibility with the instructions given below.
| Parameter | Minimum requirements |
|---|---|
| vCPU (virtual core) | Minimum 1 core. |
| RAM | From 2 GB. |
| Storage | From 10 GB SSD. |
| Operating system | OS: Ubuntu 24.04 (recommended). |
We suggest taking a look at the DE-5950X-1, NL-5950X-1 or FI-5950X-1 configurations. These servers are based on powerful processors, and fully cover the system requirements of the project. You can choose any of the available locations: Germany (DE), the Netherlands (NL) or Finland (FI).
Step 2. Choosing the server configuration.
After logging in or registering in the F3 Cloud panel, click the Order service button to go to server selection.
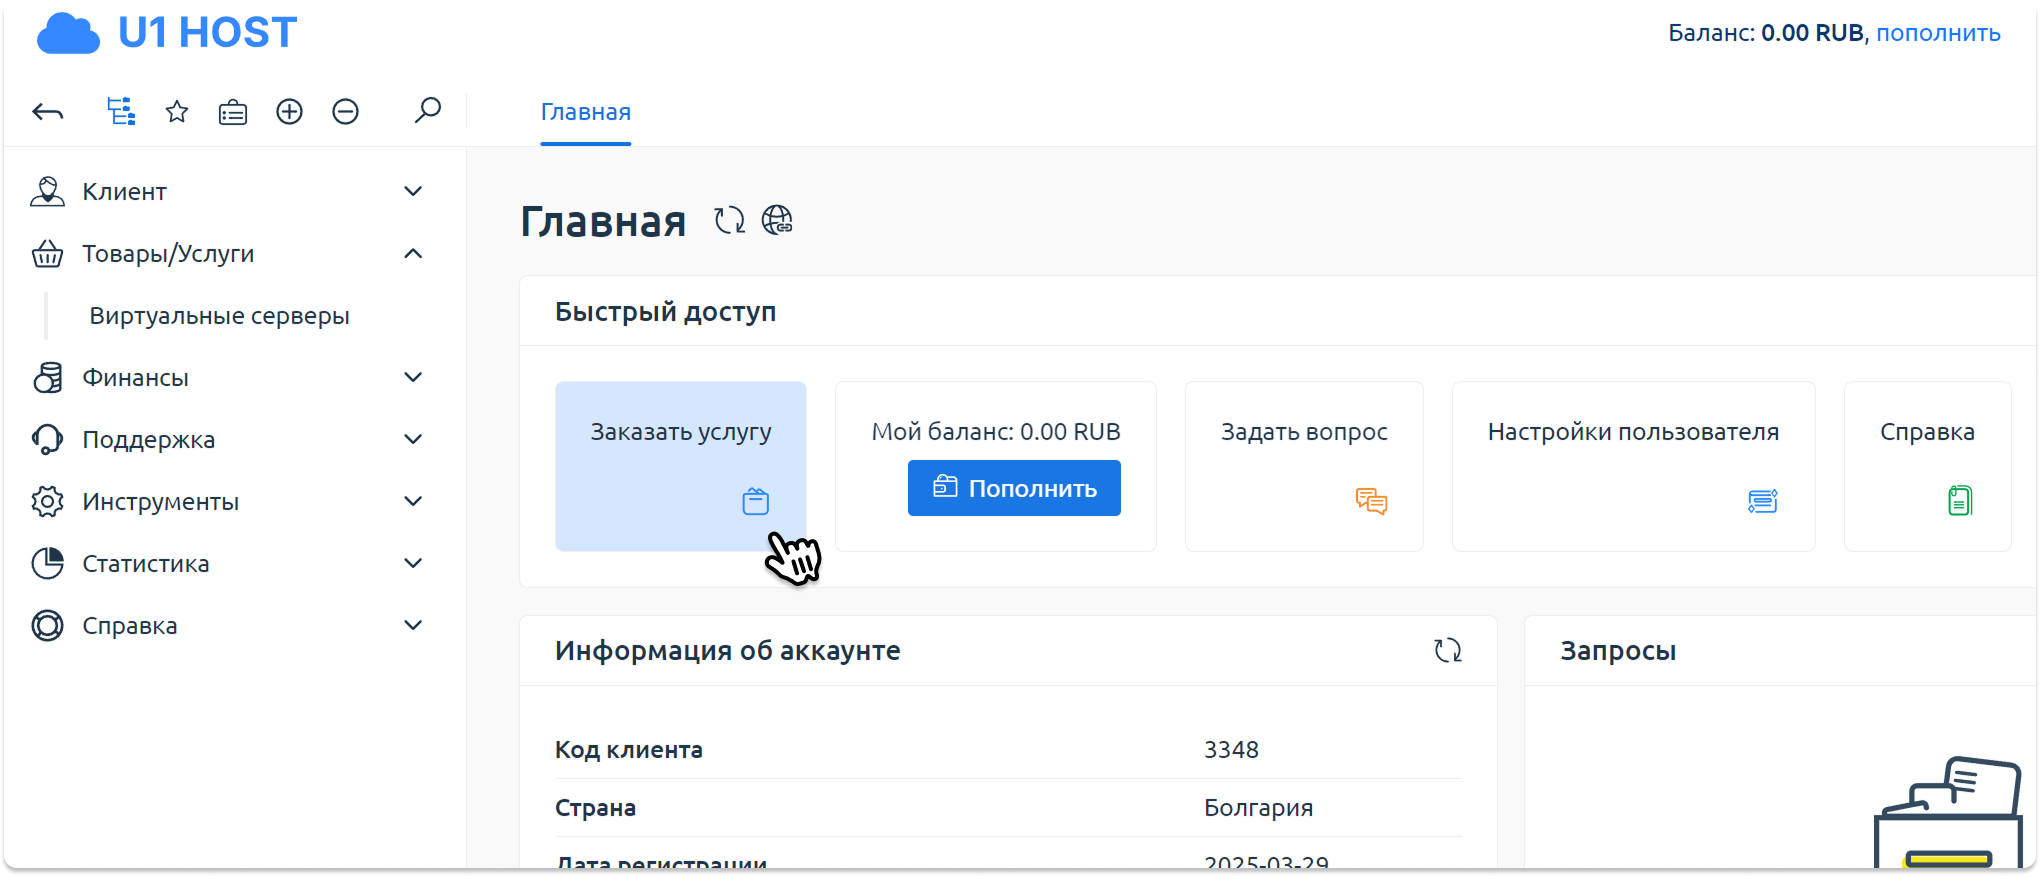
- The Order service menu shows the main plans suitable for speeds of up to 100 Mbit per second. To see the full list, click View all.
How to choose a server:
- On the DE-5950X-1, NL-5950X-1 or FI-5950X-1. card, click the Order button.
- In the server configuration, select the operating system Ubuntu 24.04 .
- Click the Pay button to complete the order.
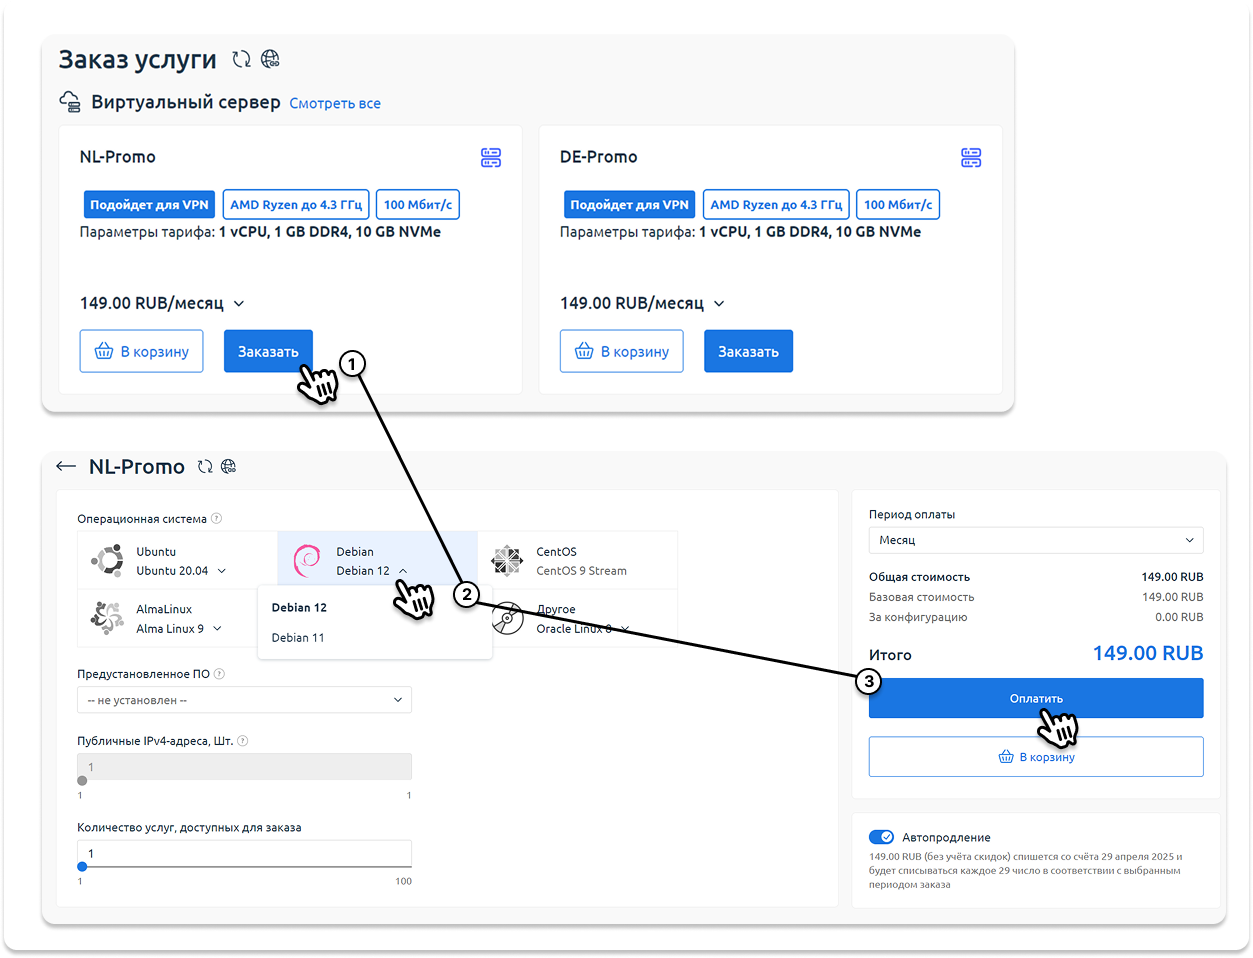
The picture is an example of how to order a server, in your case you need to select Ubuntu 24.04 rather than Debian.
Step 3. Server activation.
After payment, automatic order processing begins. Server activation usually takes no more than 120 seconds.

Server status "processing", you need to wait a little.
You can track the current status in the control panel. As soon as the server is ready to use, the status will change to Active.
INFO
Sometimes activation may take a little longer due to increased load and a queue for order processing in the selected location. If the server has not been activated within 10 minutes – please write to us in a ticket, and we will promptly check the order status.
Step 4. Getting the server details.
- Wait until the server is fully activated.
- In the client area, tick the checkbox next to the server you need and click the Instructions button in the top menu.
- Copy the connection details given in the instructions:
- Server IP address .
- Username .
- Password .
The screenshot below shows exactly where you can find this information.
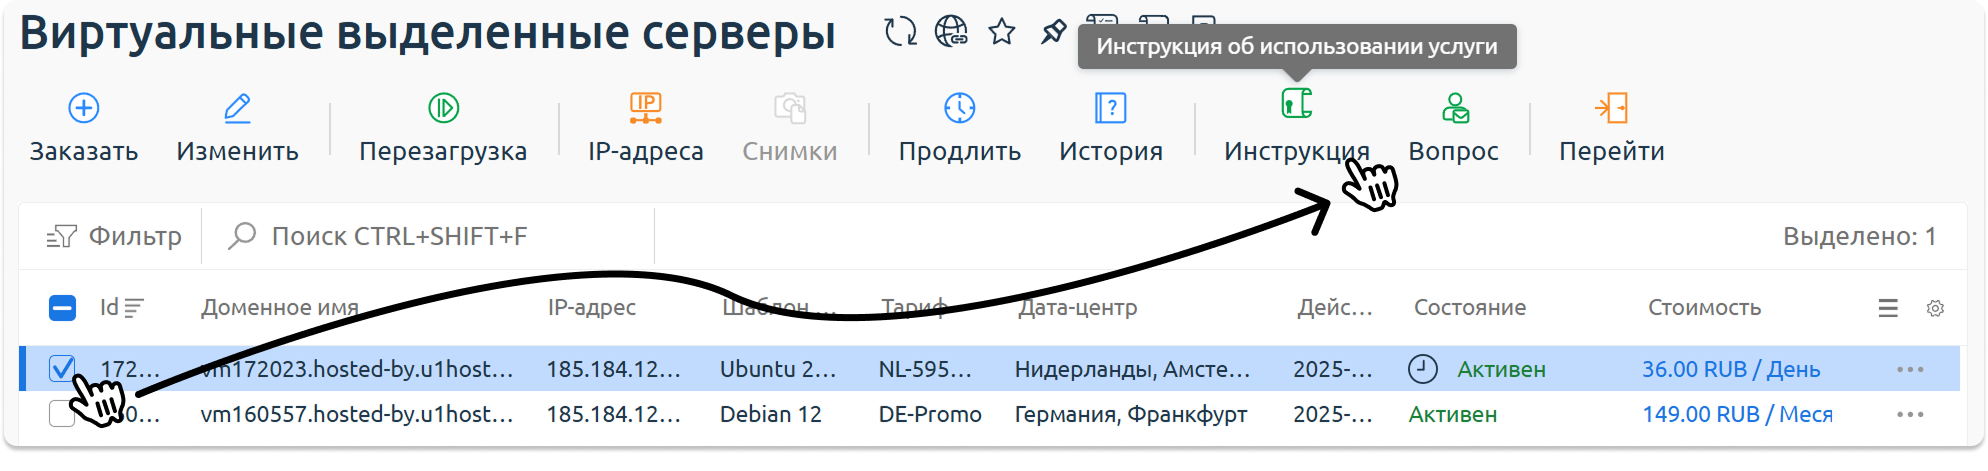
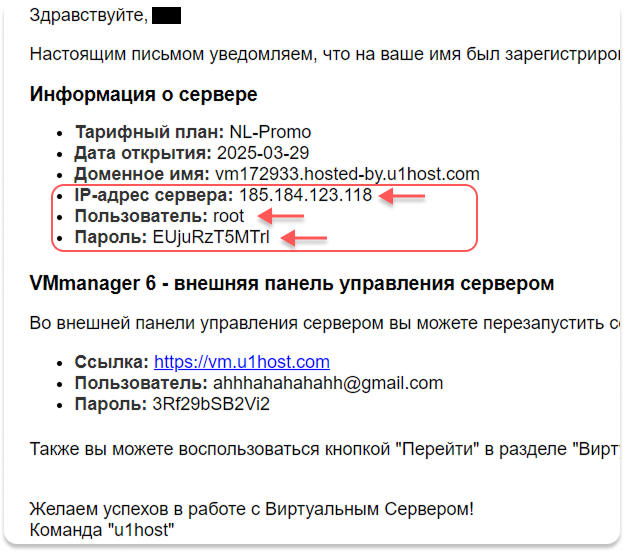
The server details are also sent to your email.
Step 5. Buying and setting up a domain.
You need to register a domain and delegate it to your server, we recommend registering the cheapest domain. (for example reg.ru, selectel.ru - there is no need to buy expensive domains)

The domain will be set up using the reg.ru website as an example, we advise choosing a domain name that looks like something "legitimate" - for example "shaurma-ashotika.ru".
After you have entered the domain name, click the "Find" button
You will be redirected to the payment page, be careful here!
You need to remove the .online domain from the order, leaving only .ru for 129₽

After that, hit the "Go to order" button

Do the same here, remove all the green ticks and leave only your .ru domain.
Click "Pay", next you will be redirected to the registration site - then follow all the instructions.
After payment, you will get access to the client area, as well as to the domain settings.
Follow the arrows shown in the screenshots step by step.

Click the round icon.

Click the tile with your domain.

Click "Change".

Click the little pencil icons next to the records.

In the IP Address field, enter the IP of your server.
Almost done, once you have fully set up the server - all that is left is to wait until the domain is delegated to your VPS.
INFO
Delegation – the process of handing over control of the domain to your server. In simple terms, you tell the whole internet that your domain (for example, myserver.com) is now bound to the specific IP address of your VPS.
According to DNS standards, the delegation process usually takes about 24-48 hours.
To check the A record specifically: dig myserver.com A +short (it will output only the IP - the domain has been delegated successfully, you can move on to the next step)
Step 6. Setting up the server and the panel.
Download any SSH client, for example: Termius, Putty, Powershell.
Next, you need to connect to your server via SSH (port 22), use the details that were given to you after ordering the server.
1. Once you are in the terminal, update the system with the command:
apt update && apt upgrade -y
reboot ## After a successful update - reboot the server, then continue.
TIP
You can set up the connection using our automatic script: https://github.com/yafoxins/3xui-autoinstall
2. Go back to the terminal and enter the command:
bash <(curl -Ls https://raw.githubusercontent.com/mhsanaei/3x-ui/master/install.sh) v2.8.10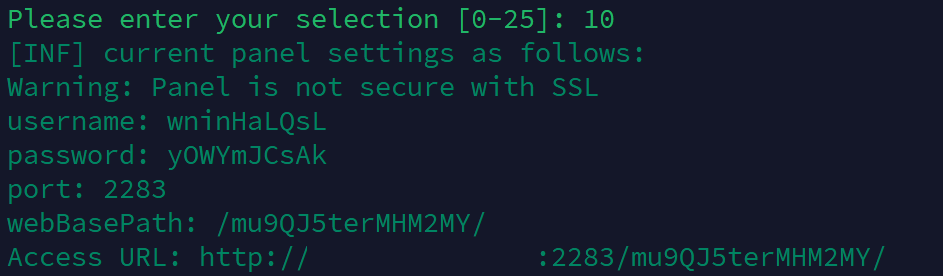
- Next, you will automatically be asked a question about changing the 3x-ui panel port:
Would you like to customize the Panel Port settings? (If not, a random port will be applied) [y/n]:
## Simply answer the question with the letter "y", then Enter.
## Next you will be asked which port? Answer "8080", then Enter.- Installing the certificate on the 3x-ui panel.

Select option "2".

Do not enter anything, just press Enter.

The details of your server, copy them into the browser.

Click Inbounds.

Create an inbound.

Do it like this - as shown in the screenshot. Substitute your own values.
DANGER
After every change in the inbound config - be sure to click"Get New ECH Cert" in all cases, and also test stream-up / stream-one / packet-up against each other, check which of them works more stably on your network in case of failure.

Likewise, do as shown in the screenshot, click Get New ECH Cert.
- Go back to the terminal, hit CTRL+C.
Now you need to issue a certificate for your domain.
Enter the commands one at a time, edit them to fit your values.
curl https://get.acme.sh | sh -s email@example.com

~/.acme.sh/acme.sh --set-default-ca --server letsencrypt

~/.acme.sh/acme.sh --issue -d domain.tld --standalone

Then you get the paths to the certificate:

Certificate: /root/.acme.sh/your_domain.ru_ecc/fullchain.cer
Key: /root/.acme.sh/your_domain.ru_ecc/your_domain.ru.key
Save the paths to the certificate and the key - then paste them in the 3x-ui inbound settings into the fields "Public Key", "Private Key". Create the inbound.
The connection is ready, now click the QR code and copy it into your VPN client.

Step 7. Server security.
- To set up fail2ban for the 3x-ui panel, follow the instructions below:
- Go to the server terminal via an SSH client.
- Enter the command
sudo x-ui - Select the
IP Limit Managementsection by entering21in the terminal. - Next, select
Install Fail2ban and configure IP Limit, theny.
WARNING
Before setting up UFW - move SSH port 22 to any other port using the F3 Cloud instructions, it will also need to be opened with the command ufw allow YOUR-PORT/tcp , otherwise you will lose access to the server.
- Setting up UFW is also mandatory, it is simpler here:
- To open the ports for the panel and the connection:
ufw allow 443/tcp,ufw allow 8080/tcp. - Save the settings:
ufw enable->y.
Further security - be sure to set it up through our detailed guide: F3 Cloud
Which client should you use to connect?
Windows / Linux: v2rayN, Happ.
Android / AndroidTV: Happ, v2rayN.
iOS: Shadowrocket. (To ensure uninterrupted operation on iOS devices, it is strongly recommended to switch clients)
DANGER
Clients (v2rayTun, Happ) have hard limits on RAM allocation (Memory Limits). The XHTTP protocol, due to the specifics of its traffic processing, can cause short-term spikes in resource consumption, which leads to forced termination of the process by the operating system and a sudden loss of the internet connection.