

Installing MikroTik RouterOS on a virtual server
Introduction
MikroTik RouterOS – a multifunctional operating system that turns an ordinary server into a powerful router. It is widely used in both corporate and home environments – thanks to its simplicity, flexibility and wide range of features.
In this guide, we will look at installing RouterOS on a virtual server running Ubuntu 20.04.
Minimum system requirements
- CPU: 1 vCore
- RAM: 512 MB
- Disk: 1 GB
Even the basic VDS plans on the F3 Cloud platform meet these requirements.
Step 1: Connecting to the server
Connect to your VDS via SSH. If you don't know how to do this, use our connection guide.
Step 2: Installing the required components
Update the system packages:
apt-get updateInstall unzip if it is not installed yet:
apt-get install unzip -yStep 3: Downloading and installing RouterOS
Go to the official MikroTik website → the Cloud Hosted Router section → choose the current stable version marked Raw disk image and copy the link.
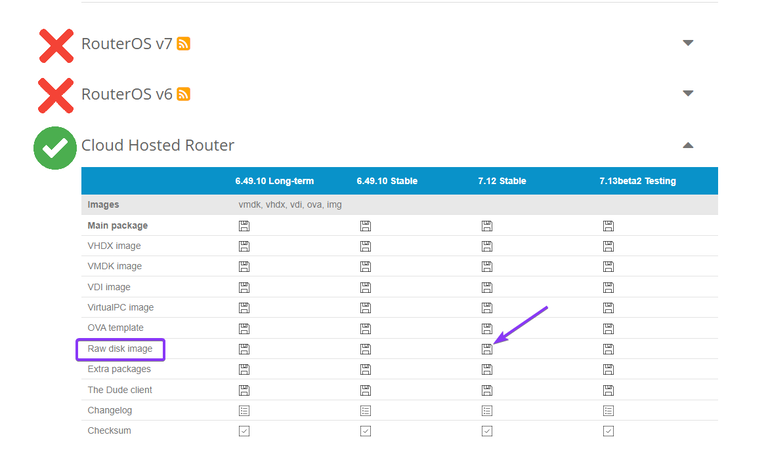
Download the image with the command:
wget https://download.mikrotik.com/routeros/7.12/chr-7.12.img.zipUnpack the archive:
unzip chr-*.img.zipWrite the image to the virtual disk:
rm chr-*.img.zip; for file in chr-*.img; do dd if="$file" of=/dev/vda bs=4M oflag=sync; doneThe
/dev/vdapath applies to all servers on F3 Cloud. If you use a different hosting provider, check the partitions with thelsblkcommand.
Step 4: Rebooting into RouterOS
Run the commands one after another:
echo 1 > /proc/sys/kernel/sysrq
echo b > /proc/sysrq-trigger
Step 5: Connecting via VNC
- Go to the server control panel.
- Click the VNC button.
- In the window that appears, enter the login
admin, leave the password empty and press Enter. - Skip the licence by entering
n, and set a new administrator password.
.png)
.png)
.png)
.png)
Step 6: Configuring the IP address and gateway
In the control panel, find the IP address and gateway parameters. Then run the following commands in VNC (type them in manually!):
ip address add address=YOUR_IP/32 network=GATEWAY_TEMPLATE interface=ether1
ip route add dst-address=0.0.0.0/0 gateway=GATEWAY_TEMPLATE.png)
Step 7: Access via a browser
Now you can log in to the MikroTik RouterOS web interface:
- Enter your server's IP address in the browser's address bar.
- Log in with the login
adminand the password you set earlier.
.png)
.png)
Conclusion
You have successfully installed and launched MikroTik RouterOS on a VDS. Now you can:
- Configure interfaces
- Manage IP addresses
- Set up routing
- Implement firewall, VPN and other features
Don't forget to save a backup of the configuration once you have finished setting it up!
Our resources
Telegram channel: https://t.me/
F3 Cloud: https://f3cloud.com