> The full list of articles is in [llms.txt](https://docs.f3cloud.com/llms.txt). Every page has a Markdown version: add .md to its address. This page as Markdown: [https://docs.f3cloud.com/en/vps/sftp-file-transfer.md](https://docs.f3cloud.com/en/vps/sftp-file-transfer.md).
# SFTP – how to transfer files to a server and create an SFTP-only user
How to transfer files to a VPS over SFTP. Connecting with the sftp command from macOS, Linux and Windows, the main put and get commands, connecting through FileZilla, a separate SFTP-only user with access to a single folder through chroot, and common errors. Tested on Debian 12 with OpenSSH 9.2.
Sooner or later you need to upload website files to a server, grab a backup, or edit a config in a convenient editor on your own computer. This is what **SFTP** is for, a file transfer protocol that runs over SSH. If you already connect to your server over SSH, you already have SFTP, and there is nothing extra to install. In this article we will look at how SFTP works, learn to transfer files from the terminal and through FileZilla, and then create a separate user who can work only with files in one folder and cannot log in to the server over SSH. We tested all the examples on a test server with Debian 12.
***
## How SFTP works
Despite the similar name, SFTP has nothing to do with the old FTP protocol. It is part of SSH. When you connect over SFTP, the client opens a regular SSH connection to port 22, goes through the same password or key check, and then, instead of a command line, starts a special file-handling program on the server. In the SSH configuration on our Debian 12 server it is enabled by default with the line `Subsystem sftp /usr/lib/openssh/sftp-server`.
This gives you three handy properties. First, everything you transfer is encrypted just like an SSH session, so your password and files never travel over the network in plain text. Second, you do not need to open new ports in the firewall or install a separate FTP server. Third, the same users and keys that work for SSH also work for logging in.
There is a downside too. A regular user who can connect over SFTP can also log in over SSH and see all the files they are allowed to read. If someone only needs access to upload files, for example a website developer, it is better to create a user who has only SFTP and only one folder. This is done with built-in SSH tools, and we will cover it in step 3.
***
## What you will need
* A **server** with Debian 12 or Ubuntu 24.04 and SSH access to it. How to connect is covered in the article about [Termius](https://docs.f3cloud.com/en/vps/termius-connection.md).
* The **`sftp` program** on your computer. It is already there on macOS and Linux. On Windows 10 and 11 it is part of the **OpenSSH Client** component. If the command is not found, add this component in the Windows additional components section, **Optional Features**.
***
## Step 1. Connect over SFTP from the terminal
Open a terminal on your computer and connect to the server. Instead of `server-IP`, enter the address of your VPS.
```bash
sftp root@server-IP
```
The program will ask for a password, as with a regular SSH connection, and on the first connection it will ask you to confirm the server key. If you reinstalled the server and got a warning about a changed key, the article about [REMOTE HOST IDENTIFICATION HAS CHANGED](https://docs.f3cloud.com/en/linux/remote-host-identification-changed.md) will help. After you log in, the `sftp>` prompt appears.
***
## Step 2. Transfer files
In an SFTP session you have two current directories, one on the server and one on your computer. Commands for the server are written as usual, and commands for your own computer start with the letter `l`, short for local.
| Command | What it does |
| --- | --- |
| `pwd` and `lpwd` | Show the current folder on the server and on the computer |
| `ls` and `lls` | List files on the server and on the computer |
| `cd` and `lcd` | Go to a folder on the server and on the computer |
| `put file` | Upload a file from the computer to the server |
| `get file` | Download a file from the server to the computer |
| `put -R folder` and `get -R folder` | Upload or download a whole folder |
| `reput file` and `reget file` | Resume an interrupted upload or download |
| `mkdir`, `rm`, `rename` | Create a folder, delete a file, rename |
| `bye` | End the session |
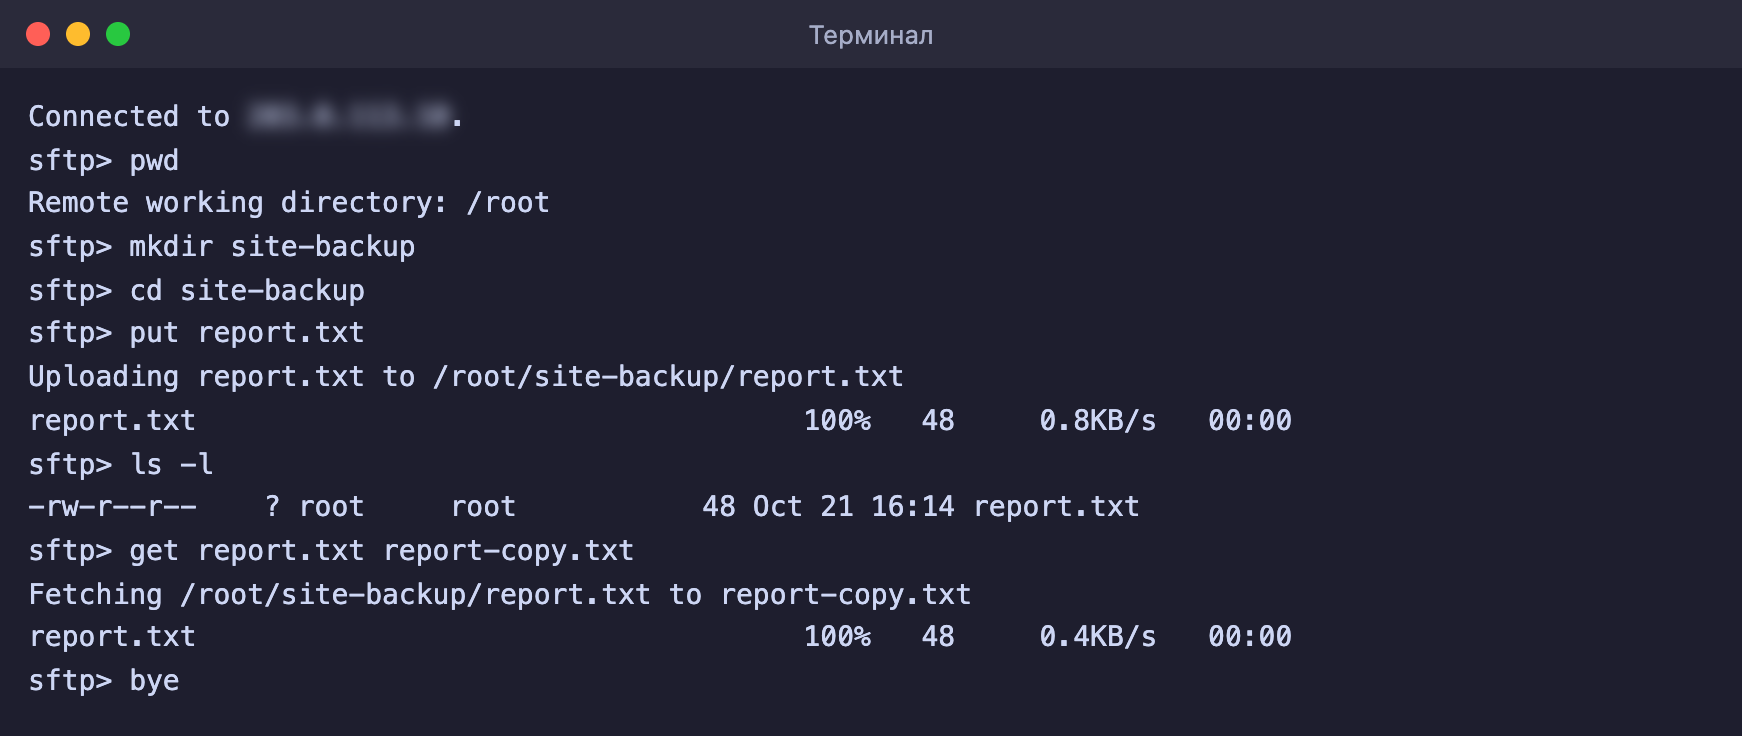
Below is a real session from our computer. We created a folder on the server, uploaded a file into it, checked that it was in place, and downloaded it back under a different name.
```bash
mkdir site-backup
cd site-backup
put report.txt
ls -l
get report.txt report-copy.txt
bye
```
The file is uploaded to the server and downloaded back
The `put` command takes a file from the current folder on your computer, and `get` saves the file into that same folder. So before you start, it is handy to use the `lcd` command to go to the right folder on your computer.
***
## How to connect through FileZilla
If you prefer to drag files with the mouse, use FileZilla, a free program for Windows, macOS and Linux. According to the official FileZilla instructions, connecting over SFTP looks like this.
1. In the quick connect bar at the top of the window, enter the server address in the address field with the `sftp://` prefix, for example `sftp://203.0.113.10`.
2. Enter your username and password.
3. You can leave the port empty, since SFTP uses 22 by default.
4. Click the **Quickconnect** button or press Enter.
After connecting, you will see the files on your computer on the left and the files on the server on the right. You move files between them by dragging.
> **Don't forget the sftp:// prefix.**
>
> Without it, FileZilla will connect over plain FTP to port 21. On a VPS with no FTP server, this connection will not work.
***
## Step 3. Create an SFTP-only user
Now we will create the user `sftpuser`, who can work with files in only one folder and cannot log in over SSH. For this, SSH can lock a user into a directory using **chroot**. For such a user, the specified folder becomes the root of the file system, and they cannot go above it.
chroot has a strict rule. The folder the user is locked into, and all the folders above it, must be owned by `root`, and nobody except `root` may have write permission to them. That is why the user will put files into a nested folder called `files`, which is already owned by them.
1. Create a group and a user with no access to the command line.
```bash
groupadd sftponly
useradd -m -d /home/sftpuser -s /usr/sbin/nologin -G sftponly sftpuser
passwd sftpuser
```
The `passwd` command will ask you to enter a password for the new user twice. The user will connect over SFTP with this password.
2. Create the chroot folder and the folder for files with the right owners.
```bash
mkdir -p /srv/sftp/sftpuser/files
chown root:root /srv/sftp /srv/sftp/sftpuser
chmod 755 /srv/sftp /srv/sftp/sftpuser
chown sftpuser:sftpuser /srv/sftp/sftpuser/files
```
3. Make a backup copy of the SSH settings and open them.
```bash
cp /etc/ssh/sshd_config /root/sshd_config.bak
nano /etc/ssh/sshd_config
```
4. Add the block below at the very end of the file and save it. SSH replaces `%u` with the username, so one block works for all future users of the `sftponly` group.
```bash
Match Group sftponly
ChrootDirectory /srv/sftp/%u
ForceCommand internal-sftp -d /files
AllowTcpForwarding no
X11Forwarding no
```
5. Check the settings and apply them. If `sshd -t` prints an error, do not reload SSH, fix the file instead.
```bash
sshd -t && systemctl reload ssh
```
> **Don't close your current connection.**
>
> While you change the SSH settings, keep open the window you are working in. First check in a new window that logging in to the server still works, and only then close the old one. That is what we did, and the `root` login kept working after the change.
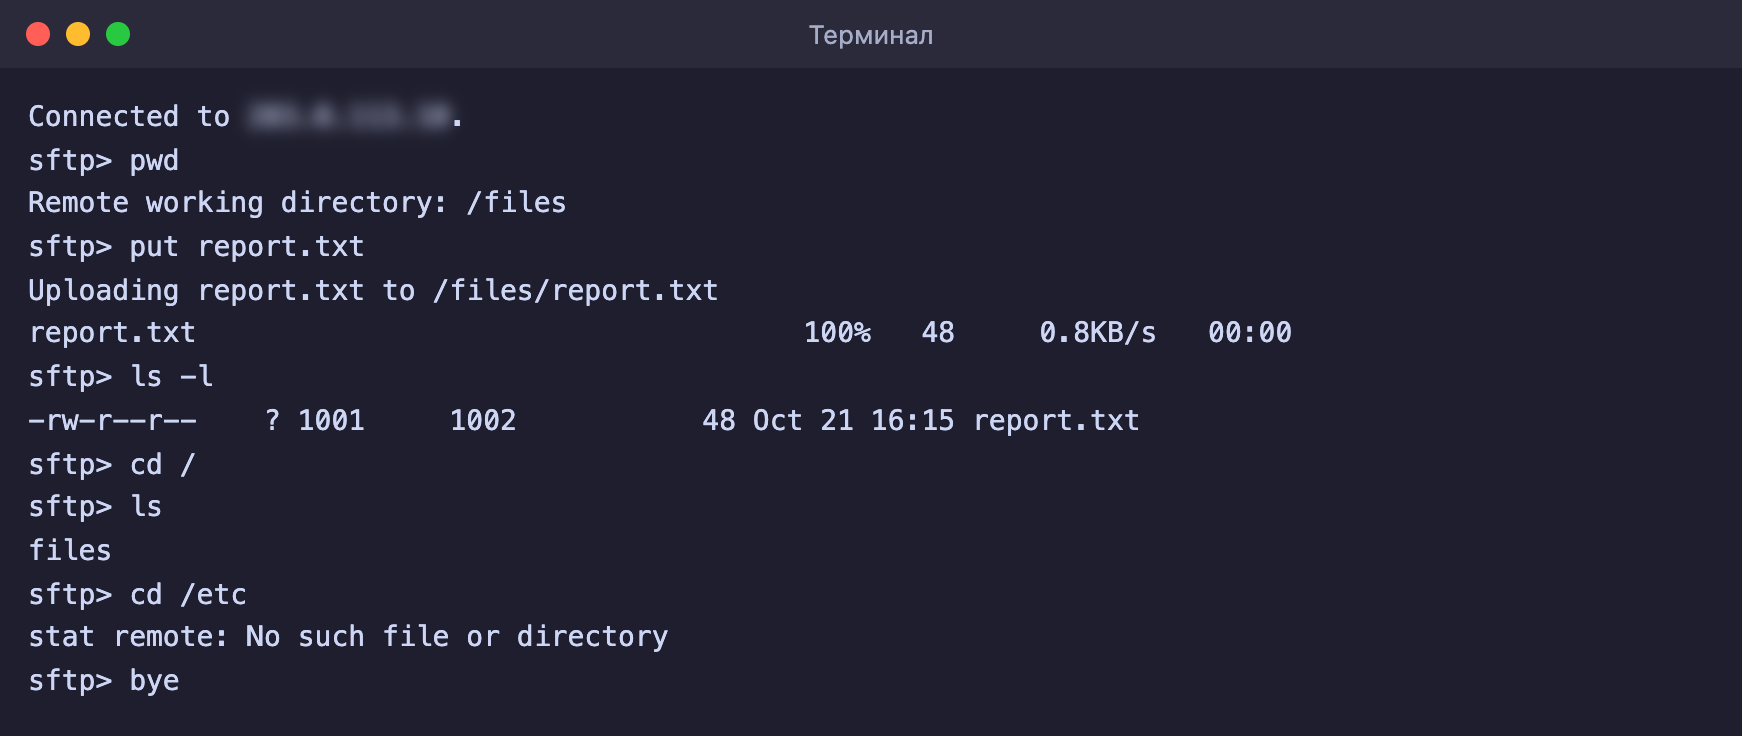
Connect as the new user with the command `sftp sftpuser@server-IP`. They land in the `/files` folder right away, can upload files into it, and cannot go any higher. In the root they see only the `files` folder, and the server's `/etc` folder simply does not exist for them.
The user is locked into their own folder
If the same user tries to log in over SSH, the server replies **This service allows sftp connections only.** and closes the connection.
To add another user like this, repeat steps 1 and 2 with their name. You do not need to change the block in `sshd_config`.
***
## Frequently asked questions
fatal: bad ownership or modes for chroot directory
The chroot folder, or one of the folders above it, is not owned by `root`, or someone else has write access to it. The client only sees **Connection closed**, and the actual reason can be found in the log with the command `journalctl -u ssh -n 20`. We got this error when we made the user the owner of `/srv/sftp/sftpuser`. Restore the owner with the commands `chown root:root /srv/sftp/sftpuser` and `chmod 755 /srv/sftp/sftpuser`.
dest open "/report.txt": Permission denied
The user is trying to write a file into the root of their chroot folder, which is owned by `root`. That is how it should be. Files need to go into the nested `files` folder, which the user lands in right after logging in.
This service allows sftp connections only.
This is not an error. A user from the `sftponly` group can work only over SFTP, and logging in to the command line over SSH is not allowed for them.
Permission denied (publickey,password)
The server accepted neither the key nor the password. We got this error when connecting as `sftpuser` with no key and no password. Check the username and password, and if no password has been set yet, set one with the command `passwd sftpuser`. If you log in with a key, the public key must be placed in `/home/sftpuser/.ssh/authorized_keys`, in the home folder and not in the chroot folder. You can read more about keys in the article about [SSH keys](https://docs.f3cloud.com/en/vps/security/ssh-keys.md).
***
## Our resources
**Telegram channel:** [https://t.me/f3cloud_news](https://t.me/f3cloud_news)\
**F3 Cloud:** [https://f3cloud.com](https://f3cloud.com/en)