> The full list of articles is in [llms.txt](https://docs.f3cloud.com/llms.txt). Every page has a Markdown version: add .md to its address. This page as Markdown: [https://docs.f3cloud.com/en/vpn-guide/wireguard-vpn-tutorial.md](https://docs.f3cloud.com/en/vpn-guide/wireguard-vpn-tutorial.md).

# Installing WireGuard on a VPS in Docker with the wg-easy panel

How to set up your own WireGuard VPN on a VPS with the wg-easy web panel in Docker. Installation in a few commands, first setup in the browser, creating clients, connecting with a file or QR code on a computer and phone, and common errors.

**WireGuard** is a fast and simple VPN protocol. It puts almost no load on the server and reconnects quickly when your phone switches networks.

So that you do not have to configure WireGuard by hand, we will install the **wg-easy** web panel for it. In the panel you create clients in a couple of clicks, and the connection settings come as a file or a QR code. We tested every step on an F3 Cloud server with Debian 12 and wg-easy version 15.4.

***

## Step 1. Install Docker

wg-easy runs in Docker. Connect to the server [via SSH](https://docs.f3cloud.com/en/vps/termius-connection.md) as the root user and install Docker with the official script.

```bash
curl -fsSL https://get.docker.com -o get-docker.sh
sh get-docker.sh
```

If Docker is already installed on the server, you can skip this step. You can check this with the `docker --version` command.

***

## Step 2. Start wg-easy

Create a folder for the panel, download the official settings file and start wg-easy.

```bash
# Folder for the panel files
mkdir -p /opt/wg-easy && cd /opt/wg-easy

# Official settings file from the wg-easy developers
curl -fsSL -o docker-compose.yml https://raw.githubusercontent.com/wg-easy/wg-easy/master/docker-compose.yml

# Allow opening the panel over plain http://
sed -i -e 's/^    #environment:/    environment:/' -e 's/^    #  - INSECURE=false/      - INSECURE=true/' docker-compose.yml

# Start the panel
docker compose up -d
```

Without the `INSECURE=true` setting, the new version of wg-easy only opens over HTTPS, and that needs a domain and a certificate. The `sed` command turns this setting on, so the panel is available straight away at the server's IP address.

> **The panel opens over HTTP without encryption.**
>
> The panel password travels over the network in plain text when you log in. Choose a strong password for the panel and do not open it over public Wi-Fi.

If a firewall is enabled on the server, open port **51820/UDP** for the VPN and port **51821/TCP** for the panel in it. We showed how to do this in the article [about the firewall](https://docs.f3cloud.com/en/vps/security/firewall.md).

***

## Step 3. Set up the panel in the browser

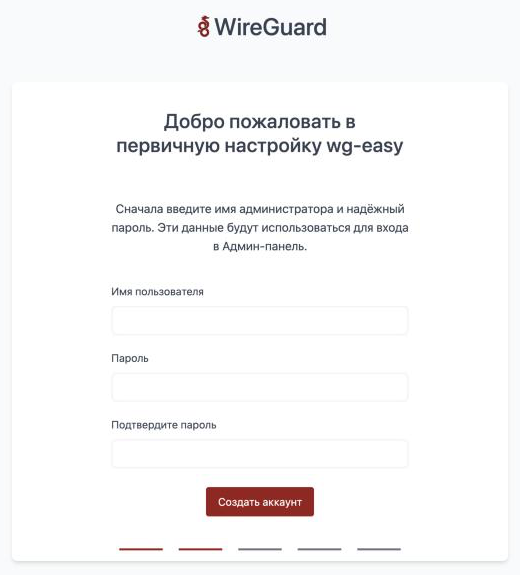
Open `http://SERVER-IP:51821` in your browser. On your first visit, a setup wizard opens in your browser's language.

1. Click <kbd>Continue</kbd>.
2. Choose an administrator **username** and **password** and click <kbd>Create Account</kbd>. You will use these details to log in to the panel.

<figure><img src="https://docs.f3cloud.com/img/wg-easy-setup-account.png" alt="Creating the administrator account in the wg-easy setup wizard"><figcaption><p>Creating the panel administrator</p></figcaption></figure>

3. When asked **“Do you have an existing setup?”**, answer <kbd>No</kbd>.
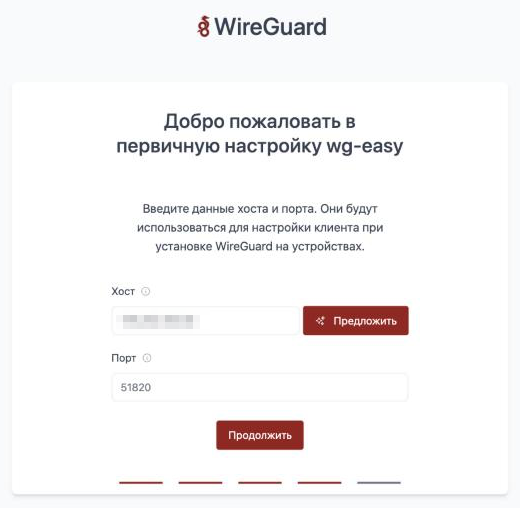
4. In the **Host** field, enter the server's IP address. The easiest way is to pick it with the <kbd>Suggest</kbd> button, and you need the line marked **IPv4 - Public**. Leave the port at **51820** and click <kbd>Continue</kbd>.

<figure><img src="https://docs.f3cloud.com/img/wg-easy-setup-host.png" alt="Server address and port in the wg-easy setup wizard"><figcaption><p>Server address and port for connections</p></figcaption></figure>

5. The message **“Setup successful”** appears. Click <kbd>Sign In</kbd> and log in with the account you have just created.

***

## Step 4. Create a client

A client is a separate profile for one device or one person. It is better to create different clients for a phone and a laptop, because then you can switch off any of them without touching the others.

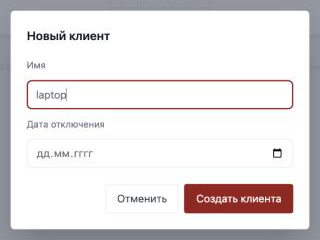
Click <kbd>New</kbd>, enter a name, for example `laptop`, and click <kbd>Create Client</kbd>. You can leave the **Expire Date** field empty, and then the client will work with no time limit.

<figure><img src="https://docs.f3cloud.com/img/wg-easy-client-new.png" alt="New client window in wg-easy" width="320"><figcaption><p>Creating a client</p></figcaption></figure>

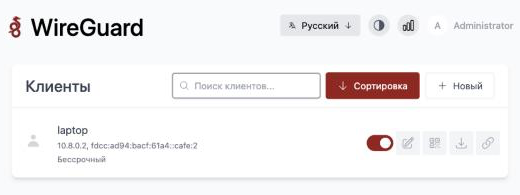
The client appears in the list. To the right of it are the buttons for managing it.

<figure><img src="https://docs.f3cloud.com/img/wg-easy-client-list.png" alt="wg-easy client list with management buttons"><figcaption><p>The client has been created</p></figcaption></figure>

| Button | What it does |
| --- | --- |
| Switch | Turns the client on and off |
| Pencil | Opens the client settings. You can also delete the client there with the <kbd>Delete</kbd> button |
| QR code | Shows a QR code for connecting from a phone |
| Down arrow | Downloads the `.conf` settings file for a computer |
| Link | Creates a temporary link to the settings file, which works for 5 minutes |

***

## Step 5. Connect to the VPN

To connect, you need the official **WireGuard** app.

#### Computer

1. Download WireGuard for Windows or macOS from the [download page](https://www.wireguard.com/install/) and install it.
2. In the wg-easy panel, download the settings file with the down arrow button.
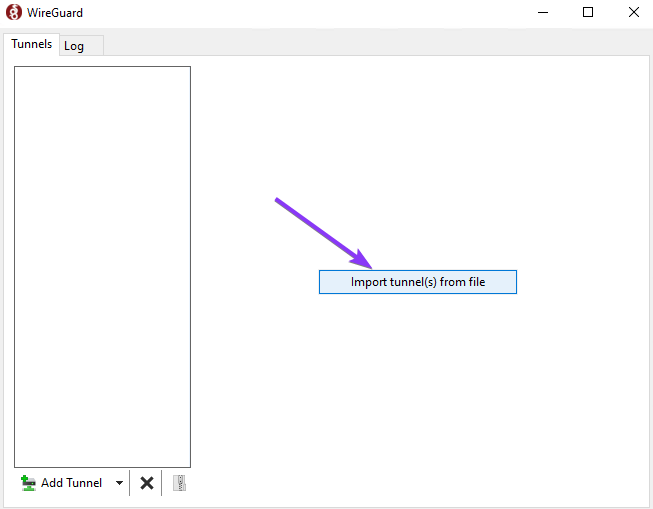
3. In the WireGuard app, click <kbd>Import tunnel(s) from file</kbd> and choose the downloaded file.

<figure><img src="https://docs.f3cloud.com/img/wireguard-windows-import.png" alt="Importing a tunnel from a file in WireGuard for Windows" width="490"><figcaption><p>Importing the settings file</p></figcaption></figure>

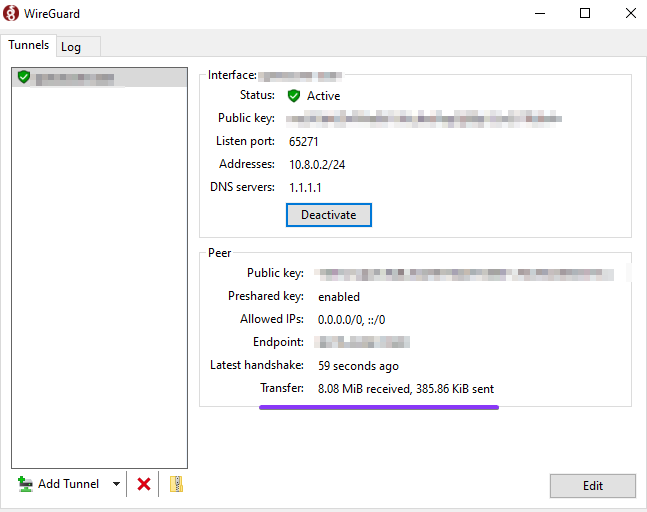
4. Click <kbd>Activate</kbd>. When the **Status** line shows **Active**, the VPN is working.

<figure><img src="https://docs.f3cloud.com/img/wireguard-windows-active.png" alt="Active tunnel in WireGuard for Windows" width="490"><figcaption><p>The connection is established</p></figcaption></figure>

#### Phone

1. Install WireGuard from the [App Store](https://apps.apple.com/app/wireguard/id1441195209) or [Google Play](https://play.google.com/store/apps/details?id=com.wireguard.android).
2. In the wg-easy panel, click the QR code button next to the client you need.

<figure><img src="https://docs.f3cloud.com/img/wg-easy-client-qr.png" alt="Client QR code in the wg-easy panel" width="310"><figcaption><p>QR code for the phone</p></figcaption></figure>

3. In the WireGuard app, tap <kbd>+</kbd>, choose scanning a QR code and point the camera at the screen.
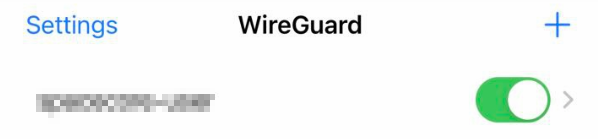
4. Turn on the switch next to the added tunnel.

<figure><img src="https://docs.f3cloud.com/img/wireguard-iphone-tunnel.png" alt="Enabled tunnel in the WireGuard app on iPhone"><figcaption><p>VPN enabled on the phone</p></figcaption></figure>

To check that your traffic goes through the VPN, open [api.ipify.org](https://api.ipify.org) in your browser. It should show your server's IP address.

> **The settings file and QR code are the key to your VPN.**
>
> Anyone who gets hold of the settings file or the QR code can connect to your server. Do not publish them or send them through public chats.

***

## Frequently asked questions

<details>

<summary>The panel does not open</summary>

Check that wg-easy is running with the `docker ps` command. The list should include the `wg-easy` container with the `Up` status. Make sure you open the address with `http://`, not `https://`, and that port 51821/TCP is open in the firewall.

</details>

<details>

<summary>The VPN does not connect</summary>

Most often, port 51820/UDP is closed in the server's firewall. Also check that the **Host** field in the setup wizard contains the server's public IP address. If it shows an internal address such as `10.42.42.42`, correct it in **Admin Panel → Config** and download the settings file again.

</details>

<details>

<summary>I forgot the panel password</summary>

You can reset the administrator password with a command on the server. It will ask you to enter a new password.

```bash
cd /opt/wg-easy && docker compose exec -it wg-easy cli db:admin:reset
```

</details>

<details>

<summary>How to update wg-easy</summary>

Run two commands. Your clients and settings are kept during the update.

```bash
cd /opt/wg-easy && docker compose pull && docker compose up -d
```

</details>

<details>

<summary>WireGuard does not work on my network</summary>

Some providers and networks block WireGuard. In that case, use protocols that are harder to detect, for example [Amnezia](https://docs.f3cloud.com/en/vpn-guide/setup-amnezia.md) or [VLESS Reality in 3X-UI](https://docs.f3cloud.com/en/vpn-guide/3x-ui-panel-guide.md).

</details>

***

## Our resources

**Telegram channel:** [https://t.me/f3cloud_news](https://t.me/f3cloud_news)\
**F3 Cloud:** [https://f3cloud.com](https://f3cloud.com/en)