> The full list of articles is in [llms.txt](https://docs.f3cloud.com/llms.txt). Every page has a Markdown version: add .md to its address. This page as Markdown: [https://docs.f3cloud.com/en/vpn-guide/setup-vless-xhttp.md](https://docs.f3cloud.com/en/vpn-guide/setup-vless-xhttp.md).

# Setting up VLESS + TLS + XHTTP in 3X-UI with your own domain

A step-by-step guide to setting up the modern VLESS + TLS + XHTTP combination. The setup is done in the 3x-ui panel, and you will also need your own domain.

## Advantages of XHTTP

**How XHTTP works.** The transport imitates the behaviour of **an ordinary web browser**. Traffic is split into fragments that travel as standard **HTTP requests** _(for example, `POST` or `GET`)_. Both **HTTP/1.1** and **HTTP/2** are supported.

**To the provider it looks as if** you are uploading pictures or sending data to a website through an API. Blocking such traffic **without “breaking”** half of the ordinary internet is **very hard**.

> **Important.**
>
> The official **sing-box** core **does not support** the XHTTP transport. Use clients built on **Xray-core** version 1.8.10 or later.

## Step 1. Server preparation and system requirements

We recommend using **our servers** at [**F3 Cloud**](https://f3cloud.com/en?ref=docs) – they fully **meet the project's system requirements** and are compatible with the instructions below.

| Parameter              | Minimum requirements         |
| ---------------------- | ---------------------------- |
| vCPU (virtual core)    | From 1 core                  |
| RAM                    | From 1 GB                    |
| Storage                | From 10 GB SSD               |
| Operating system       | Ubuntu 24.04 (recommended)   |

> We suggest the **DE-RZ9-1** configuration. It runs on an AMD Ryzen 9 5950X processor with a 1 Gbit/s port and fully covers the project's system requirements.

## Step 2. Choosing the server configuration

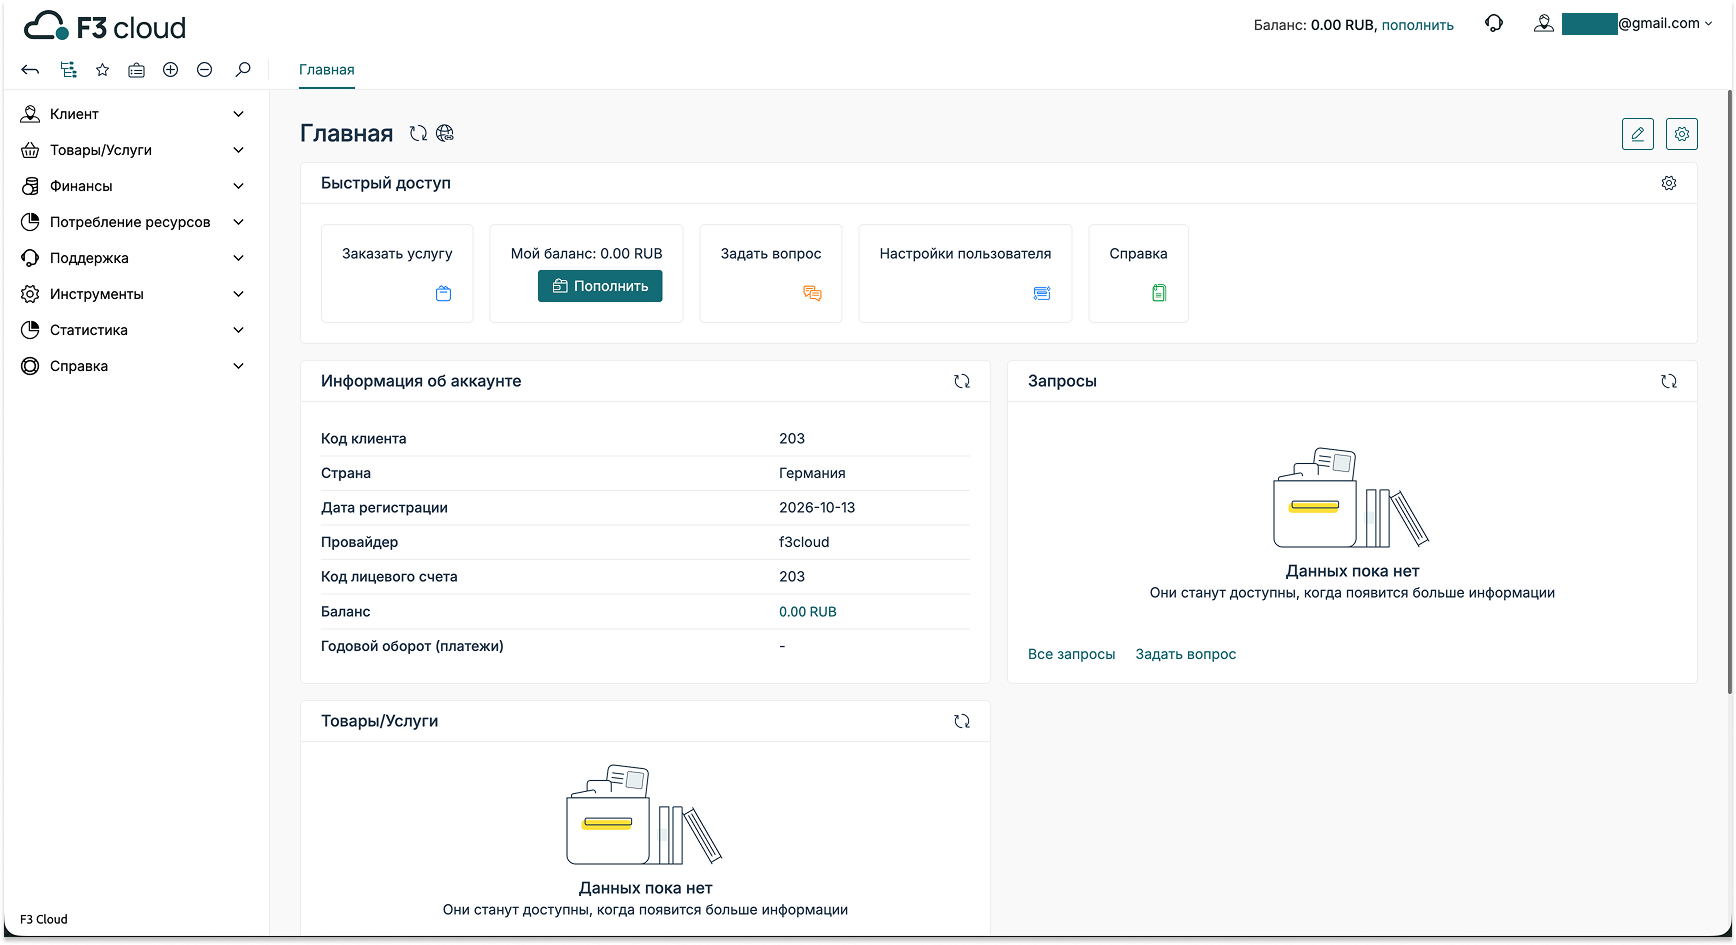
After logging in or registering in the [**F3 Cloud**](https://docs.f3cloud.com/en/client-area/registration.md) panel, press <kbd>Order service</kbd> to go to the server selection.

<figure><img src="https://docs.f3cloud.com/img/order-dashboard.png" alt=""><figcaption></figcaption></figure>

The <kbd>**Order service**</kbd> menu shows the main plans first. To see the full list, press **View all**.

How to choose a server:

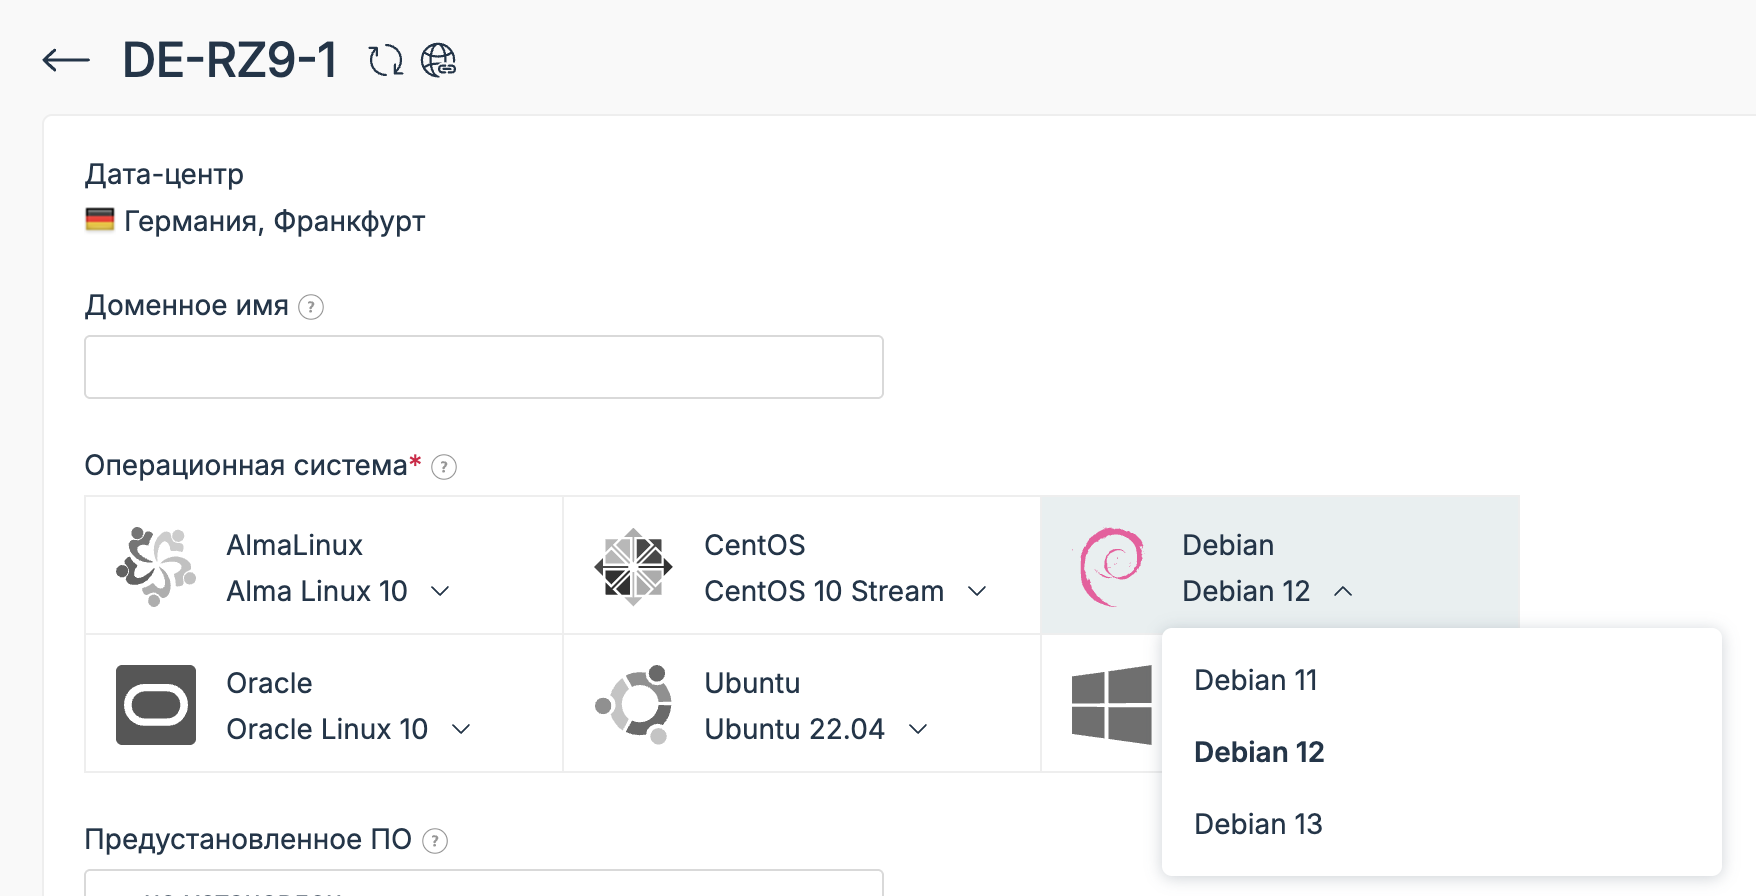
* on the **DE-RZ9-1** card, press <kbd>**Order**</kbd>;
* in the server configuration, choose the <kbd>**Ubuntu 24.04**</kbd> operating system;
* press <kbd>**Pay**</kbd> to complete the order.

<figure><img src="https://docs.f3cloud.com/img/order-os.png" alt=""><figcaption><p>The screenshot shows the order flow. In your case, choose Ubuntu 24.04 rather than Debian.</p></figcaption></figure>

## Step 3. Server activation

After payment, the order is processed automatically. Server activation usually takes no more than **2 minutes**.

<figure><img src="https://docs.f3cloud.com/img/order-status-processing.webp" alt=""><figcaption><p><em>The “Processing” status means you need to wait a little.</em></p></figcaption></figure>

You can follow the current status in the **control panel**. As soon as the server is ready, the status changes to <kbd>**Active**</kbd>.

> **Note.**
>
> Activation sometimes takes longer because of high load and an order queue in the chosen location. If the server has not been activated within 10 minutes, write to us in a ticket and we will check the order status promptly.

## Step 4. Getting the server details

1. Wait until the server is fully activated.
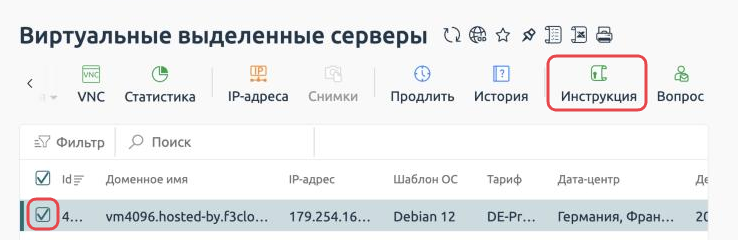
2. In the client area, tick the checkbox next to the server and press <kbd>**Instruction**</kbd> in the top menu.
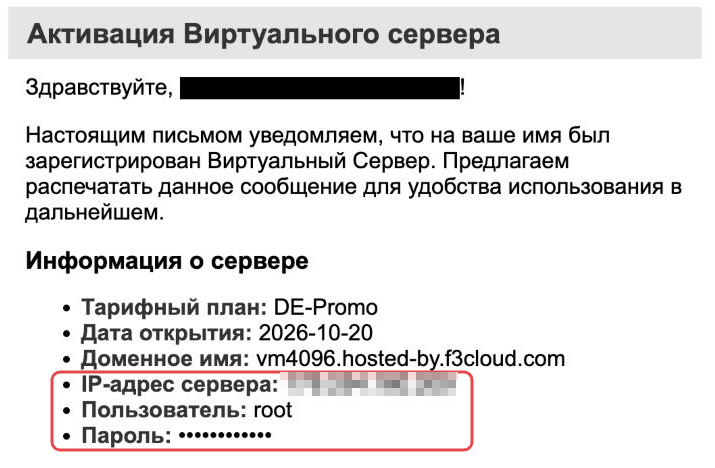
3. Copy the connection details from the instruction:
   * <kbd>Server IP address</kbd>;
   * <kbd>Username</kbd>;
   * <kbd>Password</kbd>.

The screenshot below shows where to find this information.

<figure><img src="https://docs.f3cloud.com/img/billing-vds-instruction-button.png" alt=""><figcaption></figcaption></figure>

<figure><img src="https://docs.f3cloud.com/img/billing-vds-instruction-data-v2.png" alt=""><figcaption><p>The server details are also sent to your email.</p></figcaption></figure>

## Step 5. Buying and configuring a domain

XHTTP with TLS needs your own domain pointing to the server's IP address. The cheapest domain from any registrar will do, for example reg.ru or Selectel.

> **Tip.**
>
> Choose a neutral domain name that looks like an ordinary website, for example `shaurma-ashotika.ru`. Do not use vpn, proxy, xray, vless, reality or similar words in it. The domain name is sent in plain text (SNI), and such words are easy to match against a list.

<figure><img src="https://docs.f3cloud.com/img/xhttp/step-01.png" alt=""><figcaption><p>The setup is shown using reg.ru as an example.</p></figcaption></figure>

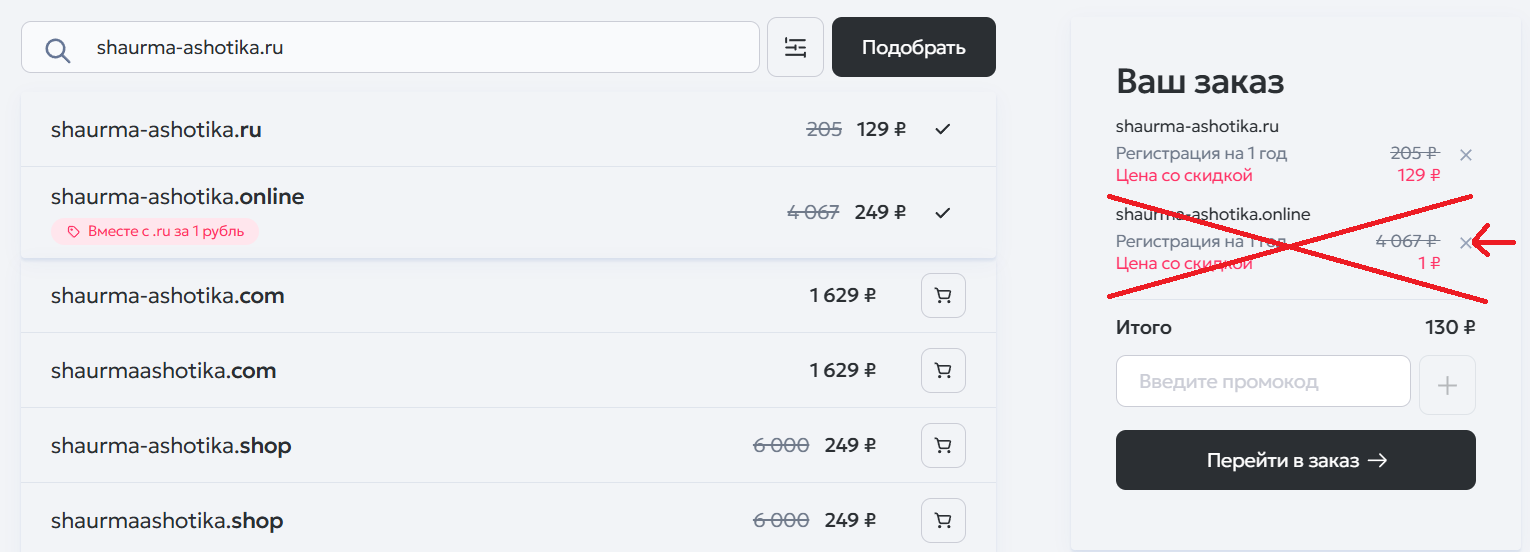
Enter the domain name and press <kbd>**Подобрать**</kbd> (Find).

The site will redirect you to the payment page, **be careful here**. Remove the .online domain from the order and keep only the .ru domain.

<figure><img src="https://docs.f3cloud.com/img/xhttp/step-02.png" alt=""><figcaption></figcaption></figure>

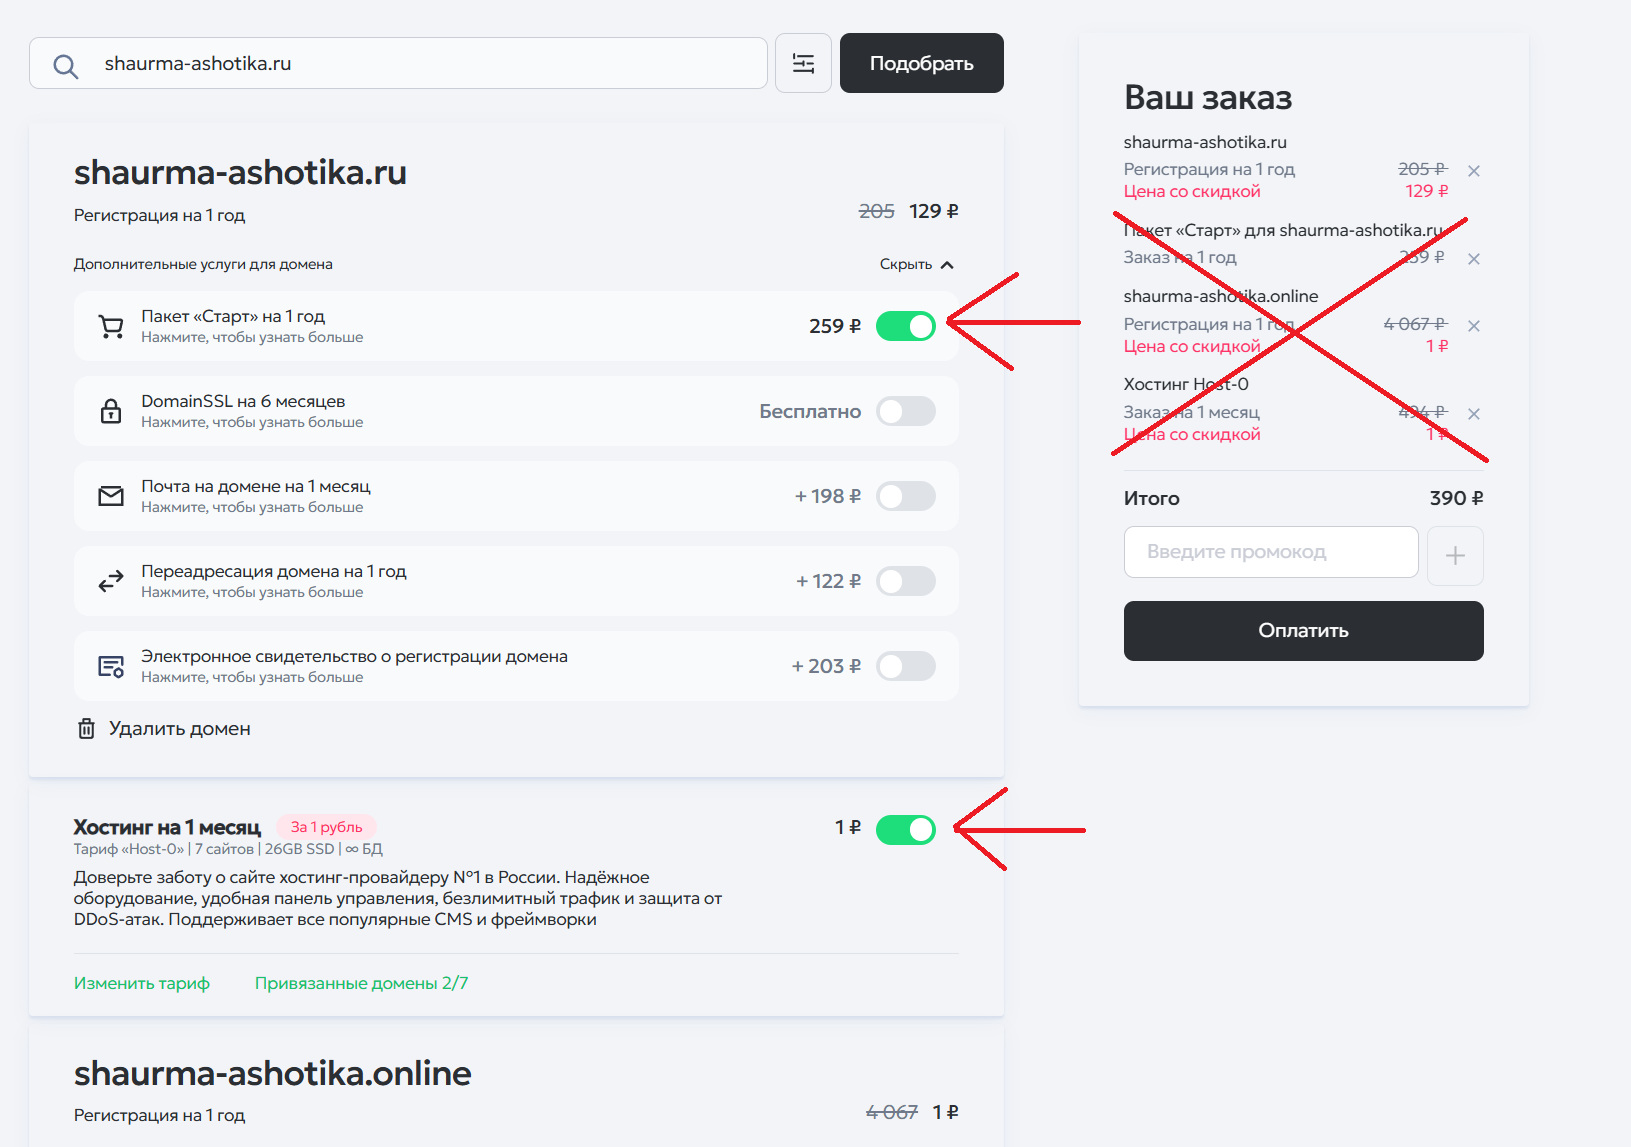
Then press <kbd>**Перейти в заказ**</kbd> (Go to order).

<figure><img src="https://docs.f3cloud.com/img/xhttp/step-03.png" alt=""><figcaption></figcaption></figure>

Do the same here: **untick all the green checkmarks** and keep **only your .ru domain**. Press <kbd>**Оплатить**</kbd> (Pay), and the site will take you to the registration page. Follow the registrar's instructions.

After payment you will get access to the registrar's client area and the domain settings. Follow the steps shown in the screenshots.

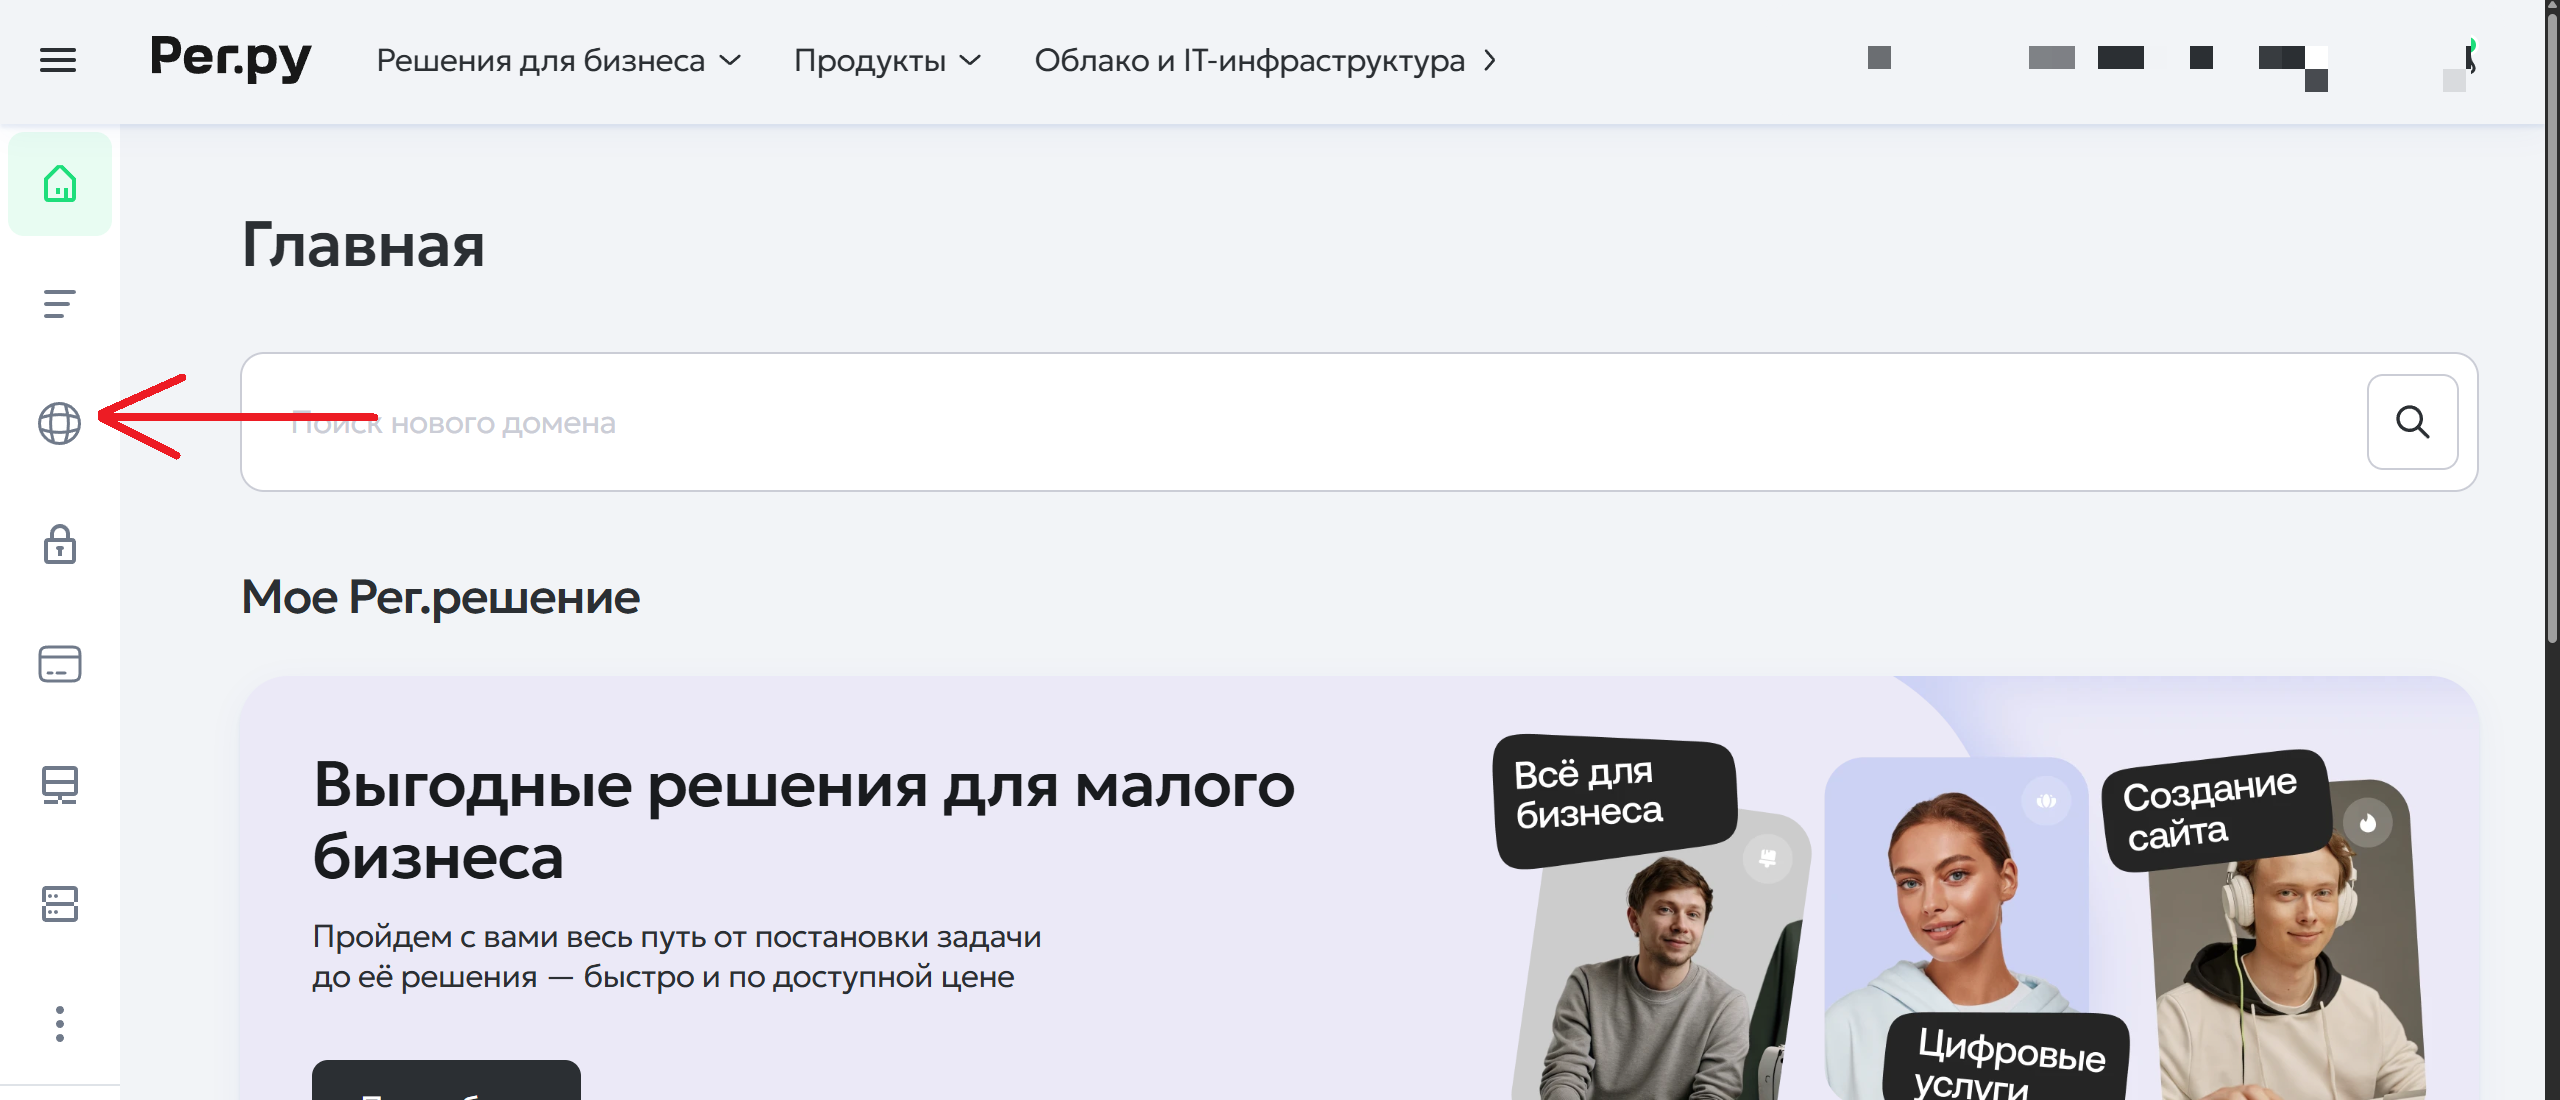
<figure><img src="https://docs.f3cloud.com/img/xhttp/step-04.png" alt=""><figcaption><p>Press the round icon.</p></figcaption></figure>

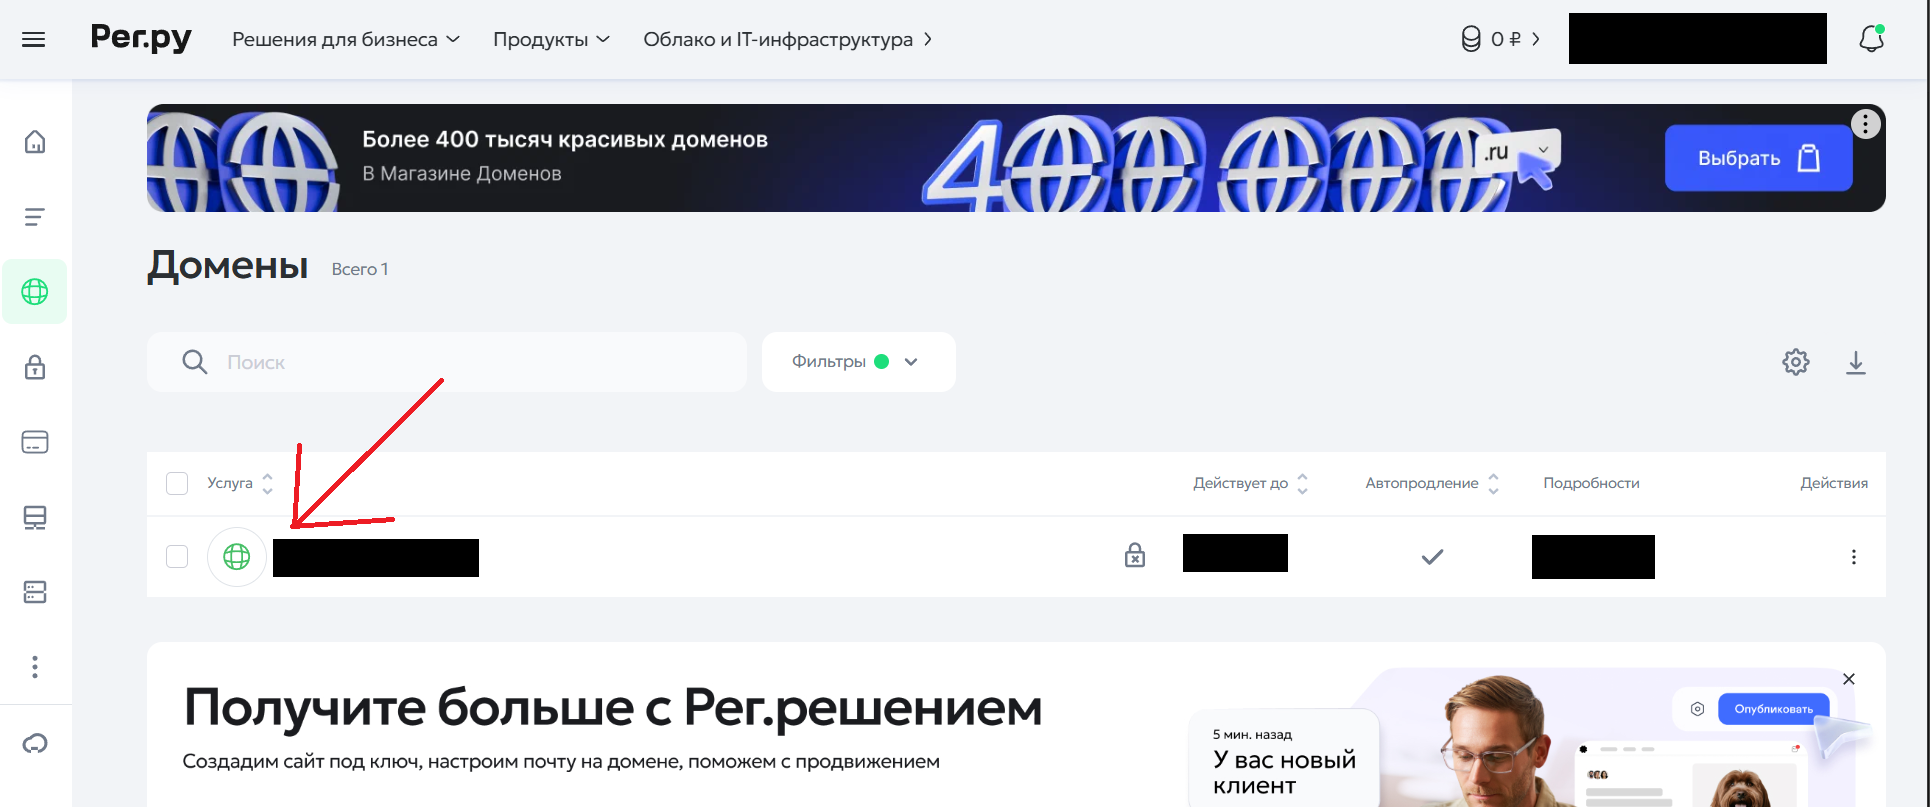
<figure><img src="https://docs.f3cloud.com/img/xhttp/step-05.png" alt=""><figcaption><p>Press the tile with your domain.</p></figcaption></figure>

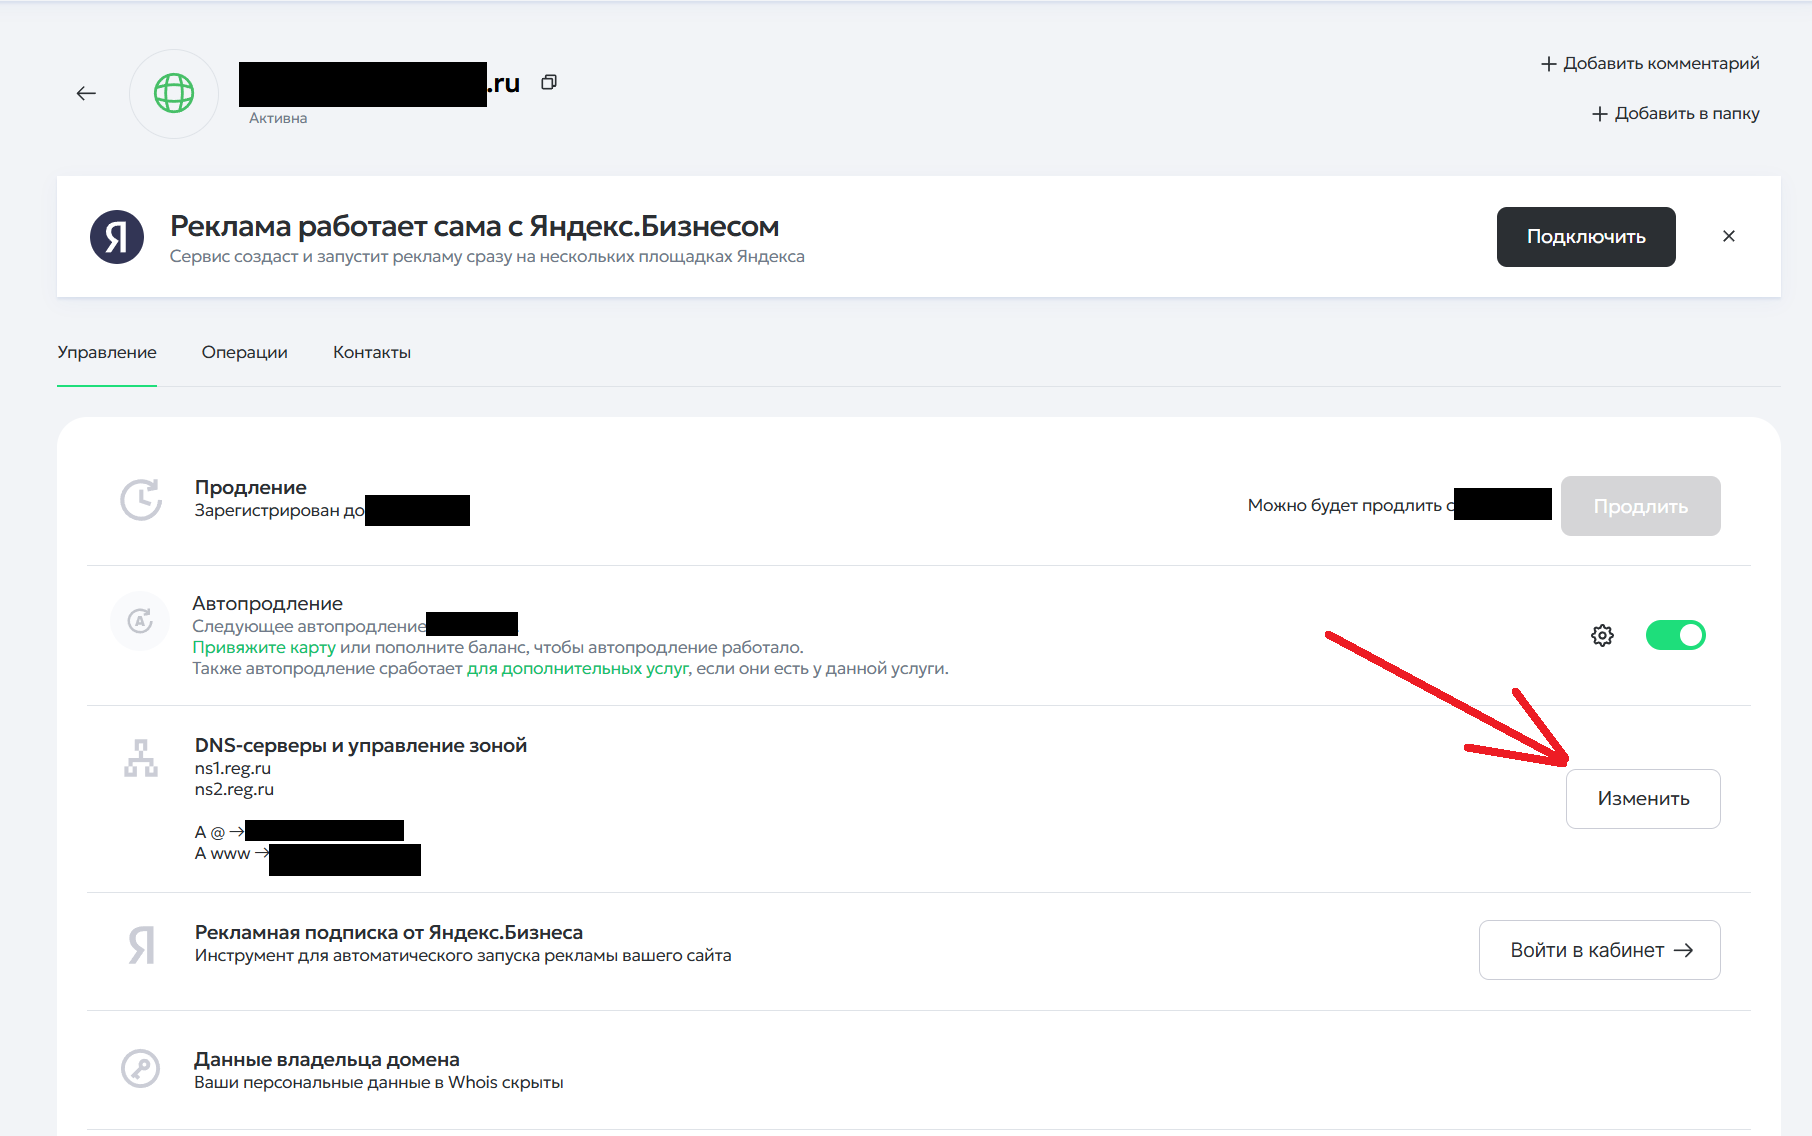
<figure><img src="https://docs.f3cloud.com/img/xhttp/step-06.png" alt=""><figcaption><p>Press “Изменить” (Edit).</p></figcaption></figure>

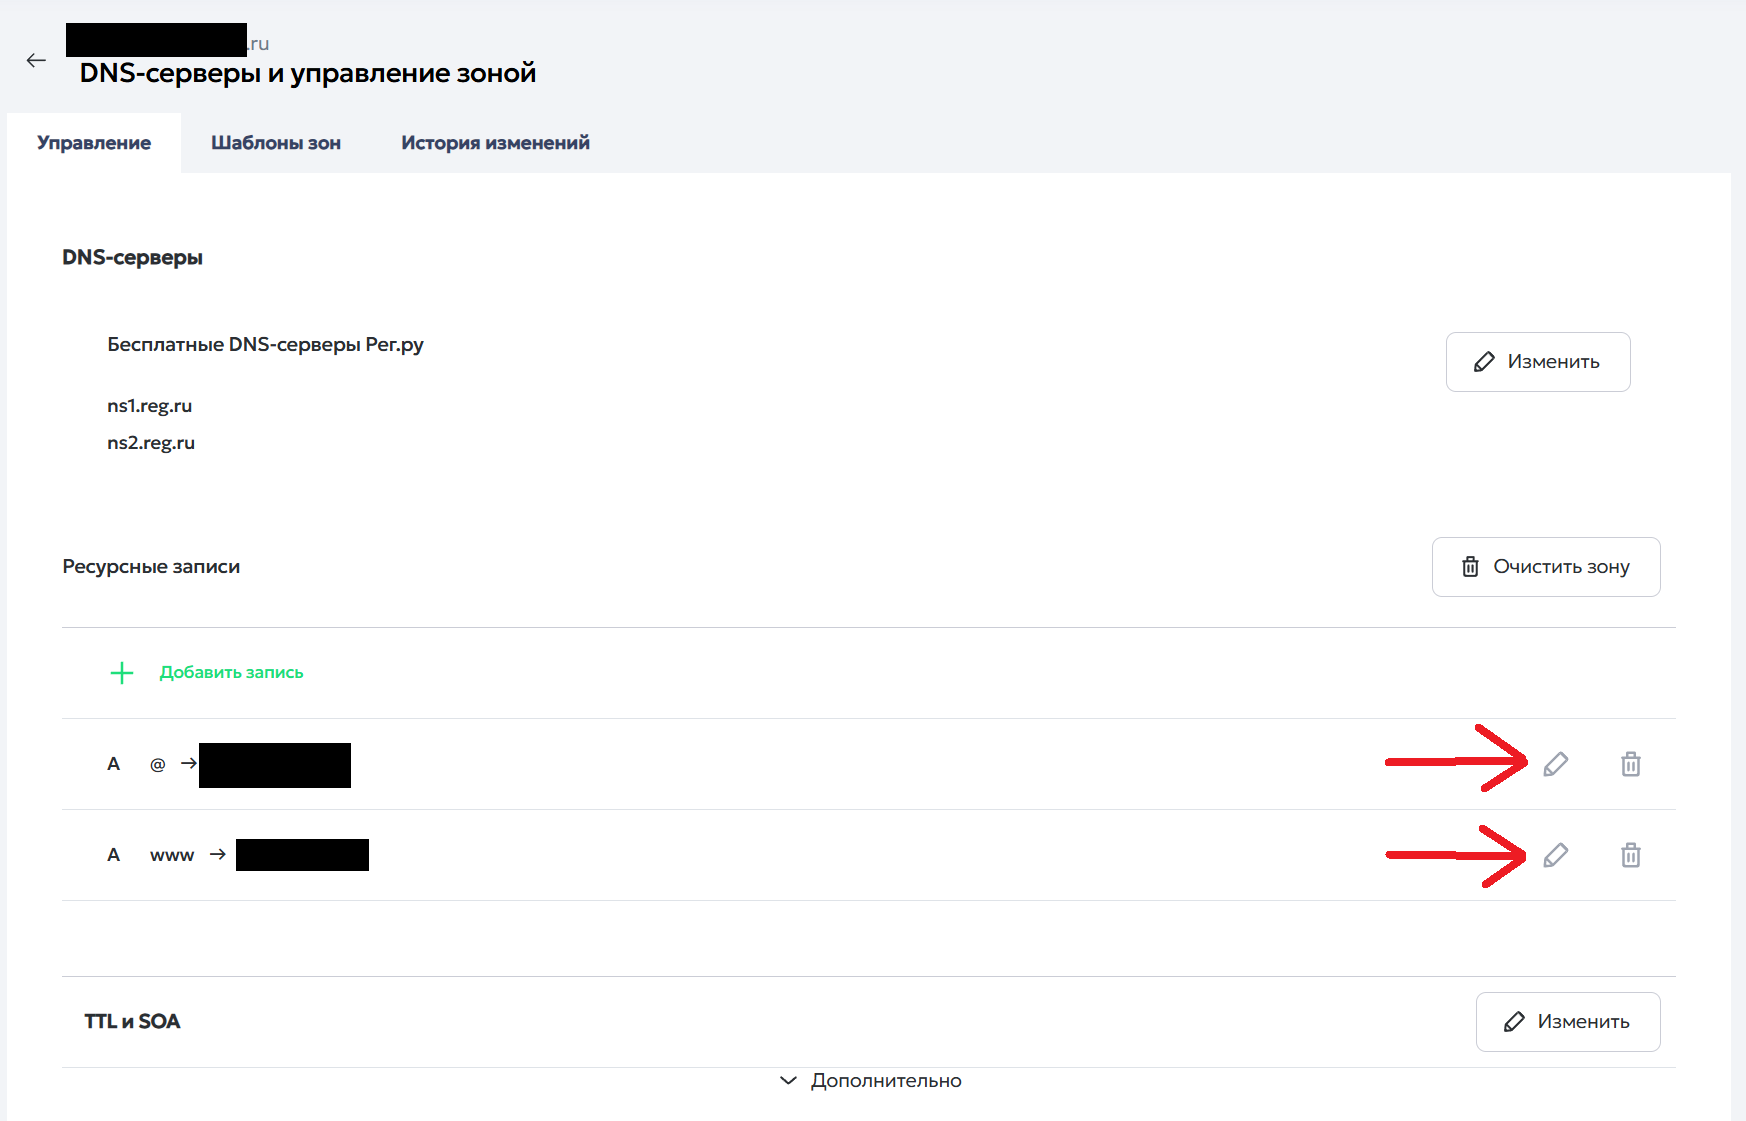
<figure><img src="https://docs.f3cloud.com/img/xhttp/step-07.png" alt=""><figcaption><p>Press the pencil icon next to the records.</p></figcaption></figure>

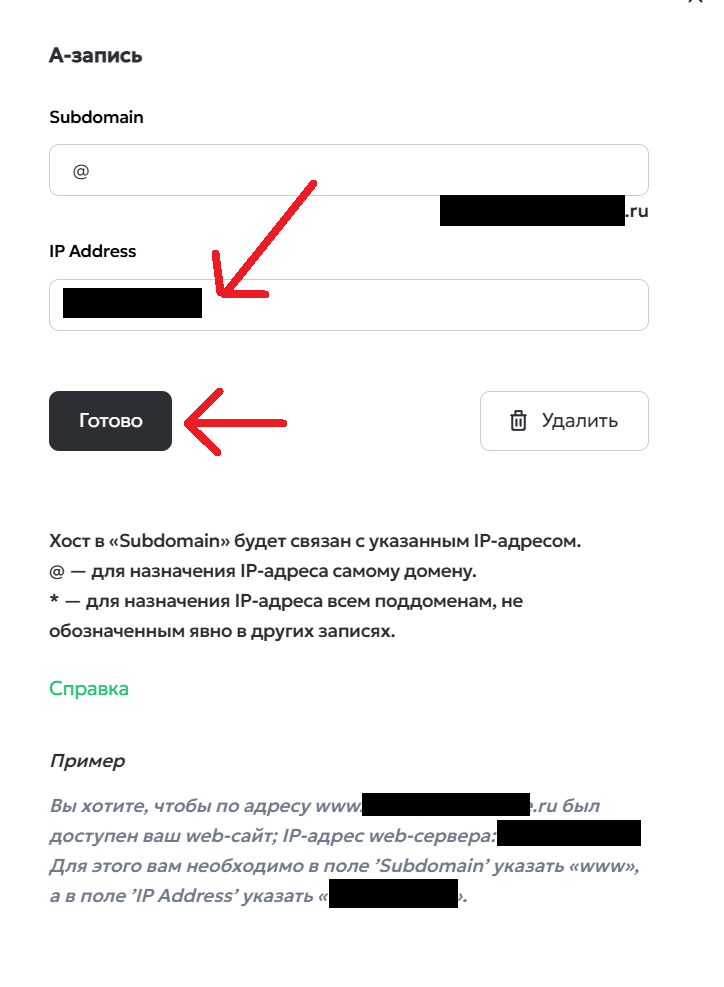
<figure><img src="https://docs.f3cloud.com/img/xhttp/step-08.png" alt=""><figcaption><p>Enter your server's IP address in the IP Address field.</p></figcaption></figure>

Almost done. Now wait until the domain's new A record points to your VPS.

> **Note.**
>
> The A record tells the whole internet that your domain (for example, `myserver.com`) is bound to your server's IP address. Changes usually apply within a few hours, in rare cases up to 48 hours.
>
> You can check the A record with `dig myserver.com A +short`. If the command prints your server's IP address, move on to the next step.
>
> If the domain is served through Cloudflare, turn off proxying for this record (grey cloud instead of orange). Otherwise the connection goes through Cloudflare's servers rather than directly to your VPS.

## Step 6. Setting up the server and the panel

Install any SSH client, for example Termius, PuTTY or PowerShell. Connect to the server over SSH (port 22) **using the details you received after ordering the server**.

**1.** Once connected, update the system:

```bash
apt update && apt upgrade -y
reboot # reboot after the update and connect again
```

> **Tip.**
>
> You can set up the connection with our automatic script: [https://github.com/yafoxins/3xui-autoinstall](https://github.com/yafoxins/3xui-autoinstall).

**2.** Connect to the server again and run the 3x-ui installation command:

```bash
bash <(curl -Ls https://raw.githubusercontent.com/mhsanaei/3x-ui/master/install.sh) v2.8.10
```

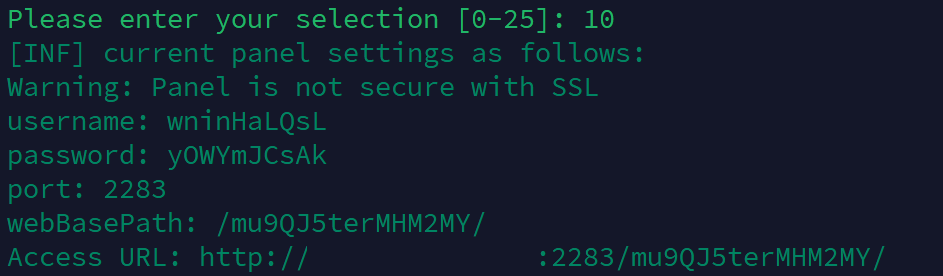
<figure><img src="https://docs.f3cloud.com/img/gb-a70a2bc8-spaces-UZCon1KDFCWX5Lp410mU-uploads-XM24rYPlUkRBpHiOKYtw-view-current-settings.on02auj_.png" alt=""><figcaption></figcaption></figure>

**3.** The installer offers to change the 3x-ui panel port:

```text
Would you like to customize the Panel Port settings? (If not, a random port will be applied) [y/n]:
# answer "y" and press Enter
# when asked for the port, answer "8080" and press Enter
```

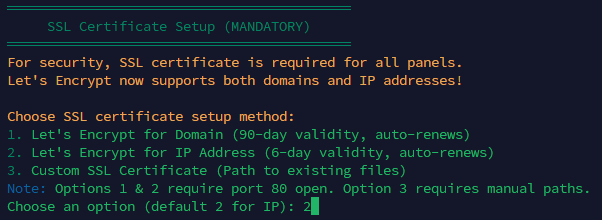
**4.** Install a certificate for the 3x-ui panel.

<figure><img src="https://docs.f3cloud.com/img/xhttp/step-09.png" alt=""><figcaption><p>Choose option 2.</p></figcaption></figure>

<figure><img src="https://docs.f3cloud.com/img/xhttp/step-10.png" alt=""><figcaption><p>Enter nothing, just press Enter.</p></figcaption></figure>

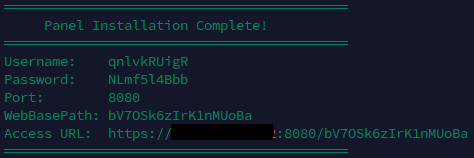
<figure><img src="https://docs.f3cloud.com/img/xhttp/step-11.png" alt=""><figcaption><p>The panel login details. Open the address in a browser.</p></figcaption></figure>

**5.** Create a connection in the panel.

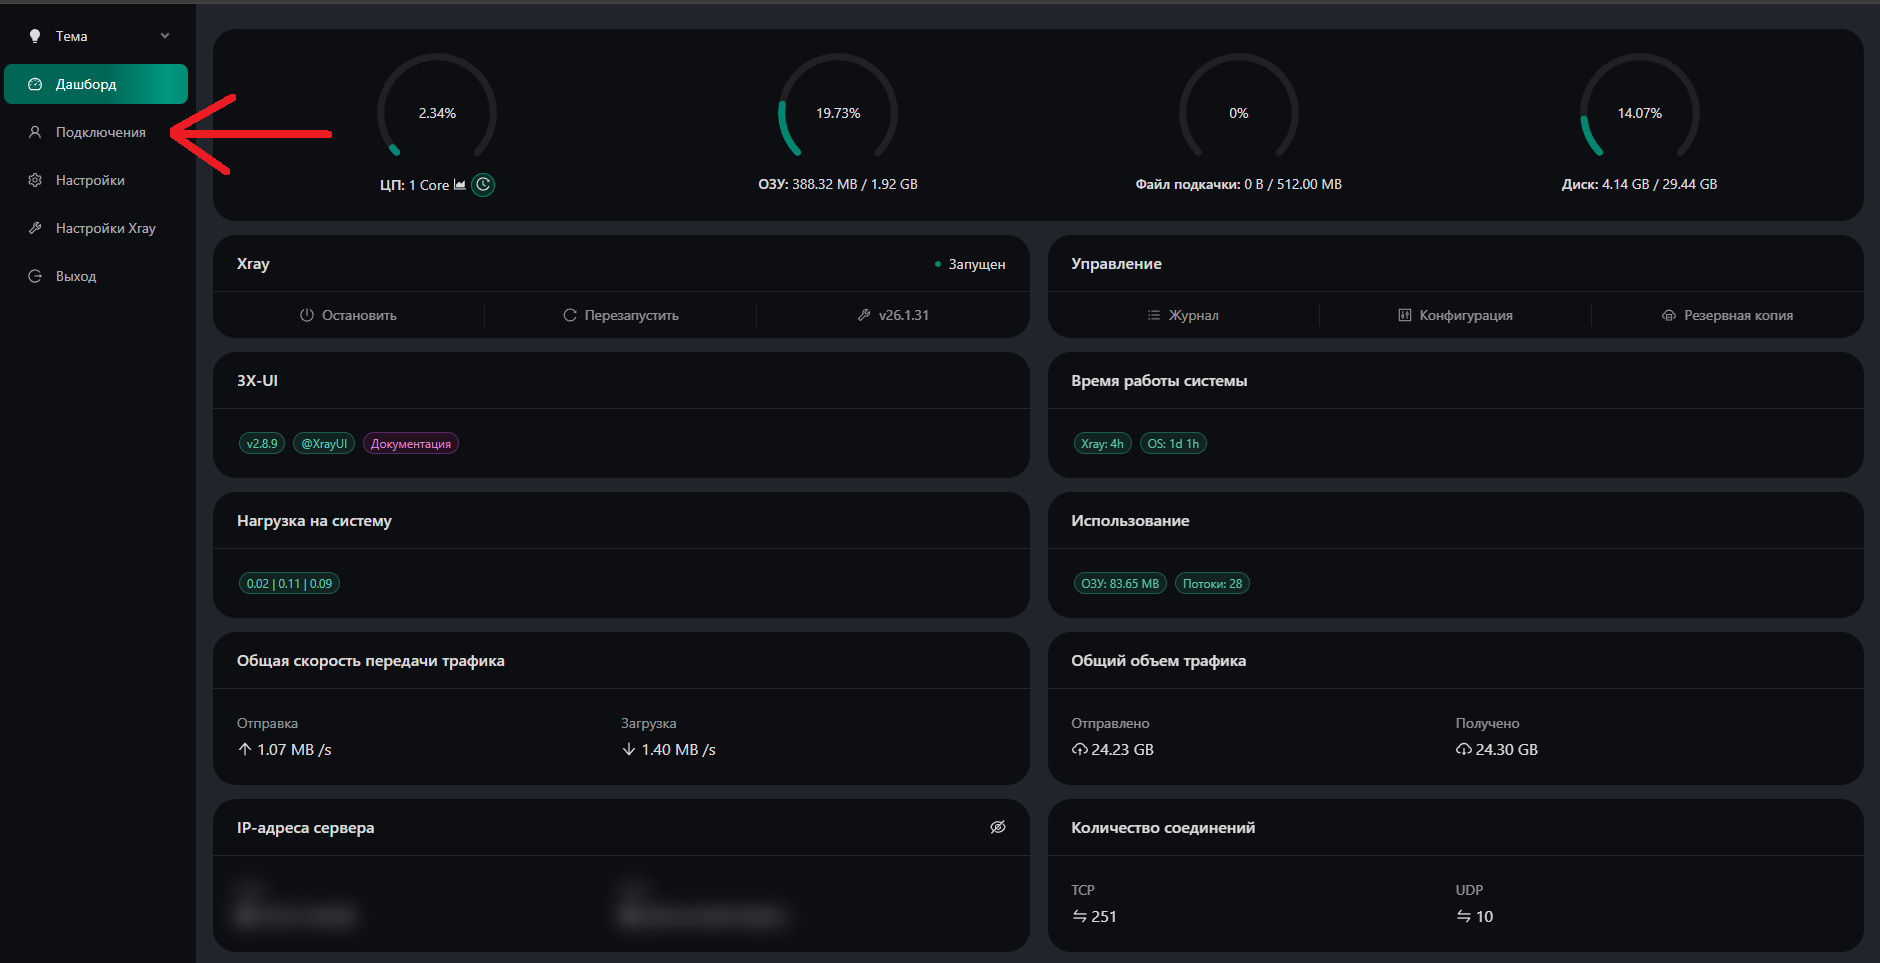
<figure><img src="https://docs.f3cloud.com/img/xhttp/step-12.png" alt=""><figcaption><p>Open the “Inbounds” section.</p></figcaption></figure>

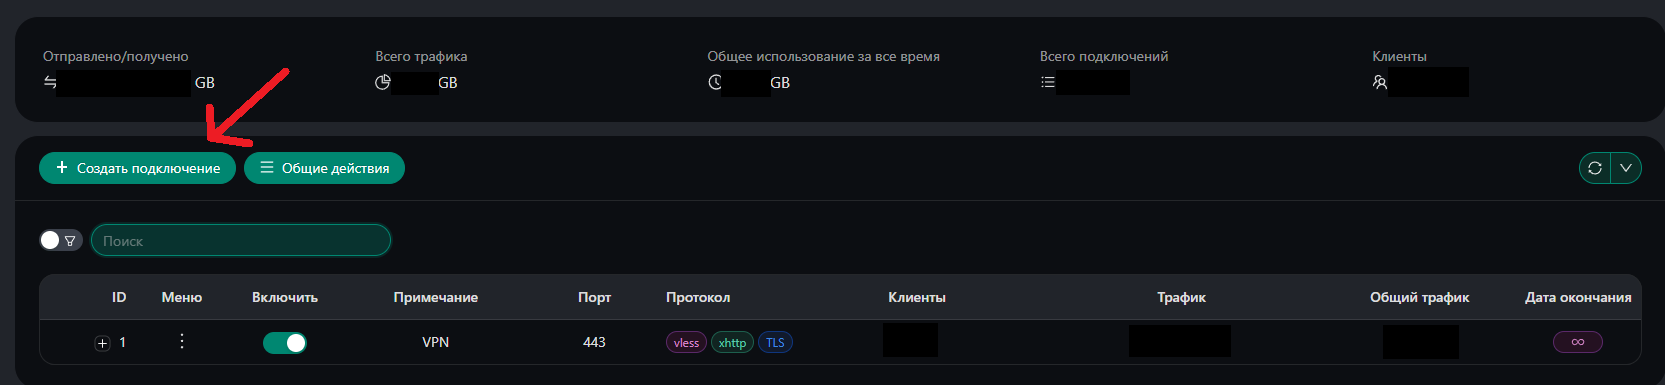
<figure><img src="https://docs.f3cloud.com/img/xhttp/step-13.png" alt=""><figcaption><p>Create a connection.</p></figcaption></figure>

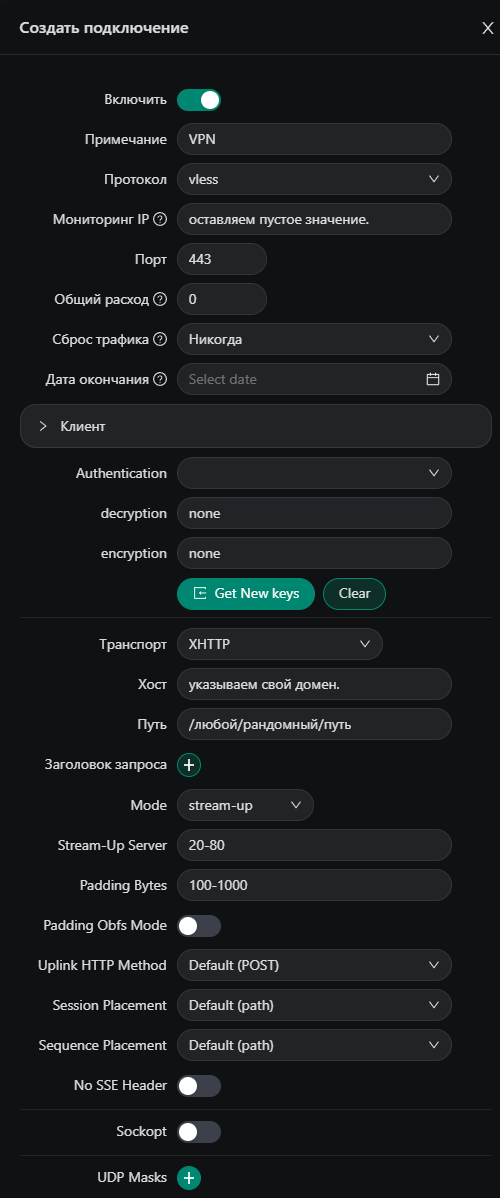
<figure><img src="https://docs.f3cloud.com/img/xhttp/step-14.png" alt=""><figcaption><p>Fill in the fields as in the screenshot, using your own values.</p></figcaption></figure>

> **Tip.**
>
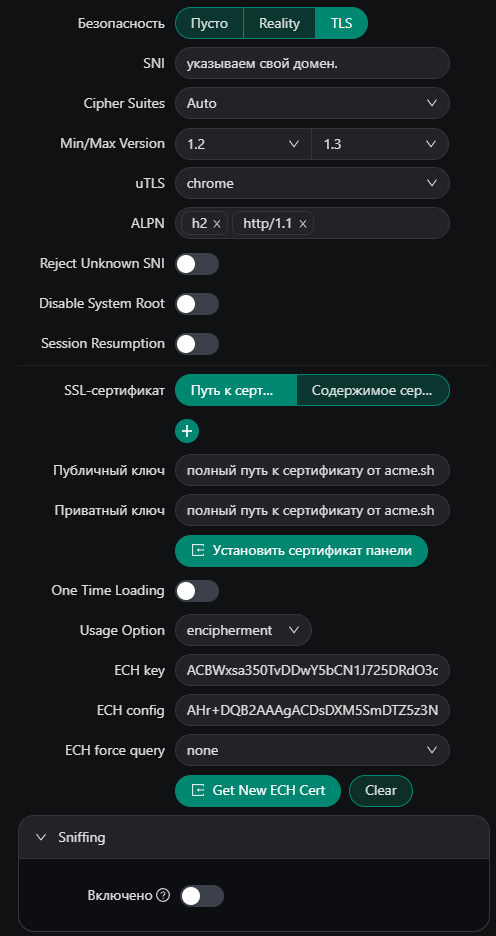
> In the connection's TLS settings, set the **uTLS** field to the `firefox` or `edge` fingerprint instead of the default `chrome`. The Chrome fingerprint now raises suspicion with provider filters more often than others, because almost every VPN app uses it. The `edge` limitation described in our Reality articles does not apply to XHTTP with ordinary TLS.

> **Important.**
>
> After every change to the connection settings, **always press** `Get New ECH Cert`. If the connection is unstable, try the `stream-up`, `stream-one` and `packet-up` modes one by one and pick the one that works best on your network.

<figure><img src="https://docs.f3cloud.com/img/xhttp/step-15.png" alt=""><figcaption><p>Fill in the fields as in the screenshot and press <strong>Get New ECH Cert</strong>.</p></figcaption></figure>

**6.** Go back to the terminal and press `Ctrl+C`. Now **issue a certificate** for your domain. Enter the commands one by one, **using your own values**:

```bash
curl https://get.acme.sh | sh -s email@example.com
~/.acme.sh/acme.sh --set-default-ca --server letsencrypt
~/.acme.sh/acme.sh --issue -d your-domain.ru --standalone
```

After the certificate is issued, the files are located here:

```text
Certificate: /root/.acme.sh/your-domain.ru_ecc/fullchain.cer
Key: /root/.acme.sh/your-domain.ru_ecc/your-domain.ru.key
```

**7.** Enter these paths in the 3x-ui connection settings in the <kbd>Public key</kbd> and <kbd>Private key</kbd> fields and save the connection.

**8.** The connection is ready. Press the QR code and import it into your VPN client.

<figure><img src="https://docs.f3cloud.com/img/xhttp/step-16.png" alt=""><figcaption></figcaption></figure>

## Step 7. Server security

To set up **fail2ban** for the **3x-ui** panel, do the following:

1. Connect to the server over SSH.
2. Enter `sudo x-ui`.
3. Open the `IP Limit Management` section by entering `21`.
4. Choose `Install Fail2ban and configure IP Limit` and confirm with `y`.

> **Warning.**
>
> Before configuring UFW, move SSH from port **22** to another port using [our guide](https://docs.f3cloud.com/en/vps/security.md). The new port must be opened with `ufw allow YOUR-PORT/tcp`, otherwise **you will lose access to the server**.

Configuring UFW is also required:

* open the connection and panel ports with `ufw allow 443/tcp` and `ufw allow 8080/tcp`;
* enable the firewall with `ufw enable` and confirm with `y`.

Set up the remaining protection measures **without fail** using our [detailed guide](https://docs.f3cloud.com/en/vps/security.md).

## Which client to use

Only clients built on Xray-core support XHTTP. We recommend:

* **Incy** – iPhone, iPad, Mac, Android, Windows, macOS and Linux. Currently available in the Russian App Store;
* **Happ** – all platforms. Removed from the Russian App Store, so iPhone and Mac need an Apple ID from another country;
* **v2rayN** – Windows, macOS and Linux, **v2rayNG** – Android.

Download links are collected in the [Marzban article](https://docs.f3cloud.com/en/vpn-guide/marzban-installation.md#incy). Clients based on the sing-box core (Hiddify, NekoBox, Throne) do not work with XHTTP.

> **Warning.**
>
> On iPhone, VPN apps run with a strict memory limit. XHTTP can cause short spikes in memory use, so the system force-quits the process and the connection drops. If this happens, try another XHTTP mode or the Shadowrocket client (paid).