> The full list of articles is in [llms.txt](https://docs.f3cloud.com/llms.txt). Every page has a Markdown version: add .md to its address. This page as Markdown: [https://docs.f3cloud.com/en/vpn-guide/remnawave-installation.md](https://docs.f3cloud.com/en/vpn-guide/remnawave-installation.md).

# Installing Remnawave on a VPS with a node and VLESS Reality

Step-by-step installation of the Remnawave panel on a VPS, with screenshots. Panel and node on separate servers, Caddy with HTTPS, a VLESS Reality profile, a host with the firefox fingerprint, users, subscriptions, firewall, updates and backups.

**Remnawave** is a panel for managing VPN servers built on the Xray core. It makes it easy to create users, hand out subscriptions, limit traffic and expiry dates, and connect several servers (nodes) to one panel. The project is free, open source and has [official documentation](https://docs.rw).

In this article we have put together the whole installation, from choosing F3 Cloud servers to connecting the first client. The commands come from the official documentation, and we went through the entire installation ourselves on panel version 3.4.5, so the button names and screenshots match what you will see. The firewall settings, backups and camouflage tips are our own additions.

### What Remnawave consists of

* **Panel** – the web interface and API, a PostgreSQL database and a Valkey cache. The panel itself does not carry user traffic.
* **Node** – a lightweight container with the Xray core. Users connect to the nodes. The panel manages nodes over a secure connection.
* **Subscription page** – an optional component. It shows users a nice page with instructions and hides the panel address.

> **The installation order matters.**
>
> Until at least one node is connected to the panel, users will not be able to connect. That is why the installation always follows the same order – panel, reverse proxy, node, profile, host and users.

***

### What you need

#### Two servers

The developers recommend putting the panel and the node on different servers. On a single server, the panel and the node will compete for port 443.\
And if the node's IP address gets blocked, you will lose access to the panel as well.

| Role | Remnawave requirements | Recommended F3 Cloud plan |
| --- | --- | --- |
| Panel | 2 cores and 2 GB RAM or more, ideally 4 cores and 4 GB, 20 GB disk | **DE-RZ9-2** (2 vCPU, 4 GB RAM, 60 GB NVMe) |
| Node | 1 core and 1 GB RAM or more | **DE-Promo** for personal use, **DE-RZ9-1** for a 1 Gbit/s channel |

Install **Ubuntu** or **Debian** on both servers. How to order a server is described in the article [on ordering a virtual server](https://docs.f3cloud.com/en/client-area/order-vps.md).

#### Domain

You will need two A records:

* `panel.your-domain.com` points to the IP address of the panel server;
* `cdn.your-domain.com` points to the IP address of the node server.

A separate name for the node lets you change the server's IP address later without updating your users' subscriptions.

> **Choose neutral names.**
>
> Do not use the words vpn, proxy, xray, vless, reality, remnawave, node or similar ones in the domain and subdomains. The server name is sent in plain text, and such words are easy to match against a list. It is better to use `cdn.example.com`, `photos.example.com` or the domain itself without a subdomain.

> **About Cloudflare.**
>
> The Remnawave documentation suggests proxying the panel domain through Cloudflare if it works reliably in your region. Cloudflare services currently work intermittently from Russia, so we recommend leaving the proxy off (grey cloud).\
> For the node domain, the proxy must always be off, because Reality only works with a direct connection to the server.

***

### 1. Prepare both servers

Connect to each server over SSH, for example with [Termius](https://docs.f3cloud.com/en/vps/termius-connection.md), and run the same commands.

```bash
# Update the system
apt update && apt upgrade -y

# Install Docker with the official script
curl -fsSL https://get.docker.com | sh

# Check that Docker and the Compose plugin work
docker --version && docker compose version
```

If both commands showed their versions, Docker is ready.

<figure><img src="https://docs.f3cloud.com/img/remnawave-docker.png" alt="Docker and Docker Compose versions"><figcaption><p>Docker and Compose are installed</p></figcaption></figure>

***

### 2. Install the panel

Run all the commands in this step **on the panel server**.

```bash
# Create a folder and download the official docker-compose.yml and .env files
mkdir /opt/remnawave && cd /opt/remnawave
curl -o docker-compose.yml https://raw.githubusercontent.com/remnawave/backend/refs/heads/main/docker-compose-prod.yml
curl -o .env https://raw.githubusercontent.com/remnawave/backend/refs/heads/main/.env.sample
```

Generate the secret keys. The command writes random values into the `.env` file for you.

```bash
sed -i "s/^APP_SECRET=.*/APP_SECRET=$(openssl rand -hex 64)/" .env && sed -i "s/^METRICS_PASS=.*/METRICS_PASS=$(openssl rand -hex 64)/" .env && sed -i "s/^WEBHOOK_SECRET_HEADER=.*/WEBHOOK_SECRET_HEADER=$(openssl rand -hex 64)/" .env
```

Change the database password. The developers strongly recommend not keeping the default one.

```bash
pw=$(openssl rand -hex 24) && sed -i "s/^POSTGRES_PASSWORD=.*/POSTGRES_PASSWORD=$pw/" .env && sed -i "s|^\(DATABASE_URL=\"postgresql://postgres:\)[^\@]*\(@.*\)|\1$pw\2|" .env
```

Open the `.env` file with `nano .env` and enter your domain in three lines.

```ini
FRONT_END_DOMAIN=panel.your-domain.com
PANEL_DOMAIN=panel.your-domain.com
SUB_PUBLIC_DOMAIN=panel.your-domain.com/api/sub
```

Do not add `https://` or a trailing slash to `SUB_PUBLIC_DOMAIN`. Save the file with <kbd>Ctrl</kbd> + <kbd>O</kbd>.\
Close the editor with <kbd>Ctrl</kbd> + <kbd>X</kbd>.

Start the panel and watch the startup log.

```bash
docker compose up -d && docker compose logs -f -t
```

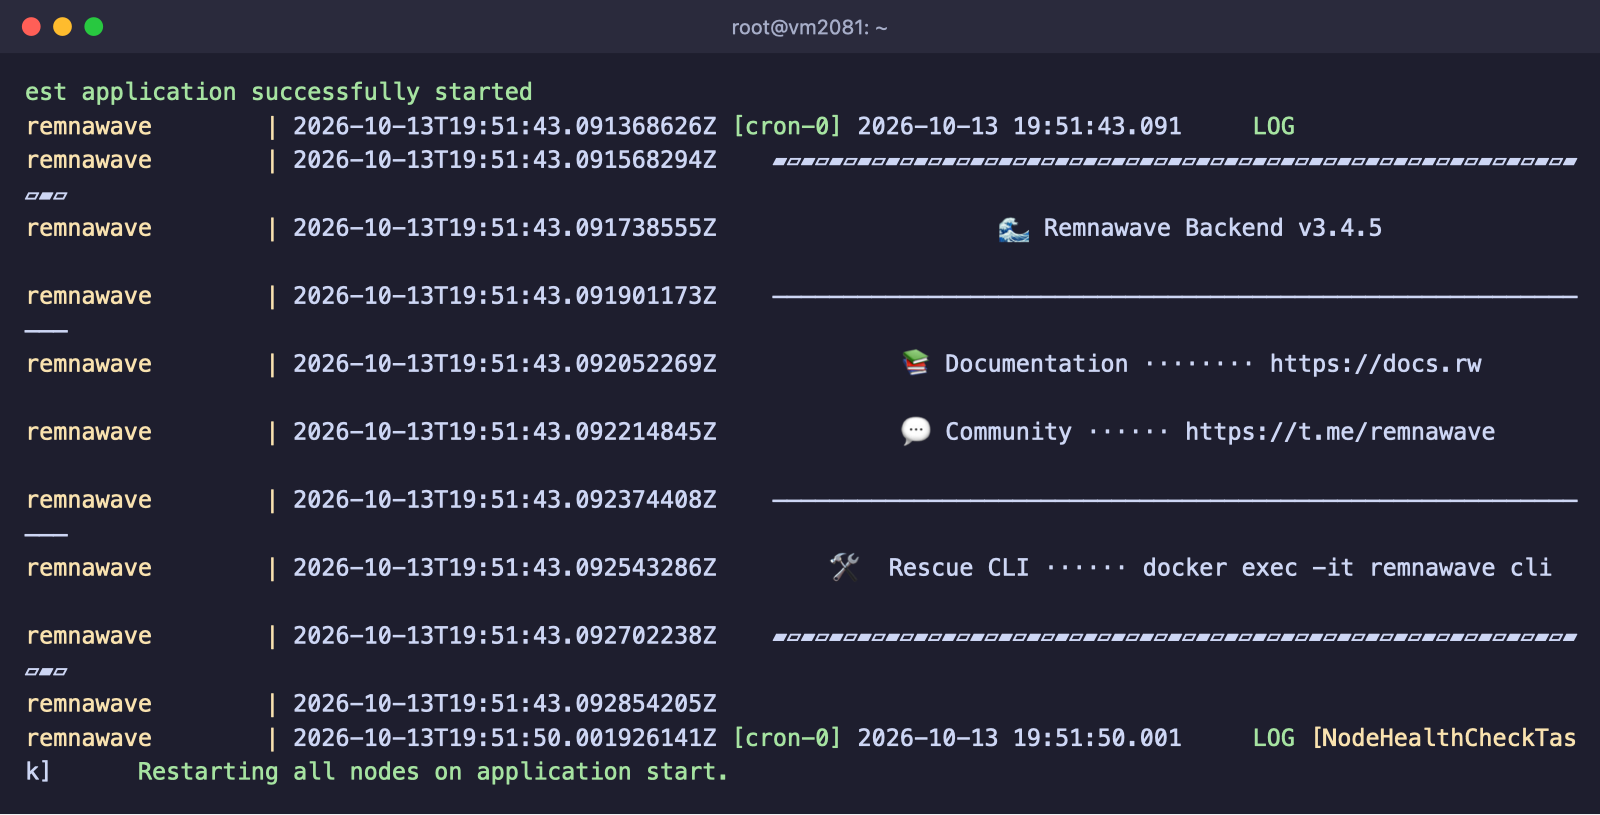
When the Remnawave banner with the version number appears in the log, the panel has started. Leave the log view with <kbd>Ctrl</kbd> + <kbd>C</kbd>, and the containers will keep running.

<figure><img src="https://docs.f3cloud.com/img/remnawave-panel-start.png" alt="Remnawave panel startup log with version 3.4.5"><figcaption><p>The panel has started</p></figcaption></figure>

> **Do not expose the services to the internet.**
>
> All Remnawave services listen only on `127.0.0.1` and cannot be reached from the internet directly. Do not change this in `docker-compose.yml`. The panel must only be reached through the reverse proxy from the next step.

> **If you have changed .env.**
>
> After any change to `.env`, recreate the containers with `docker compose down && docker compose up -d` rather than simply restarting them.

***

### 3. Set up Caddy and HTTPS

Remnawave supports Caddy, Nginx and Traefik. Caddy is the easiest to set up, because it obtains and renews the Let's Encrypt certificate by itself.

```bash
# Create a folder and a Caddy configuration file
mkdir -p /opt/remnawave/caddy && cd /opt/remnawave/caddy && nano Caddyfile
```

Paste the settings below into the file, replacing the domain with your own.

```text
https://panel.your-domain.com {
        encode
        reverse_proxy * http://remnawave:3000
}
:443 {
    tls internal
    respond 204
}
```

The second block answers with an empty page to any request that is not for your domain, for example when someone scans by IP address.

Next to it, create a `docker-compose.yml` file for Caddy with `nano docker-compose.yml` and paste the following into it.

```yaml
services:
  caddy:
    image: caddy:2.9
    container_name: 'caddy'
    hostname: caddy
    restart: always
    ports:
      - '0.0.0.0:443:443'
      - '0.0.0.0:80:80'
    networks:
      - remnawave-network
    volumes:
      - ./Caddyfile:/etc/caddy/Caddyfile
      - caddy-ssl-data:/data

networks:
  remnawave-network:
    name: remnawave-network
    driver: bridge
    external: true

volumes:
  caddy-ssl-data:
    driver: local
    external: false
    name: caddy-ssl-data
```

Start Caddy.

```bash
docker compose up -d && docker compose logs -f -t
```

After a minute, open `https://panel.your-domain.com` in a browser. You should see the panel registration page with a valid certificate.

***

### 4. Register the administrator

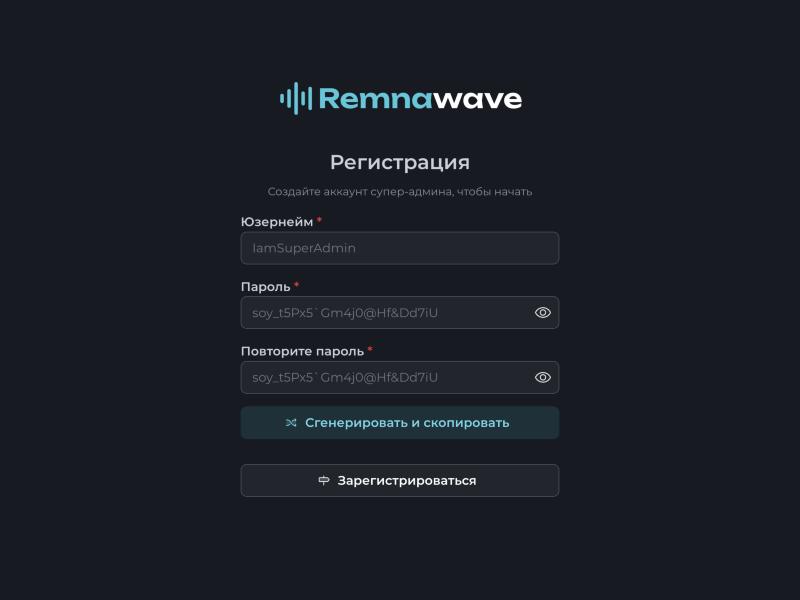
The first time you open the panel, it offers to create a super-admin account. **The first registered user becomes the main administrator**, so register right after Caddy is running.

Choose a username, then press <kbd>Generate & copy</kbd> so that the panel creates a strong password for you, and save it in a password manager straight away. Then press <kbd>Sign up</kbd>.

<figure><img src="https://docs.f3cloud.com/img/remnawave-register.jpg" alt="Remnawave administrator registration page"><figcaption><p>Registering the main administrator</p></figcaption></figure>

> **If you have lost access to the panel.**
>
> If you lose access to the panel, you can reset the administrator with the built-in recovery tool. Run `docker exec -it remnawave cli` on the panel server.

***

### 5. Connect the node

On the **node server**, create a folder for it.

```bash
mkdir /opt/remnanode && cd /opt/remnanode
```

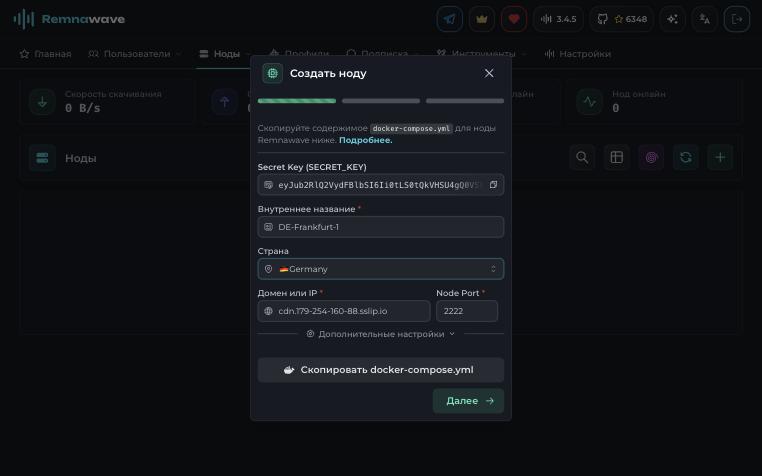
In the panel, open **Nodes** and press <kbd>+</kbd>. Fill in the form:

* **Internal name** – any name that makes sense to you, for example `DE-Frankfurt-1`;
* **Country** – the server's country, users will see its flag;
* **Domain or IP** – the node address, for example `cdn.your-domain.com`;
* **Node Port** – the port the panel uses to manage the node. The default is `2222`.

<figure><img src="https://docs.f3cloud.com/img/remnawave-node-create.jpg" alt="Node creation form in Remnawave"><figcaption><p>Creating a node</p></figcaption></figure>

Press <kbd>Copy docker-compose.yml</kbd>. The panel copies a ready-made file that looks roughly like this.

```yaml
services:
  remnanode:
    container_name: remnanode
    hostname: remnanode
    image: remnawave/node:latest
    network_mode: host
    restart: always
    cap_add:
      - NET_ADMIN
    ulimits:
      nofile:
        soft: 1048576
        hard: 1048576
    environment:
      - NODE_PORT=2222
      - SECRET_KEY="key from the panel"
```

On the node server, open the editor with `nano docker-compose.yml`, paste the copied content, save the file and start the node.

```bash
docker compose up -d && docker compose logs -f -t
```

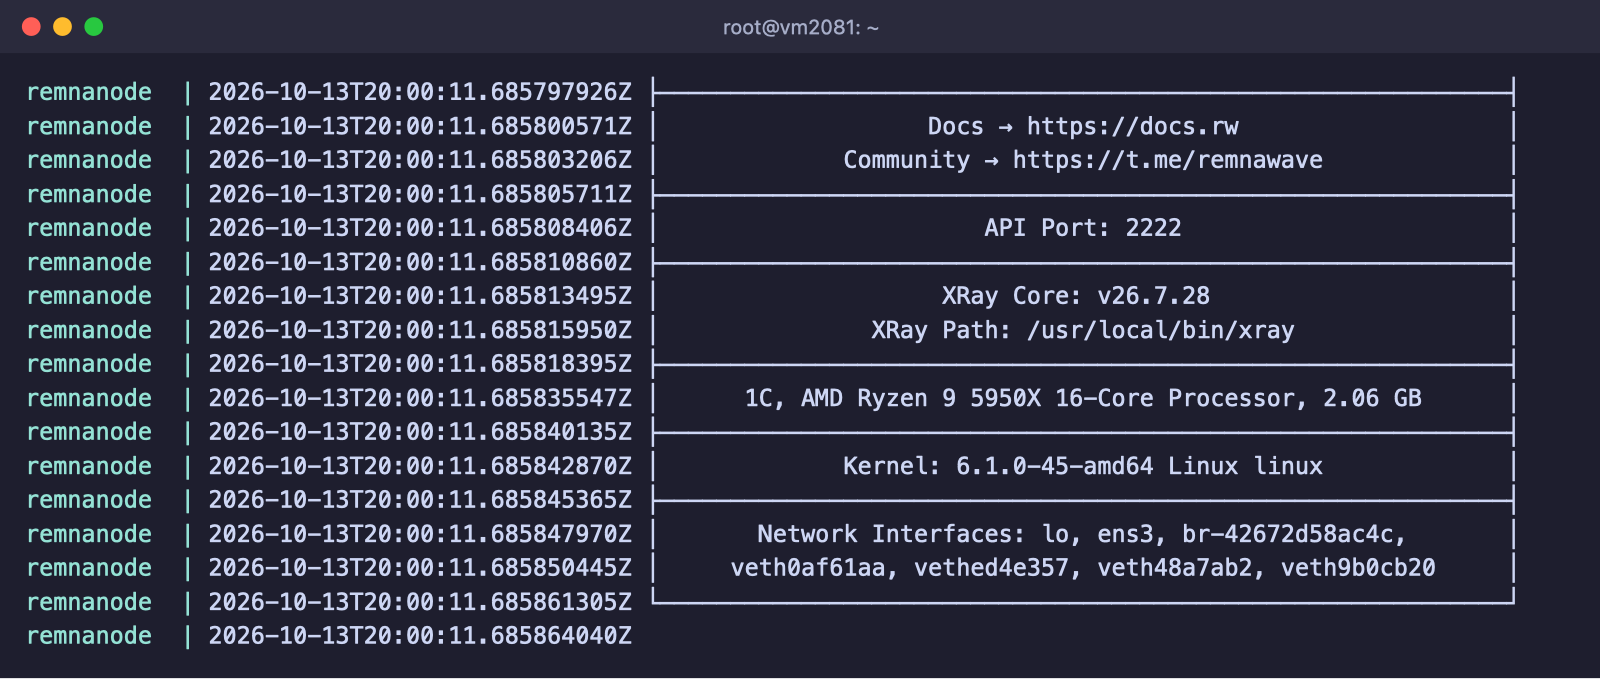
The log will show a table with the API port, the Xray version and the server specifications. This means the node has started and is waiting for the panel.

<figure><img src="https://docs.f3cloud.com/img/remnawave-node-start.png" alt="Remnawave node startup log with the Xray version"><figcaption><p>The node has started</p></figcaption></figure>

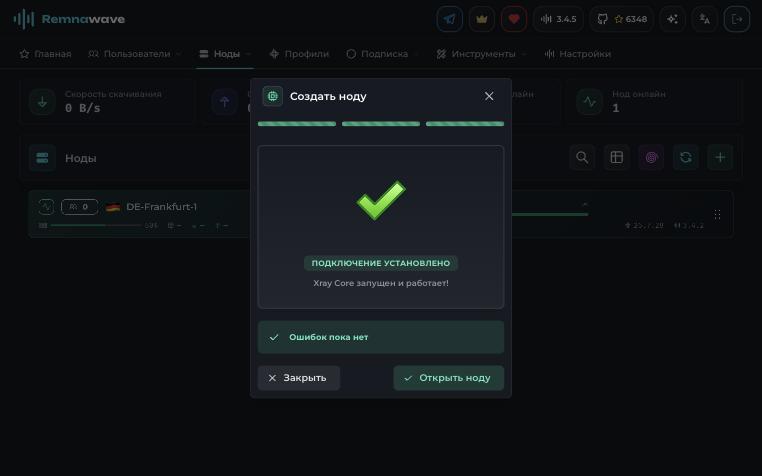
Go back to the panel and press <kbd>Next</kbd>. At the **Core configuration** step, press <kbd>Select</kbd> and tick the default profile `Default-Profile` for now. We will create the working profile in the next step. Press <kbd>Create node</kbd>. After a few seconds you will see the message “Connection successful. Xray Core is up and running!”.

<figure><img src="https://docs.f3cloud.com/img/remnawave-node-ok.jpg" alt="Message about a successful node connection"><figcaption><p>The panel has connected to the node</p></figcaption></figure>

> **Close the node port to outsiders.**
>
> The node port is only needed by the panel. Allow connections to it only from the panel server's IP address. The commands are in the “Firewall” section below.

***

### 6. Create a VLESS Reality profile

By default the panel creates the `Default-Profile` profile with a single Shadowsocks inbound. To get around blocking, add a VLESS Reality profile.

1. Open **Config Profiles**, press <kbd>+</kbd>, enter a profile name, for example `VLESS-Reality`, and press <kbd>Create</kbd>. The profile editor will open.
2. Below the editor, next to the <kbd>Format</kbd> button, press the menu button and choose **Load from GitHub**.
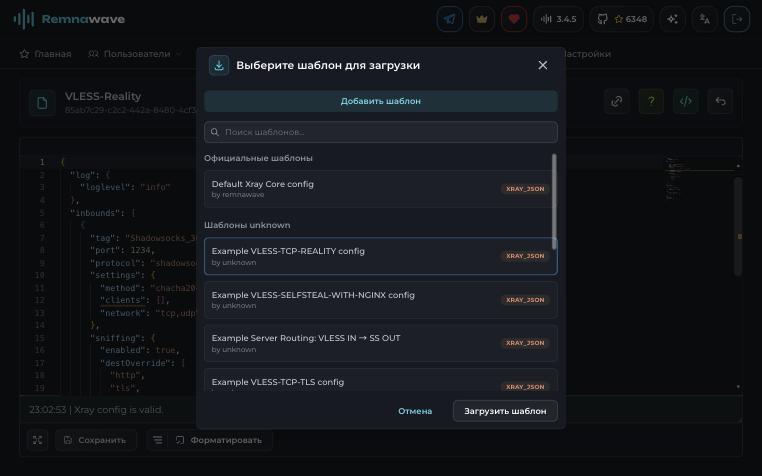
3. Choose the **Example VLESS-TCP-REALITY config** template and press <kbd>Load template</kbd>. It already contains the `VLESS_TCP_REALITY` inbound on port 443.

<figure><img src="https://docs.f3cloud.com/img/remnawave-template.jpg" alt="Choosing the VLESS-TCP-REALITY template"><figcaption><p>Choosing a profile template</p></figcaption></figure>

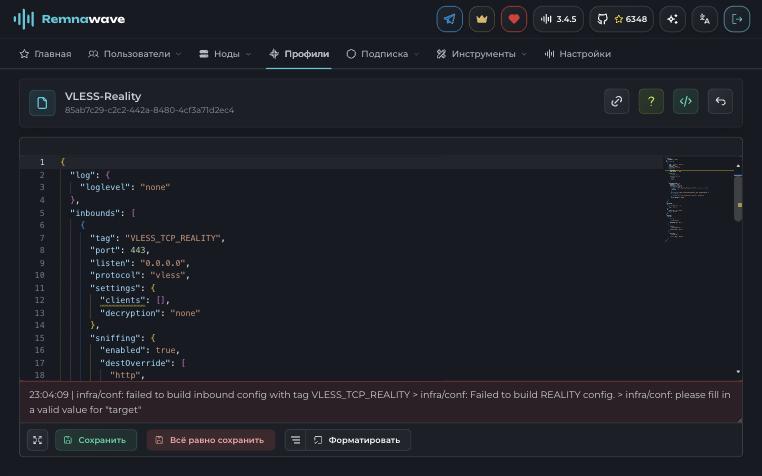
Right after loading, the panel highlights the error `please fill in a valid value for "target"`. This is normal, because the template still needs a few values.

<figure><img src="https://docs.f3cloud.com/img/remnawave-profile.jpg" alt="Profile editor with the Reality template loaded"><figcaption><p>The template is loaded, only the Reality fields are left to fill in</p></figcaption></figure>

The easiest way to generate the Reality keys is right on the node server.

```bash
# Create a Reality key pair. Paste the PrivateKey value into the privateKey field
docker exec remnanode xray x25519

# Create a value for the shortIds array
openssl rand -hex 8
```

In the `realitySettings` block, fill in these fields:

* `privateKey` – the **PrivateKey** value from the first command;
* `shortIds` – the value from the second command, inside the square brackets and quotes;
* `target` and `serverNames` – the address of the camouflage site and its name, see the warning below for details.

The message `Xray config is valid` should appear at the bottom of the editor. Press <kbd>Save</kbd>.

> **Do not imitate big third-party sites.**
>
> Do not put sites such as google.com, microsoft.com or apple.com in `target` and `serverNames`, because this is one of the main signs servers are being blocked by today. The most reliable option is to imitate your own domain with the self-steal scheme. To do this, install nginx with a site on your domain on the node server, set `target` to `127.0.0.1:8443`, put your domain in `serverNames` and set `xver: 0`. Step-by-step instructions are in the article [about self-steal for VLESS Reality](https://docs.f3cloud.com/en/vpn-guide/reality-self-steal.md).

Now all that is left is to enable the new inbound for the node and the users.

1. In **Nodes**, open your node, press the edit button in the **Core configuration** block, tick the `VLESS-Reality` profile and save the node.
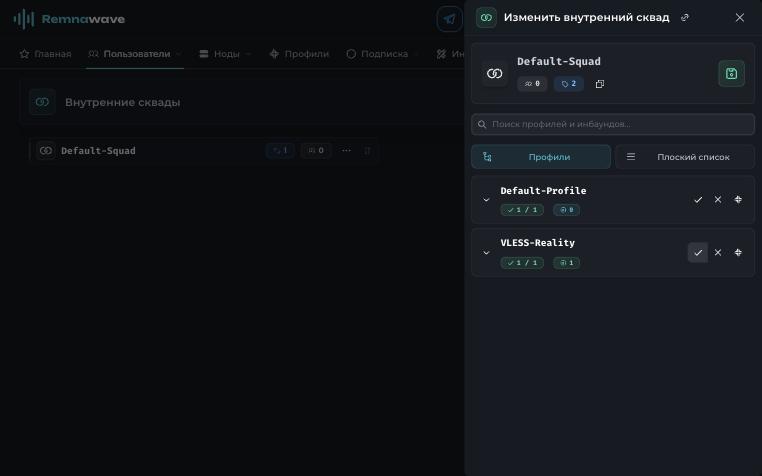
2. Open **Users → Internal Squads**, click `Default-Squad`, tick the `VLESS-Reality` profile and save. Without this, users will not receive the new inbound.

<figure><img src="https://docs.f3cloud.com/img/remnawave-squad.jpg" alt="Enabling the VLESS-Reality profile in an internal squad"><figcaption><p>The VLESS-Reality profile is enabled in Default-Squad</p></figcaption></figure>

***

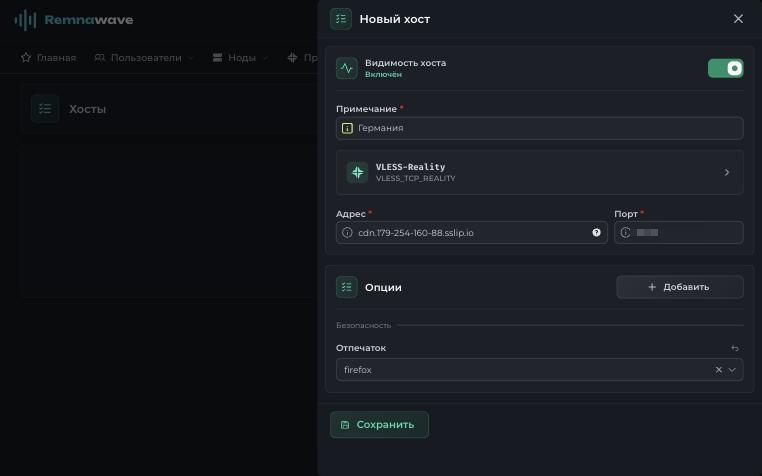
### 7. Create a host

The host defines which address and which parameters users get in their subscription.

1. Open **Subscription → Hosts** and press <kbd>+</kbd>.
2. Turn on the **Host visibility** switch. It is off by default, and a hidden host does not get into the subscription.
3. In the **Remark** field, enter a name users will understand, for example “Germany”.
4. Click the **No inbound selected** block, tick `VLESS_TCP_REALITY` and confirm your choice. The port fills in automatically.
5. In the **Address** field, enter `cdn.your-domain.com`.
6. In the **Options** block, press <kbd>Add</kbd>, choose **Fingerprint** and set it to `firefox`.
7. Press <kbd>Save</kbd>.

<figure><img src="https://docs.f3cloud.com/img/remnawave-host.png" alt="New host form with the firefox fingerprint"><figcaption><p>A host with the firefox fingerprint</p></figcaption></figure>

> **Why firefox and not chrome.**
>
> Since late 2025, the traffic filtering systems of Russian ISPs (TSPU) judge a TLS connection by several signs at once, namely the hosting subnet, the site name (SNI) and the client fingerprint. The `chrome` fingerprint is the default in almost every VPN app and panel, so the combination of “Chrome fingerprint and data-centre IP address” has become a reliable proxy marker for the filters. Users report that with several simultaneous connections using this fingerprint, the connection “freezes” for a few minutes, and switching to `firefox` helps.
>
> The `edge` fingerprint used to help as well, but since September 2026 it has been incompatible with new Xray versions. Starting with Xray 26.9.8 (included, for example, in 3X-UI 3.8.0 and later), a Reality server only accepts clients with post-quantum ML-KEM key exchange. The `edge` profile in Xray corresponds to the old Edge 85 without ML-KEM, so a connection with it will not be established. The `firefox` profile supports ML-KEM if the app has Xray core 26.3.23 or newer, so keep your clients up to date. Do not use `random` or `randomized` either, because they may pick a profile without ML-KEM.

***

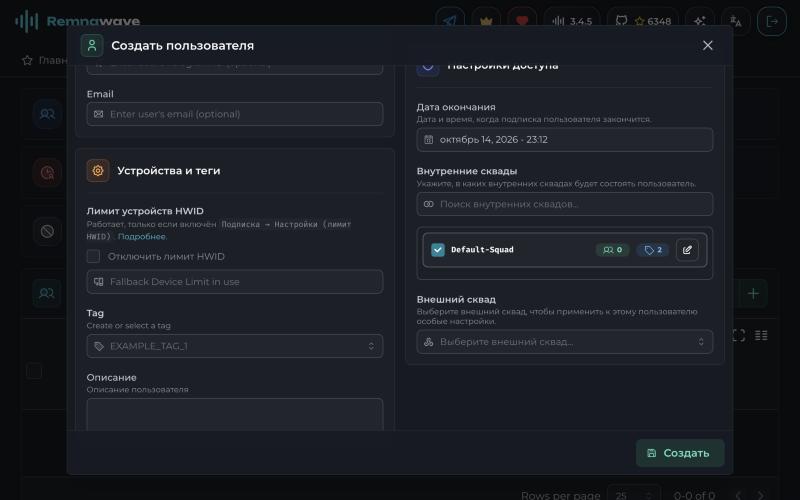
### 8. Create a user and a subscription

1. Open **Users** and press <kbd>+</kbd>.
2. Enter a **Username** without spaces. You will not be able to change it later.
3. Set the **Traffic limit**, where `0` means unlimited.
4. Check the **Expiry date**, because by default the panel sets a period of one day.
5. In the **Internal squads** block, tick `Default-Squad`.
6. Press <kbd>Create</kbd>.

<figure><img src="https://docs.f3cloud.com/img/remnawave-user-create.jpg" alt="User creation form with Default-Squad selected"><figcaption><p>Creating a user</p></figcaption></figure>

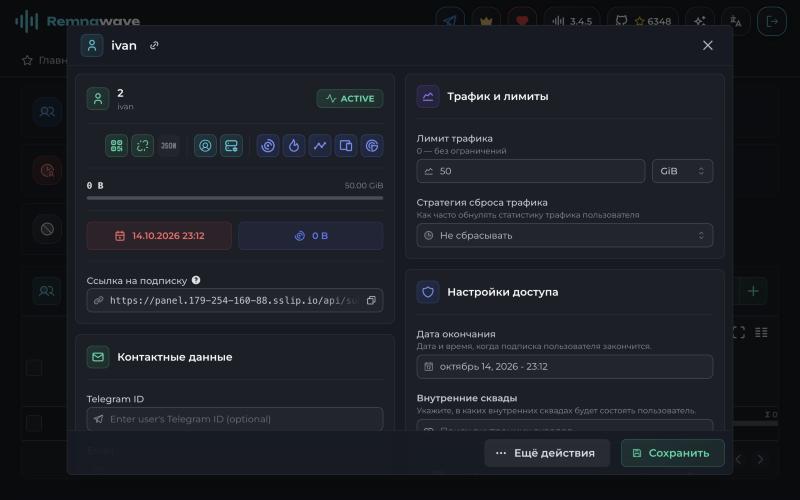
Open the user you have created. Their card has a **Subscription URL** field that looks like `https://panel.your-domain.com/api/sub/identifier`, with a copy button next to it. This is the link to send to the user.

<figure><img src="https://docs.f3cloud.com/img/remnawave-user.jpg" alt="User card with the subscription link"><figcaption><p>The user card and the subscription link</p></figcaption></figure>

***

### Connecting a client

Copy the subscription link from the user card and import it into the app, as shown in the [import instructions](https://docs.f3cloud.com/en/vpn-guide/marzban-installation.md#step-4.-connect-to-the-vpn). The subscription updates itself, so users do not need to set anything up again when the server changes.

***

### Firewall

The official documentation has no firewall commands, so here is our UFW-based setup. If you have moved SSH to another port, use it instead of `22`.

#### Panel server

```bash
ufw allow 22/tcp
ufw allow 80/tcp
ufw allow 443/tcp
ufw enable
```

#### Node server

```bash
# Replace PANEL_IP with the IP address of the panel server
ufw allow 22/tcp
ufw allow 443/tcp
ufw allow from PANEL_IP to any port 2222 proto tcp
ufw enable
```

Other protective measures are described in the article [on protecting a server from unauthorised access](https://docs.f3cloud.com/en/client-area/protect-vps-from-unauthorised-access.md).

***

### Subscription page (optional)

A separate subscription page hides the panel address from users and shows them connection instructions. It can run on the same server as the panel.

1. Add an A record for the subscription domain, for example `sub.your-domain.com`, and set it in the `SUB_PUBLIC_DOMAIN` variable in `/opt/remnawave/.env`. Then recreate the panel container with `cd /opt/remnawave && docker compose down remnawave && docker compose up -d`.
2. Create a token in **Remnawave Settings → API tokens**.
3. Create the `/opt/remnawave/subscription` folder with a `.env` file in it.

```ini
APP_PORT=3010
REMNAWAVE_PANEL_URL=http://remnawave:3000
REMNAWAVE_API_TOKEN=token_from_the_panel
```

4. Create a `docker-compose.yml` file in the same folder.

```yaml
services:
  remnawave-subscription-page:
    image: remnawave/subscription-page:latest
    container_name: remnawave-subscription-page
    hostname: remnawave-subscription-page
    restart: always
    env_file:
      - .env
    ports:
      - '127.0.0.1:3010:3010'
    networks:
      - remnawave-network

networks:
  remnawave-network:
    driver: bridge
    external: true
```

5. Start the page with `docker compose up -d` and add a new block to `/opt/remnawave/caddy/Caddyfile`.

```text
https://sub.your-domain.com {
        encode
        reverse_proxy * http://remnawave-subscription-page:3010
}
```

6. Restart Caddy with `cd /opt/remnawave/caddy && docker compose down && docker compose up -d`.

***

### Updating

Update the panel first, then the nodes.

```bash
# On the panel server
cd /opt/remnawave && docker compose pull && docker compose down && docker compose up -d
docker image prune
```

```bash
# On the node server
cd /opt/remnanode && docker compose pull && docker compose down && docker compose up -d
```

If you have installed the subscription page, update it too with the same command from the `/opt/remnawave/subscription` folder.

***

### Backups

Remnawave has no official backup guide. It is enough to save the database and the configuration files, because the Valkey cache keeps nothing important on disk. This is how we do it.

```bash
cd /opt/remnawave
# Save the database to a file with today's date
docker exec remnawave-db pg_dump -U postgres postgres > backup-$(date +%F).sql
# Save the configuration files to an archive
tar czf remnawave-config-$(date +%F).tar.gz .env docker-compose.yml caddy/Caddyfile
```

Download the copies to your computer or to other storage, because a copy on the same server will not help if something happens to it. We cover backups in more detail in a [separate article](https://docs.f3cloud.com/en/client-area/protect-vps-from-unauthorised-access/backups.md).

***

### Common problems

<details>

<summary>The panel does not open</summary>

Check that the A record of the panel domain points to the server's IP address. Then look at the logs with `docker compose logs` in the `/opt/remnawave` and `/opt/remnawave/caddy` folders. If Caddy could not obtain a certificate, its log will show the reason.

</details>

<details>

<summary>The node does not connect to the panel</summary>

Make sure that port `2222` on the node server is open for the panel's IP address and that `SECRET_KEY` has been copied into `docker-compose.yml` in full. You can view the node log with `docker compose logs` in the `/opt/remnanode` folder.

</details>

<details>

<summary>The profile does not save, an error about target</summary>

The message `please fill in a valid value for "target"` means that the template fields in the `realitySettings` block have not been filled in. Fill in `target`, `serverNames`, `privateKey` and `shortIds` as described in step 6.

</details>

<details>

<summary>SPAWN_ERROR: xray error</summary>

Xray on the node could not start with this profile, most often because of a mistake in the settings or a port that is already in use. Check the Xray log with `docker exec remnanode xlogs` and fix the profile.

</details>

<details>

<summary>The user does not see the server in the subscription</summary>

Check three things. The profile is enabled in `Default-Squad`, the user belongs to this squad, and the **Host visibility** switch is on for the host. By default a new host is created with it turned off.

</details>

<details>

<summary>The connection works, but sites do not open</summary>

Check that `serverNames`, the keys and `shortIds` in the profile match what the client receives, and that the node's IP address is not blocked by the provider.

</details>

***

### Our resources

**Telegram channel:** [https://t.me/f3cloud_news](https://t.me/f3cloud_news)\
**F3 Cloud:** [https://f3cloud.com](https://f3cloud.com/en)