> The full list of articles is in [llms.txt](https://docs.f3cloud.com/llms.txt). Every page has a Markdown version: add .md to its address. This page as Markdown: [https://docs.f3cloud.com/en/proxy-guide/proxy-server-configuration.md](https://docs.f3cloud.com/en/proxy-guide/proxy-server-configuration.md).
# Your own HTTP(S) and SOCKS5 proxy on a VPS with 3proxy
How to create your own HTTP(S) and SOCKS5 proxy server on a VPS with 3Proxy. Quick setup with the ready-made F3 Cloud script in half a minute, or a manual build with config, autostart and users.
**3proxy** is a lightweight proxy server that works both as an HTTP(S) proxy and as a SOCKS5 proxy. On your own VPS you get proxies that only you use, going out to the internet through the server's IP address.
Below are two ways.\
The first is the ready-made **3proxy Manager** script, which installs and configures everything by itself.\
The second is a manual installation, if you want to understand the settings.
***
## Method 1. Installing with the 3proxy Manager script
The script supports Debian 11 and newer, Ubuntu 20.04 and newer, AlmaLinux, Rocky Linux and CentOS Stream 8 and newer. Its source code is open and available [on GitHub](https://github.com/f3cloud-host/3Proxy).
### Step 1. Install 3proxy
Connect to the server [over SSH](https://docs.f3cloud.com/en/vps/termius-connection.md) as root, download the script and run it.
```bash
cd /root && curl -fsSL -o 3proxy.sh https://raw.githubusercontent.com/f3cloud-host/3Proxy/main/3proxy.sh && chmod +x 3proxy.sh
/root/3proxy.sh
```
> **The script menu is in Russian.**
>
> The script menu is in Russian, so below we translate every prompt and menu item and you can follow along without knowing the language. Answers are typed in Latin letters: `y` for yes and `n` for no.
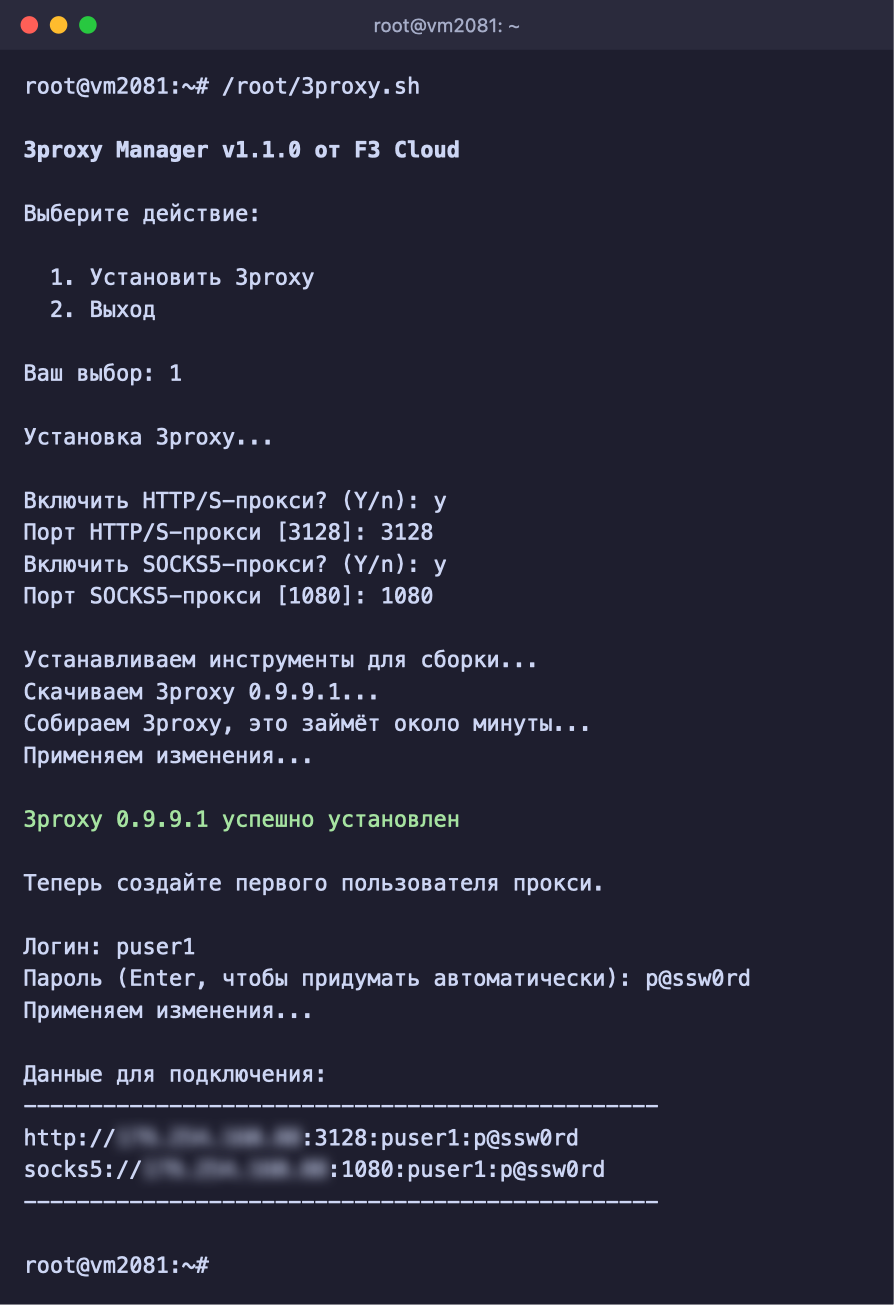
Type `1` (**Установить 3proxy**, install 3proxy) and press Enter. The script asks four questions:
1. **Включить HTTP/S-прокси?** Enable the HTTP(S) proxy? Answer `y` or `n`.
2. **Порт HTTP/S-прокси**, its port, 3128 by default.
3. **Включить SOCKS5-прокси?** Enable the SOCKS5 proxy? Answer `y` or `n`.
4. **Порт SOCKS5-прокси**, its port, 1080 by default.
To keep the defaults, just press Enter four times. The script then downloads and builds 3proxy, which takes about half a minute.
> **HTTP(S) and SOCKS5 need different ports.**
>
> The script will not let you pick the same port for both proxies, or a port that another program already uses. If the ufw or firewalld firewall is enabled on the server, the chosen ports are opened in it automatically.
Right after installation the script asks you to create the first user. Enter a login at **Логин**, then a password at **Пароль**. If you press Enter instead of a password, the script generates a strong one for you.
3proxy is installed and the first user is created
At the end, under **Данные для подключения** (connection details), you get one ready-to-use line per proxy. The proxies start working right away.
***
### Step 2. Add users
It is best to create a separate user for everyone you give access to. That way you can cut off any of them without touching the rest.
Run the script again with `/root/3proxy.sh`. Now it shows the management menu.
| Item | What it does |
| --- | --- |
| `1` Добавить пользователя | Adds a user |
| `2` Удалить пользователя | Deletes a user, their access stops immediately |
| `3` Список пользователей | Shows all users and their passwords |
| `4` Удалить 3proxy | Removes 3proxy from the server completely |
| `5` Выход | Closes the menu |
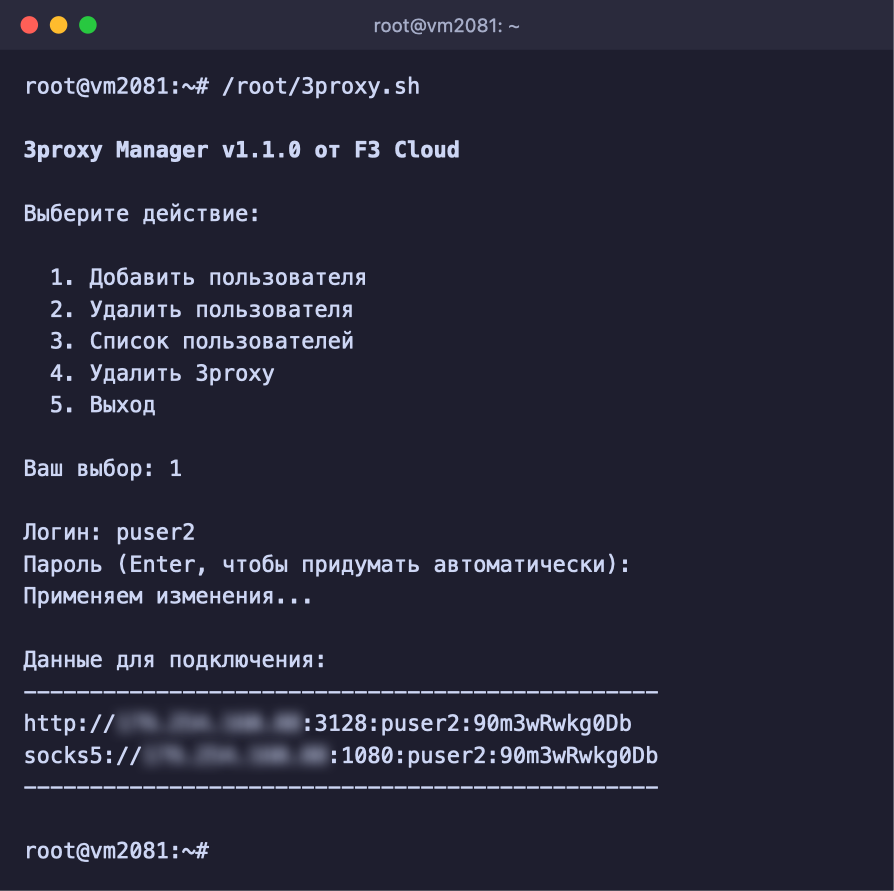
Type `1`, then the login and password of the new user.
A new user with a password generated by the script
***
### Step 3. View the list of users
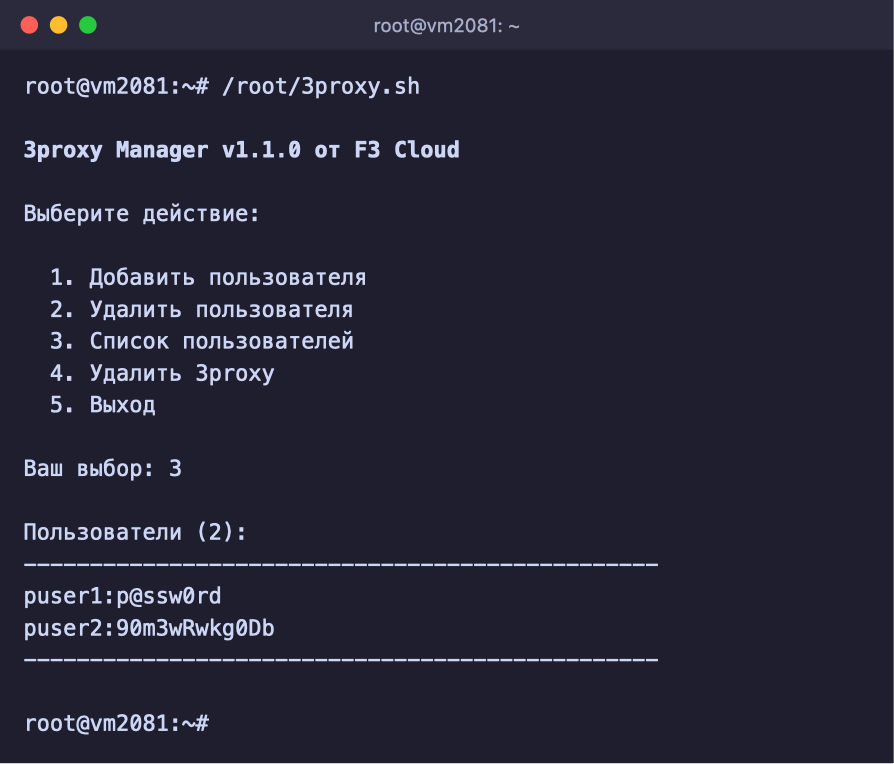
If you forgot a login or password, run `/root/3proxy.sh` and type `3`.
The list of users with passwords
***
### How to connect to the proxy
The connection details look like this:
* `http://IP:port:login:password` for the HTTP(S) proxy;
* `socks5://IP:port:login:password` for the SOCKS5 proxy.
The line lists, in order, the proxy type, the server IP address, the port, the login and the password. If a program asks you to fill in the fields separately, copy them from this line.
You can check that the proxy works right from your home computer. The command should print your server's IP address.
```bash
# Put in the server IP address, login and password
curl -x http://SERVER_IP:3128 --proxy-user login:password https://api.ipify.org
```
The proxy does not connect
Check that the service is running with `systemctl status 3proxy`; the **Active** line should say `active (running)`. If you enabled a firewall after installing 3proxy, open the proxy ports in it, for example `ufw allow 3128/tcp`.
Error 407 or a wrong login and password
The proxy responds but does not accept the login or password. Compare them with the user list in item `3` of the script menu. Logins and passwords are case-sensitive.
How to change the port
The easiest way is to remove 3proxy with item `4` of the menu and install it again with new ports. You will then need to create the users again.
***
## Method 2. Manual installation and configuration of 3proxy
This method repeats what the script does, only you run each step yourself. The commands below are for Debian and Ubuntu.
### Step 1. Build 3proxy
```bash
# Install the build tools
apt update && apt install -y build-essential curl
# Download the 3proxy sources and verify the archive checksum
cd /root
curl -fsSL -o 3proxy-0.9.9.1.tar.gz https://github.com/3proxy/3proxy/releases/download/0.9.9.1/3proxy-0.9.9.1.tar.gz
echo "13711040af096f09d5202b0cb516ec08db7c08130ed21719063d2e570215fb34 3proxy-0.9.9.1.tar.gz" | sha256sum -c
# Build and install the program
tar xzf 3proxy-0.9.9.1.tar.gz
cd 3proxy-0.9.9.1
make -f Makefile.Linux
install -m 755 bin/3proxy /usr/local/bin/3proxy
```
If the checksum check prints `3proxy-0.9.9.1.tar.gz: OK`, the archive downloaded intact. The build takes less than a minute.
> **AlmaLinux and CentOS use a different first command.**
>
> On AlmaLinux and CentOS, install the tools with `dnf install -y gcc make tar curl` instead of `apt`. The other steps are the same.
We use version 0.9.9.1 from the LTS branch, which only receives bug fixes. You can check for updates on the [3proxy releases page](https://github.com/3proxy/3proxy/releases).
***
### Step 2. Create a user for the proxy
So that the proxy does not run as root, create a separate system user for it with no login.
```bash
useradd --system --no-create-home --shell /usr/sbin/nologin proxy3
```
***
### Step 3. Create the configuration file
Copy the whole command and run it. It fills in the proxy3 user IDs by itself.
```bash
mkdir -p /etc/3proxy
cat > /etc/3proxy/3proxy.cfg < /etc/3proxy/passwd <<'EOF'
puser1:CL:p@ssw0rd
EOF
# Hide the files with passwords from other users of the server
chmod 600 /etc/3proxy/passwd /etc/3proxy/3proxy.cfg
```
To add users later, open the file with `nano /etc/3proxy/passwd`, add lines, save with Ctrl + O, exit with Ctrl + X and restart the proxy with `systemctl restart 3proxy`.
> **The users file must not be empty.**
>
> If `/etc/3proxy/passwd` has no lines at all, 3proxy will not start. Keep at least one user in it.
***
### Step 5. Run the proxy as a service
The service keeps the proxy running in the background and starts it again after the server reboots.
```bash
cat > /etc/systemd/system/3proxy.service <<'EOF'
[Unit]
Description=3proxy proxy server
After=network-online.target
Wants=network-online.target
[Service]
Type=simple
ExecStart=/usr/local/bin/3proxy /etc/3proxy/3proxy.cfg
Restart=on-failure
RestartSec=3
LimitNOFILE=65536
[Install]
WantedBy=multi-user.target
EOF
systemctl daemon-reload
systemctl enable --now 3proxy
```
Check that the service is running with `systemctl status 3proxy`; the **Active** line should say `active (running)`. If a firewall is enabled on the server, open the proxy ports in it, for example `ufw allow 3128/tcp` and `ufw allow 1080/tcp`.
***
### Step 6. Connect and remove the installation files
The connection details are made of the server IP address, the port, the login and the password.
```text
http://SERVER_IP:3128:puser1:p@ssw0rd
socks5://SERVER_IP:1080:puser1:p@ssw0rd
```
You can check the proxy with the same `curl` command as in the first method. Once everything works, delete the sources, they are no longer needed.
```bash
rm -rf /root/3proxy-0.9.9.1 /root/3proxy-0.9.9.1.tar.gz
```
***
## Our resources
**Telegram channel:** [https://t.me/f3cloud_news](https://t.me/f3cloud_news)
\
**F3 Cloud:** [https://f3cloud.com](https://f3cloud.com/en)