> The full list of articles is in [llms.txt](https://docs.f3cloud.com/llms.txt). Every page has a Markdown version: add .md to its address. This page as Markdown: [https://docs.f3cloud.com/en/games/teamspeak-server.md](https://docs.f3cloud.com/en/games/teamspeak-server.md).

# TeamSpeak server on a VPS – installation, admin key, ports and backups

How to create a TeamSpeak voice server on a VPS. Installing TeamSpeak 3 Server on Debian from the official archive, a separate user and a systemd service, accepting the licence, the privilege key and the ServerQuery password, opening ports 9987, 30033 and 10011 in UFW, checking the ports from outside, connecting with a client, updating and backups. A separate section covers the TeamSpeak 6 Server beta in Docker. Tested on Debian 12 with TeamSpeak 3 Server 3.13.8.

Your own TeamSpeak voice server on a VPS runs around the clock, so friends or your team can join the right channel at any time, even when your computer is switched off. You decide how many channels there are, who can speak in them and who gets admin rights. In this article we will install the server from the official archive, run it as a separate user under systemd, find the admin key and the ServerQuery password, open the ports, check them from outside, connect with a client and set up backups. At the end there is a section about the TeamSpeak 6 Server beta. We repeated every step on a test server with Debian 12, and the server version at the time of testing was **TeamSpeak 3 Server 3.13.8**.

***

## How a TeamSpeak server works

A TeamSpeak server is a program that receives voice from the speaker and passes it on to everyone sitting in the same channel. The server does not mix the voice streams, so when several people talk at once, it receives several streams and sends all of them to every listener. This has a simple consequence for the network. Incoming traffic on the server is small, while outgoing traffic grows with the number of listeners and the number of people speaking at the same time, and it is the outgoing bandwidth that determines how many people your server can handle. Voice travels over the UDP protocol to port **9987**. UDP does not wait for an acknowledgement of every packet, and in a live conversation a late packet is no longer needed anyway, so the delay is lower than with TCP. Besides voice, the server listens on several more ports. Clients use **30033/tcp** to transfer files, avatars and channel icons. **10011/tcp** is used by ServerQuery, a text management console that bots, panels and the administrator themselves talk to. The official TeamSpeak documentation treats only 9987/udp and 30033/tcp as required and the ServerQuery ports as optional, and we will do the same in the firewall.

TeamSpeak has no accounts with a login and password. When a client starts for the first time, it creates a key pair, and the server recognises a person by a unique identity derived from the public key. Permissions are tied to this identity, and the nickname is only a label on the screen. This scheme has one inconvenience. While nobody on a new server has any permissions, there is nobody to appoint the first administrator. The **privilege key** (formerly called a token) solves this. The server creates it on the very first start and shows it once. Whoever enters the key in the client joins the Server Admin group, and the key stops working after that. The second secret is the **ServerQuery password** for the `serveradmin` account. It is also issued once and gives control of all virtual servers. That is why finding these two values in step 4 matters more than it may seem.

TeamSpeak currently has two generations of the server. On the downloads page the stable release is still **TeamSpeak 3 Server 3.13.8**, while **TeamSpeak 6 Server** is published as a beta for those who want to try it, and the README of the server itself openly calls it incomplete. For a server that simply has to work, the limitations of the beta are significant. The built-in licence covers 32 slots and is renewed every two months with new builds, and in the build we tested it is valid until 1 December 2026. TeamSpeak 3 licences do not work with version 6, and there is no data migration between versions yet. That is why we devoted the main part of the article to the stable TeamSpeak 3 and gave the beta a separate section at the end. When the 3.13.8 server starts, it writes to the log that its built-in licence is valid until 1 July 2027, so by summer 2027 it is worth checking the downloads page for a newer version.

> **A company needs a different licence.**
>
> The server without a licence key is free with no time limit, but it allows one virtual server and up to 32 slots. The text of the licence gives this mode only to private individuals and non-profit communities. If a company needs the server, TeamSpeak offers a separate commercial licence, and you can find out the terms from TeamSpeak itself.

***

## What you need

* **A server** with Debian 12 and **at least 1 GB of memory**, as the TeamSpeak documentation recommends, for example the **DE-RZ9-1** plan. The TeamSpeak server itself took about 17 MB when idle on our server. If you do not have a server yet, order one using the [guide](https://docs.f3cloud.com/en/client-area/order-vps.md).
* **An SSH connection**, for example via [Termius](https://docs.f3cloud.com/en/vps/termius-connection.md). Commands are run as `root`.
* **A TeamSpeak client** for you and for everyone who will join. You download it from the [TeamSpeak downloads page](https://teamspeak.com/en/downloads/) on the **TeamSpeak 3** tab, and at the time of testing the version there was 3.6.2.
* **A second computer** with Linux or macOS to check the ports in step 6. A second VPS will do too.

***

## Step 1. Create a user and download the server

Running the server as `root` is not safe, so we will create a separate user `teamspeak` with the home folder `/opt/teamspeak`. Logging in as this user is disabled, and systemd will manage the server. You can read more about users in the article about [Linux users](https://docs.f3cloud.com/en/linux/linux-users.md).

```bash
useradd -r -m -d /opt/teamspeak -s /usr/sbin/nologin teamspeak
```

To download and unpack the archive you need the `wget` and `bzip2` packages. They were already installed in our image, and the command below is for the case when you do not have them.

```bash
apt install -y wget bzip2
```

Download the server archive. The address is taken from the TeamSpeak downloads page, and if a newer version has been released there, replace 3.13.8 with it in both places.

```bash
cd /root
wget https://files.teamspeak-services.com/releases/server/3.13.8/teamspeak3-server_linux_amd64-3.13.8.tar.bz2
```

The archive weighs about 10 MB. Unpack it into `/opt/teamspeak` and hand the files over to the `teamspeak` user.

```bash
tar -xjf teamspeak3-server_linux_amd64-3.13.8.tar.bz2 -C /opt/teamspeak --strip-components=1
chown -R teamspeak:teamspeak /opt/teamspeak
```

The `--strip-components=1` option removes the outer folder of the archive from the paths, so the `ts3server` file ends up directly in `/opt/teamspeak`. After unpacking, the folder takes about 22 MB.

***

## Step 2. Read the licence and accept it

The server will not start until you explicitly agree to the licence. See this for yourself by starting it manually as `teamspeak`.

```bash
cd /opt/teamspeak
runuser -u teamspeak -- ./ts3server
```

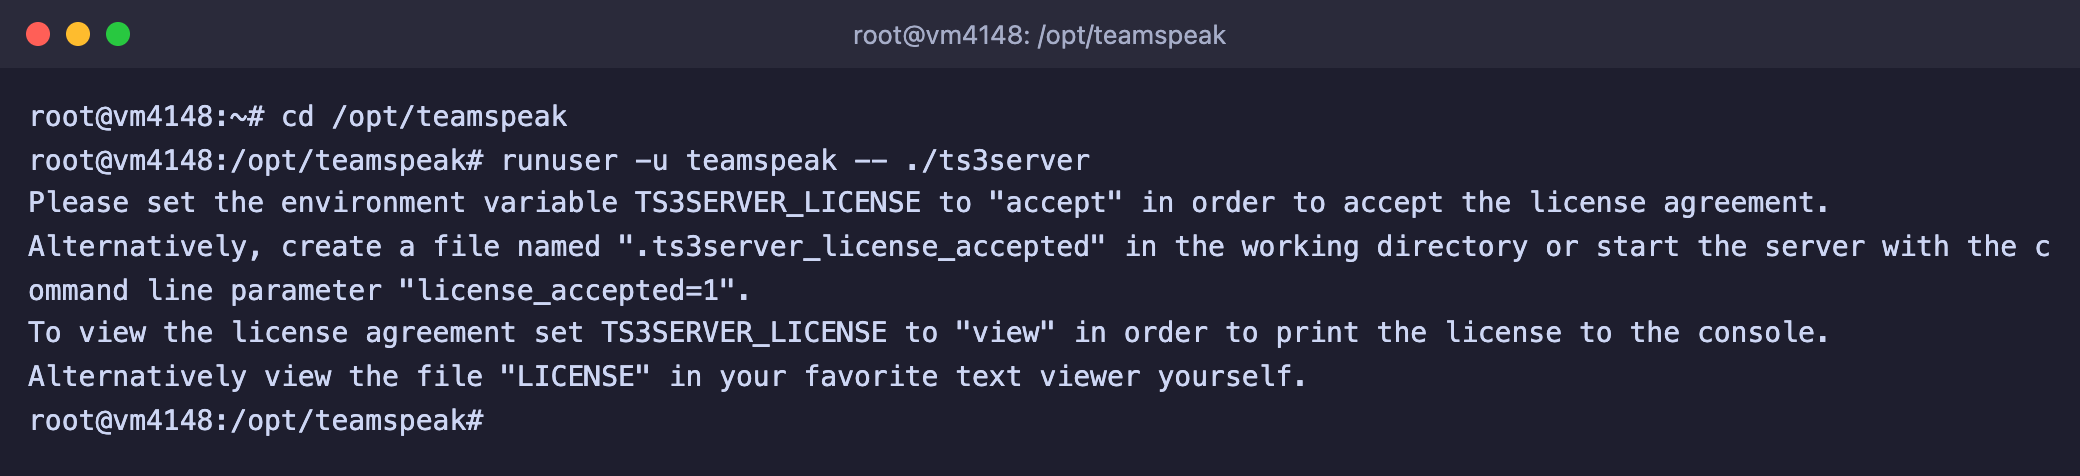
The server will exit immediately and explain how to accept the licence.

<figure><img src="https://docs.f3cloud.com/img/teamspeak-license-error.png" alt="The TeamSpeak server refuses to start and asks to accept the licence"><figcaption><p>Without agreeing to the licence the server does not start</p></figcaption></figure>

You can read the licence right in the terminal. It is long, so scroll with the <kbd>Space</kbd> key, and press <kbd>Q</kbd> to exit.

```bash
runuser -u teamspeak -- env TS3SERVER_LICENSE=view ./ts3server | less
```

Agreeing to the licence is recorded as an empty file `.ts3server_license_accepted` in the working folder of the server. TeamSpeak describes two more ways, the `license_accepted=1` parameter on the command line and the `TS3SERVER_LICENSE=accept` variable, but the file is more convenient because it stays in place after updates.

```bash
runuser -u teamspeak -- touch /opt/teamspeak/.ts3server_license_accepted
```

***

## Step 3. Set up autostart

To make the server run in the background, start together with the VPS and come back up after a crash, we will set it up as a systemd service. How services work is described in detail in the article about [systemd](https://docs.f3cloud.com/en/linux/systemd-services.md).

```bash
nano /etc/systemd/system/teamspeak.service
```

Paste the text below into the file, save it with <kbd>Ctrl</kbd> + <kbd>O</kbd>, then <kbd>Enter</kbd>, and exit the editor with <kbd>Ctrl</kbd> + <kbd>X</kbd>.

```ini
[Unit]
Description=TeamSpeak 3 server
After=network-online.target
Wants=network-online.target

[Service]
User=teamspeak
WorkingDirectory=/opt/teamspeak
ExecStart=/opt/teamspeak/ts3server
Restart=on-failure
RestartSec=10

[Install]
WantedBy=multi-user.target
```

The `WorkingDirectory` parameter is important, because the server looks for the licence acceptance file in the working folder and also keeps its database, files and logs there. The server runs in the normal mode, not in the background mode, so systemd puts everything it prints to the screen into the journal. Enable autostart and start the service.

```bash
systemctl daemon-reload
systemctl enable --now teamspeak
systemctl status teamspeak
```

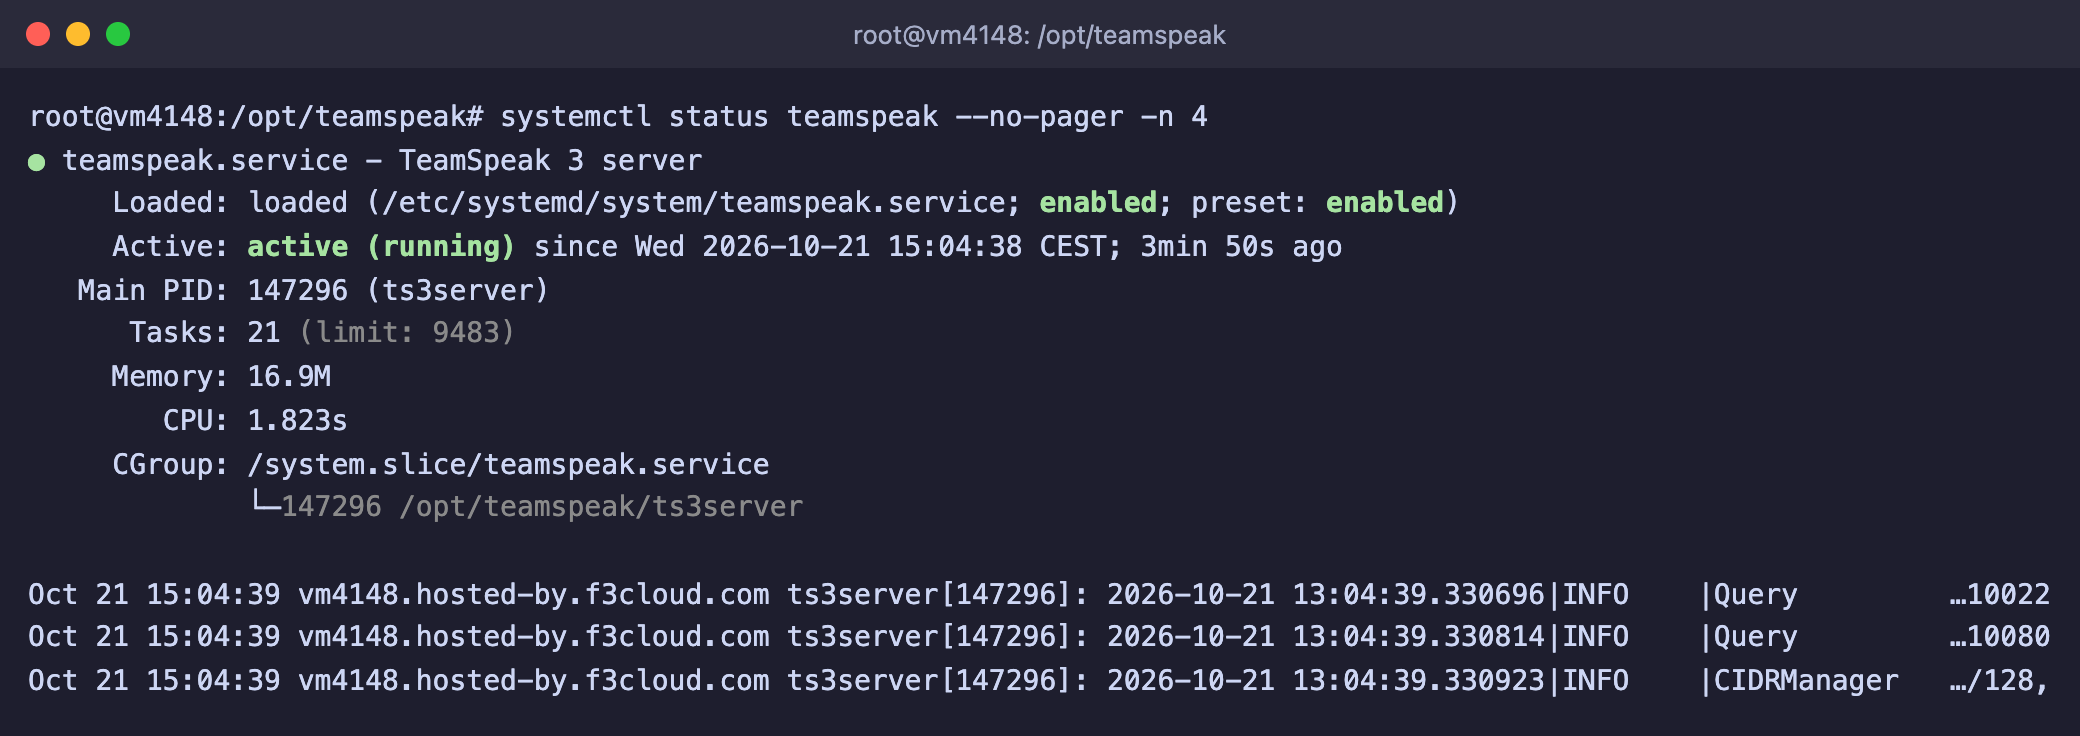
<figure><img src="https://docs.f3cloud.com/img/teamspeak-systemd-status.png" alt="systemctl status teamspeak, the service is active (running), the ts3server process"><figcaption><p>The service is running and enabled at startup</p></figcaption></figure>

On our server the first start, together with creating the database, took about a second, and when idle the service used 16.9 MB of memory according to systemd. We checked that the service survives a crash. When we forcibly killed the process with the `kill -9` command, systemd started the server again after 10 seconds.

From now on the server has to be managed through systemd.

* `systemctl stop teamspeak` turns the server off.
* `systemctl start teamspeak` turns it on.
* `systemctl restart teamspeak` restarts it.
* `journalctl -u teamspeak -f` shows the journal in real time, and you can exit with <kbd>Ctrl</kbd> + <kbd>C</kbd>. You can read more about journals in the article about [Linux logs](https://docs.f3cloud.com/en/linux/linux-logs.md).

***

## Step 4. Find the privilege key and the ServerQuery password

On the first start the server printed two secrets. Since the server runs under systemd, they are in the journal of the service. Let us pull out only the lines we need.

```bash
journalctl -u teamspeak --no-pager -o cat | grep -E "loginname|apikey|token="
```

<figure><img src="https://docs.f3cloud.com/img/teamspeak-credentials.png" alt="Journal lines with the ServerQuery password, the API key and the privilege key, the values are hidden"><figcaption><p>The password, the API key and the privilege key (the values are hidden in the screenshot)</p></figcaption></figure>

The output has four lines.

* The first line has the name of the `serveradmin` account and its **ServerQuery password**.
* The second line has the **API key** for managing the server over HTTP, and it is only useful for those who write bots and panels.
* The third and fourth lines have the same **privilege key**, which you will need in step 7. The server prints it twice, the first time in a journal line and the second time in a frame.

Copy these values into a password manager. The privilege key is additionally written in the `logs` folder, in the log file of the virtual server, but the ServerQuery password and the API key do not end up in the log files, and you can find them only in the systemd journal. If the journal is cleaned over time or you lose the values earlier, do not worry, because the "Frequently asked questions" section below describes how to create a new key and reset the password.

> **Do not send the key and the password to anyone.**
>
> The privilege key gives admin rights on the server, and the ServerQuery password gives full control of all servers. Do not show them in screenshots and do not forward them in messengers. If the key has fallen into the wrong hands before you used it, create a new one as described in the "Frequently asked questions" section.

***

## Step 5. Open the ports in UFW

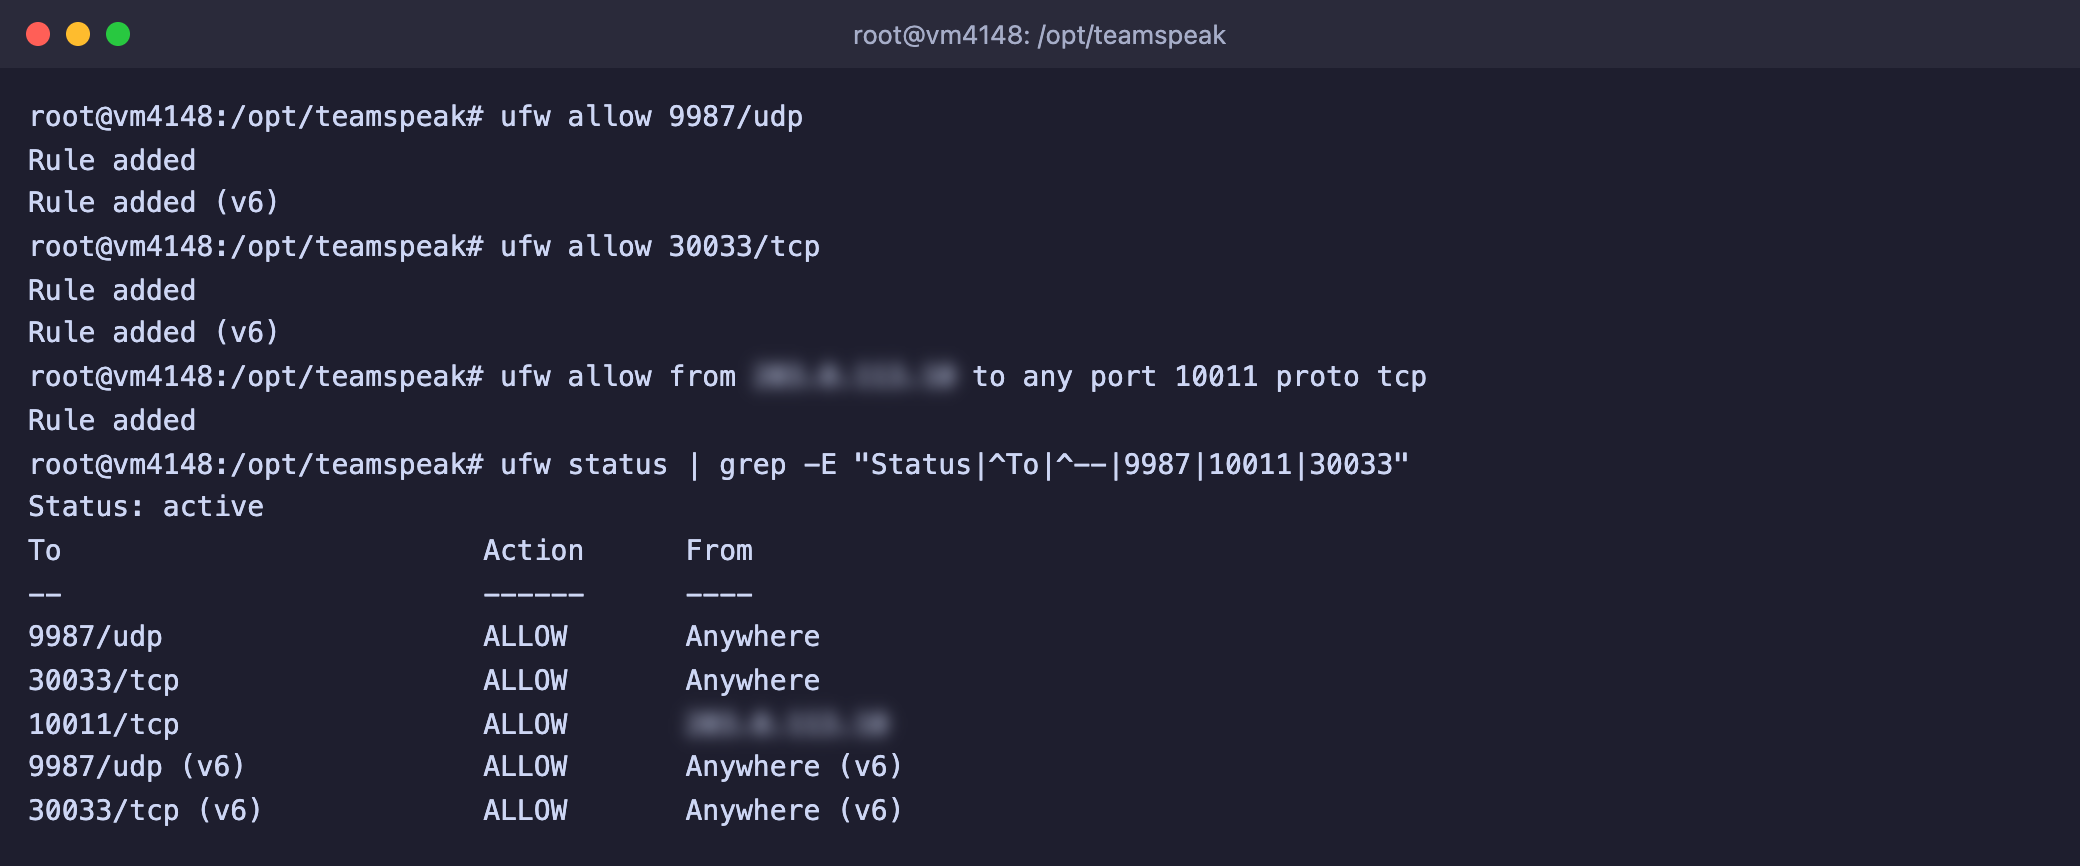
If the UFW firewall is enabled on your VPS, open the voice port and the file transfer port. Everyone who will join the server needs these two ports. You can read more about the firewall in the article about [UFW](https://docs.f3cloud.com/en/vps/security/firewall.md).

```bash
ufw allow 9987/udp
ufw allow 30033/tcp
```

You should not open the ServerQuery port 10011 to the whole internet. The password is sent in plain text over it, and the official server manual calls this option the former default and strongly recommends more secure protocols. If you need ServerQuery access from your home computer, open the port only for your own address. We did exactly that for the check in step 6, and you should replace `your-computer-IP` with your external address.

```bash
ufw allow from your-computer-IP to any port 10011 proto tcp
ufw status
```

<figure><img src="https://docs.f3cloud.com/img/teamspeak-ufw.png" alt="The ufw allow commands for ports 9987/udp, 30033/tcp and 10011/tcp for one address only, then ufw status"><figcaption><p>Voice and files are open to everyone, ServerQuery only to one address</p></figcaption></figure>

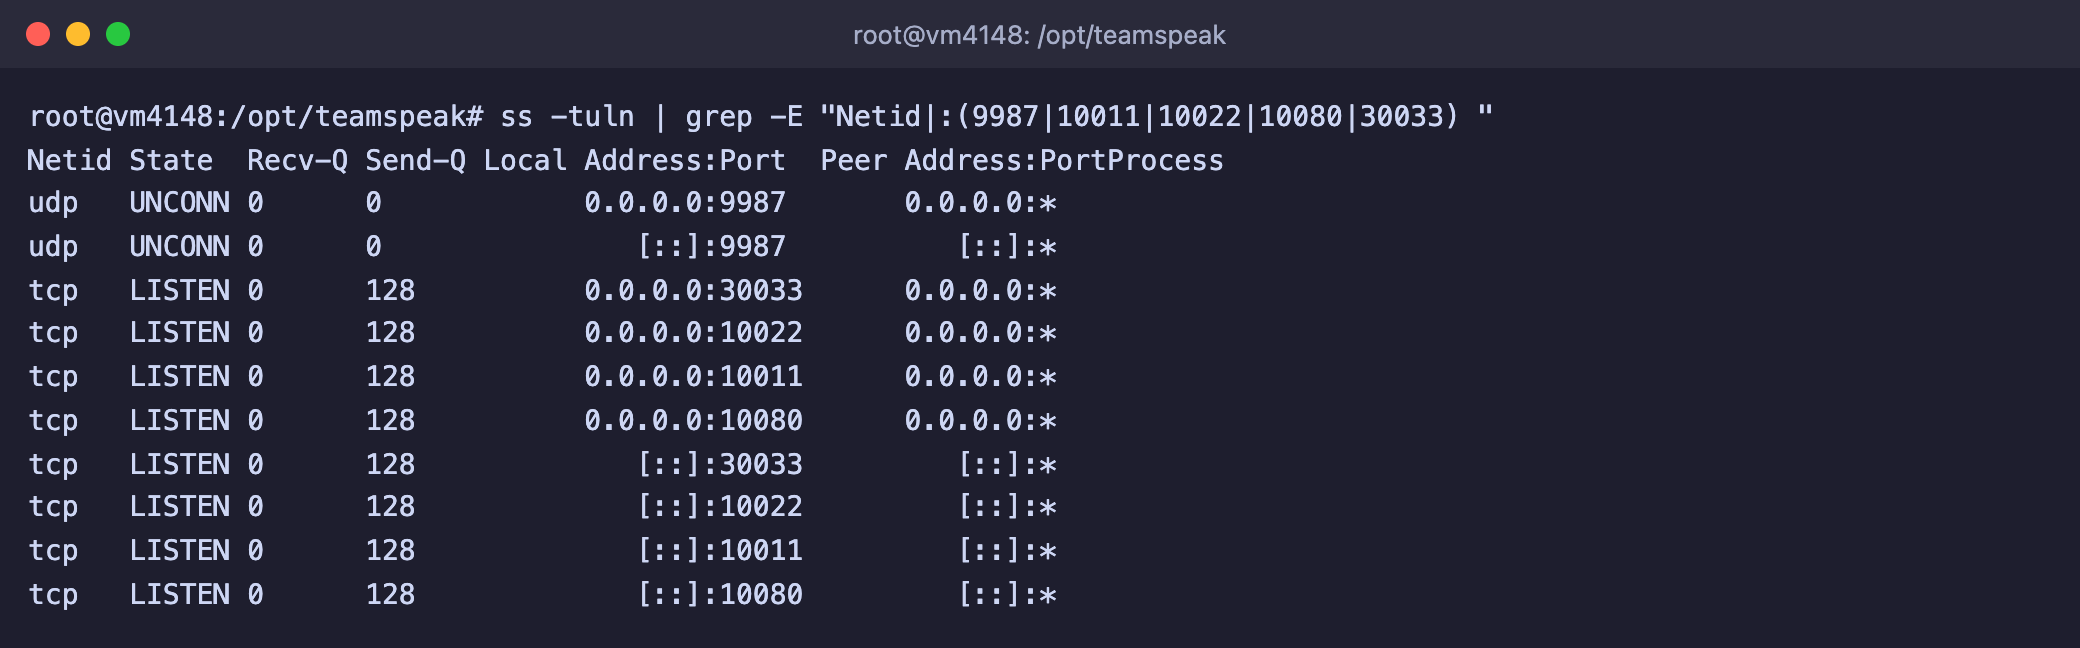
The server itself listens on more ports than we opened. Besides voice and file transfer, it accepts ServerQuery connections in three variants, the plain one on 10011, SSH on 10022 and HTTP on 10080, and on all addresses at once. You can check this with the `ss` command.

```bash
ss -tuln | grep -E "Netid|:(9987|10011|10022|10080|30033) "
```

<figure><img src="https://docs.f3cloud.com/img/teamspeak-ports.png" alt="The ss output, the server listens on udp 9987 and tcp 30033, 10022, 10011, 10080"><figcaption><p>The ports the TeamSpeak server listens on</p></figcaption></figure>

We did not open ports 10022 and 10080 in the firewall, and they do not respond from another computer. It is best to leave it that way.

***

## Step 6. Check the ports from outside

You need to check the ports from another computer. If you run the check on the server itself, it will pass even with a closed firewall, because the traffic goes through the internal interface, which the firewall does not restrict. We checked from a macOS computer, and the commands on Linux are the same.

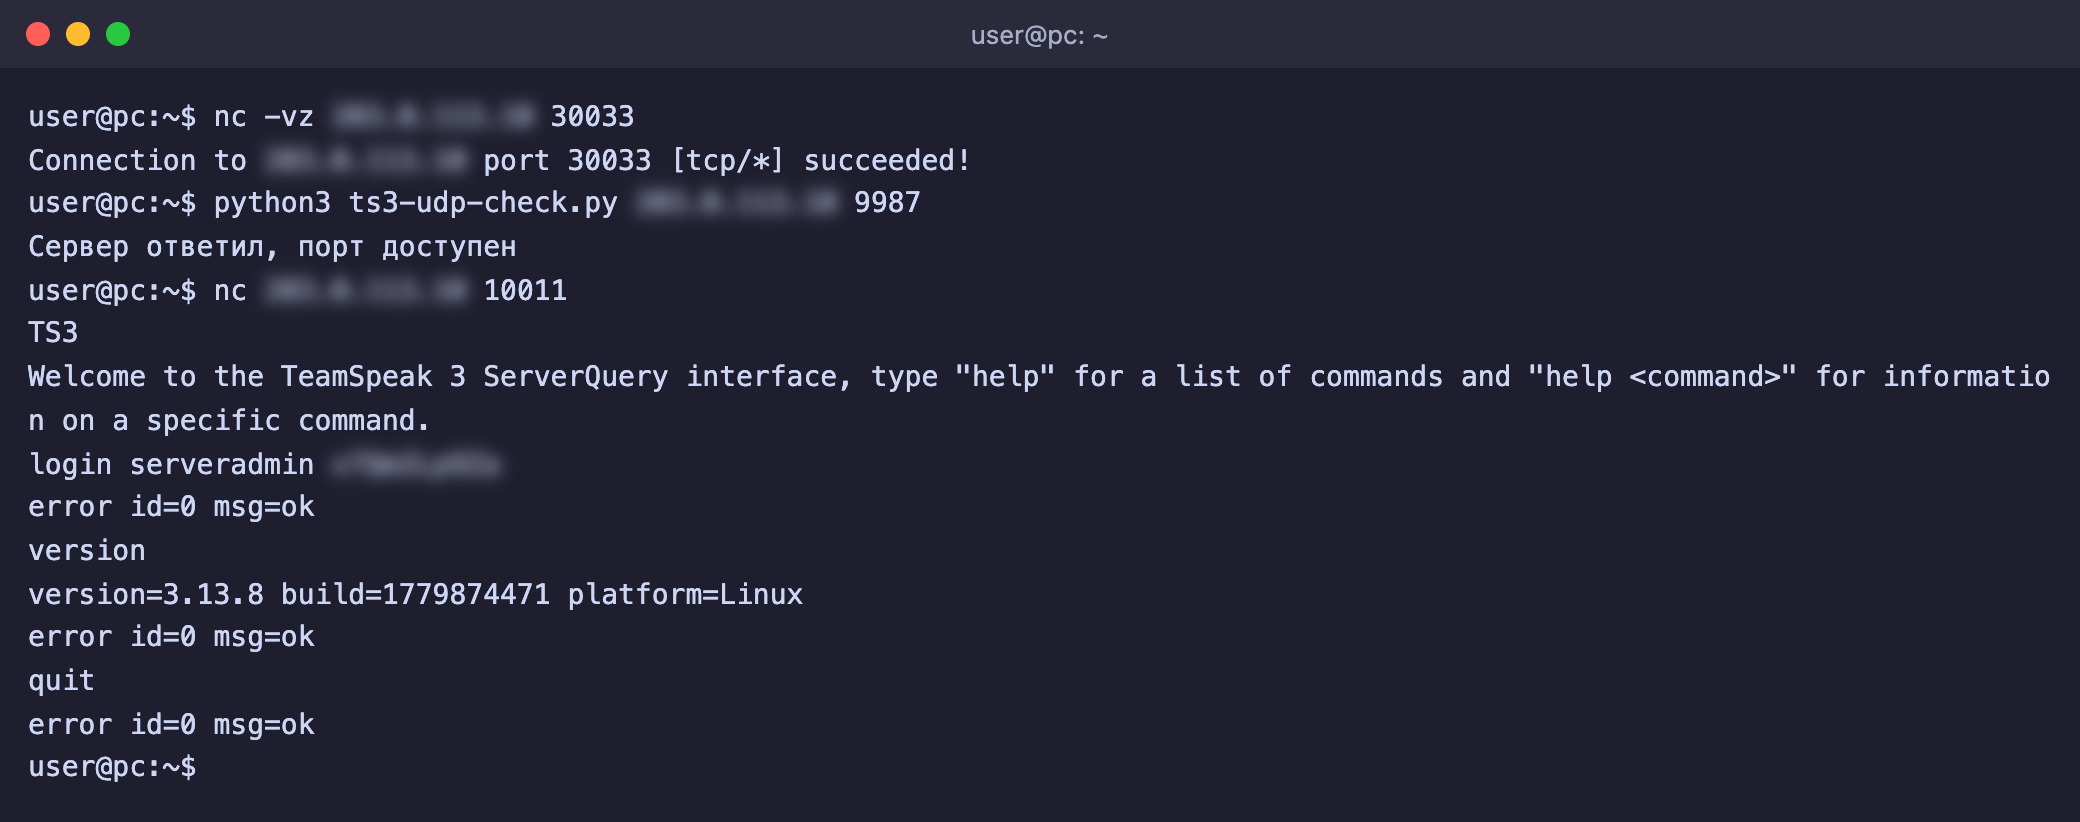
First let us check the file transfer port. It works over TCP, so the `nc` utility is enough.

```bash
nc -vz server-IP 30033
```

The answer **succeeded** means the port is open and the server responds.

The voice port is harder, because UDP does not respond to a simple connection check. We wrote a short Python script that sends the first handshake packet, the one the client starts a connection with, and waits for a reply for three seconds. This is not an official utility, we made it ourselves to check the port without a graphical client. Create the file.

```bash
nano ts3-udp-check.py
```

```python
import os, socket, struct, sys, time

host = sys.argv[1]
port = int(sys.argv[2]) if len(sys.argv) > 2 else 9987

# The first TeamSpeak handshake packet, as the client sends it
data = struct.pack('>IBI', 1566914096, 0, int(time.time())) + os.urandom(4) + bytes(8)
packet = b'TS3INIT1' + struct.pack('>HH', 101, 0) + b'\x88' + data

s = socket.socket(socket.AF_INET, socket.SOCK_DGRAM)
s.settimeout(3)
s.sendto(packet, (host, port))
try:
    reply, addr = s.recvfrom(2048)
    print('The server replied, the port is reachable')
except socket.timeout:
    print('No reply, the port is closed or the server is not running')
```

Run it, giving the server address and the port.

```bash
python3 ts3-udp-check.py server-IP 9987
```

Finally, let us check ServerQuery. Connect to port 10011, and the server greets you with the line `TS3`. Then enter the commands one by one. Replace `PASSWORD` with the ServerQuery password from step 4.

```bash
nc server-IP 10011
```

```text
login serveradmin PASSWORD
version
quit
```

<figure><img src="https://docs.f3cloud.com/img/teamspeak-check-outside.png" alt="The check from outside, nc to port 30033, the script reply for port 9987 and logging in to ServerQuery with the version command"><figcaption><p>All three ports respond, the server reports version 3.13.8</p></figcaption></figure>

The reply `error id=0 msg=ok` to the `login` command means the password was accepted, and in reply to `version` the server names its version and platform. On our server, before the `ufw allow` commands the script stayed silent and reported no reply, and after them the reply came in about 60 milliseconds.

After the check, remove the ServerQuery rule if you no longer need it.

```bash
ufw delete allow from your-computer-IP to any port 10011 proto tcp
```

***

## Step 7. Connect with a client and become an administrator

The steps below follow the official TeamSpeak 3 documentation, because we did not launch the graphical client on the test server. The names of the menu items are taken from there.

1. Install the TeamSpeak 3 client and launch it.
2. In the **Connections** menu choose **Connect**.
3. In the address field enter the IP address of the server. If the server runs on port 9987, you do not need to specify the port, and for another port use the format `IP:PORT`.
4. Enter the nickname other people will see you under. Leave the server password field empty until you have set one.
5. Click the connect button.

You will join the server as a regular user without admin rights. To get them, in the **Permissions** menu choose **Use Token** and paste the privilege key from step 4. If everything worked, an **SA** icon will appear next to your nickname. The key is single-use, so after you enter it successfully it will stop working. To give admin rights to someone else, open **Token Manager** in the **Permissions** menu, click **Add Token**, choose the **Server Group** type and the **Server Admin** group, and then click **Create**. In the iOS app the item for entering the key is called **Use Privilege Key**.

Now you can configure the server. Right-click the server name above the top channel and choose **Edit Virtual Server**. Among other things, this is where the common server password is set. You need it if you do not want just anyone who learns the address to join the server. You can make the link for friends in the form `ts3server://server-IP?port=9987`, and when they click it, the client connects to the server on its own. It is convenient to use a domain instead of an IP address, and how to do that is described in the article about [pointing a domain to a VPS](https://docs.f3cloud.com/en/vps/domain-to-vps.md).

> **The TeamSpeak 6 client works too.**
>
> According to the TeamSpeak documentation, the version 6 client can connect to a TeamSpeak 3 server, but it gets only the features of version 3. The TeamSpeak 6 client is also still a beta on the downloads page, and on first launch it asks you to create a myTeamSpeak account.

***

## Backups

Everything TeamSpeak stores is inside `/opt/teamspeak`. According to the official documentation, moving the server to another machine requires the following files.

* `ts3server.sqlitedb` holds the database with all channels, groups, permissions and users, and it is the most important file.
* The `files` folder stores uploaded files, icons and avatars.
* `query_ip_allowlist.txt` and `query_ip_denylist.txt` contain the address lists for ServerQuery. The documentation calls them `whitelist` and `blacklist`, and in version 3.13.8 the files are named exactly as we wrote.
* `licensekey.dat` exists only for those who bought a licence.
* `ssh_host_rsa_key` holds the key of the SSH variant of ServerQuery, and we added it ourselves so that the server key does not change after a restore.

Simply copying `ts3server.sqlitedb` on a running server is unreliable. SQLite writes changes to a neighbouring journal file first and moves them into the main file only later. We checked this on our server. After creating two channels, a copy of the main file alone contained only one channel instead of three, while a copy made with SQLite's own tools saved all three. That is why we use the `sqlite3` utility with the `.backup` command, which makes a consistent copy without stopping the server.

```bash
apt install -y sqlite3
nano /opt/teamspeak/backup.sh
```

The script saves the database and files into an archive in the `/opt/teamspeak/backups` folder and keeps the 7 latest archives.

```bash
#!/bin/sh
# Copy of the TeamSpeak database and files without stopping the server, keeps the 7 latest archives
set -e
cd /opt/teamspeak
mkdir -p backups
tmp=$(mktemp -d)
sqlite3 ts3server.sqlitedb ".backup '$tmp/ts3server.sqlitedb'"
cp -a files query_ip_allowlist.txt query_ip_denylist.txt ssh_host_rsa_key "$tmp"/
[ -f licensekey.dat ] && cp -a licensekey.dat "$tmp"/
tar -czf "backups/teamspeak-$(date +%F-%H%M).tar.gz" -C "$tmp" .
rm -rf "$tmp"
ls -1t backups/teamspeak-*.tar.gz | tail -n +8 | xargs -r rm --
```

Make the script executable, run it manually and add it to the schedule of the `teamspeak` user, for example every night at 4:00.

```bash
chmod +x /opt/teamspeak/backup.sh
chown teamspeak:teamspeak /opt/teamspeak/backup.sh
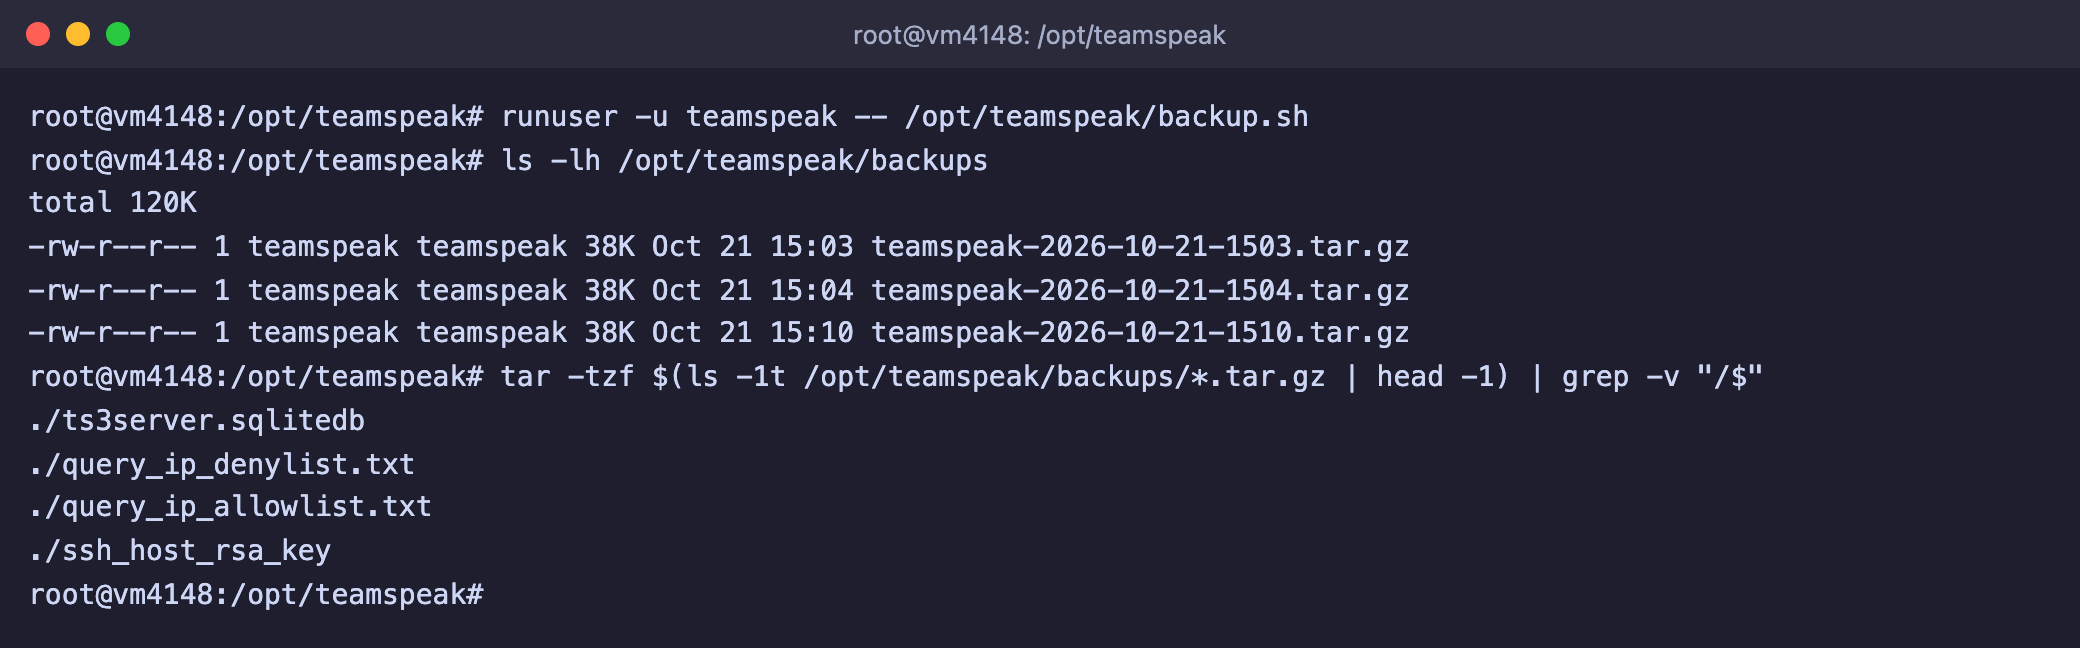
runuser -u teamspeak -- /opt/teamspeak/backup.sh
echo "0 4 * * * /opt/teamspeak/backup.sh" | crontab -u teamspeak -
```

<figure><img src="https://docs.f3cloud.com/img/teamspeak-backup.png" alt="Running backup.sh, the list of archives in the backups folder and the contents of the latest archive"><figcaption><p>The archive holds the database, the address lists and the SSH key, as well as the files folder</p></figcaption></figure>

We tested the script both manually and on the schedule, and both times an archive appeared. You can read more about scheduling in the article about [cron](https://docs.f3cloud.com/en/linux/cron-linux.md). Copies on the same server will not help if the server itself is lost, so download the archives to your own computer from time to time or send them to another server, for example with the [rsync](https://docs.f3cloud.com/en/linux/rsync-linux.md) command.

To restore the server from a copy, stop the service, delete the current database and files, unpack the archive you need and start the service again. In the example, replace the archive name with your own.

```bash
systemctl stop teamspeak
rm -rf /opt/teamspeak/ts3server.sqlitedb* /opt/teamspeak/files
tar -xzf /opt/teamspeak/backups/teamspeak-2026-10-21-1503.tar.gz -C /opt/teamspeak
chown -R teamspeak:teamspeak /opt/teamspeak
systemctl start teamspeak
```

We tested the restore on our server. After it, the server name, both channels, the old ServerQuery password and the old privilege key came back. The `rm` command also deletes the temporary database files ending in `-wal` and `-shm`, so that the server starts from a clean state.

> **A server without a database starts as a new one.**
>
> If you start the server without the `ts3server.sqlitedb` file, it creates an empty database and issues a new ServerQuery password and a new privilege key. We made sure of this by temporarily removing the database, and then restored the data from a copy. So do not delete the database without a fresh archive.

***

## Updating the server

The server is updated by replacing files. The TeamSpeak server documentation simply says to copy the new files over the old ones. The database and settings are not affected, because they are not in the archive. We repeated this procedure on our server. There was no version newer than 3.13.8 at that moment, so we unpacked the same version over the installed one. The channels, keys and settings stayed in place, and after the start the line with the version appeared in the log again. Before updating, stop the server and make a backup with the script from the previous section.

```bash
systemctl stop teamspeak
runuser -u teamspeak -- /opt/teamspeak/backup.sh

cd /root
wget https://files.teamspeak-services.com/releases/server/NEW-VERSION/teamspeak3-server_linux_amd64-NEW-VERSION.tar.bz2
tar -xjf teamspeak3-server_linux_amd64-NEW-VERSION.tar.bz2 -C /opt/teamspeak --strip-components=1
chown -R teamspeak:teamspeak /opt/teamspeak

systemctl start teamspeak
```

The last `chown` command is required. We unpacked the archive as `root`, and after unpacking the `ts3server` file belonged to `root`. You can check the version after the start in the journal.

```bash
journalctl -u teamspeak -n 80 --no-pager -o cat | grep "TeamSpeak 3 Server"
```

The list of changes for each version is in the `/opt/teamspeak/CHANGELOG` file.

***

## TeamSpeak 6 as a beta server in Docker

If you want to try the new generation, TeamSpeak recommends installing TeamSpeak 6 Server through Docker. How to install Docker itself is described in the article about [installing Docker](https://docs.f3cloud.com/en/docker/docker-installation.md). We tested build **6.0.0-beta13.1**. The image takes about 60 MB, and the container used about 20 MB of memory when idle. The set of ports in version 6 is almost the same. Voice goes to **9987/udp**, file transfer to **30033/tcp**, and ServerQuery is not enabled by default. We checked this from outside, and port 10011 refuses the connection. You can enable it with server parameters, and according to the documentation port 10022 is assigned to it for SSH and 10080 for HTTP.

Run the command from the official README of the server. We added `--restart unless-stopped` to it so that the container comes back up after the VPS reboots. Here, agreeing to the licence is set by the `TSSERVER_LICENSE_ACCEPTED=accept` variable, and the data is stored in the `teamspeak-data` volume.

```bash
docker run -d --name teamspeak-server --restart unless-stopped \
  -p 9987:9987/udp -p 30033:30033 \
  -e TSSERVER_LICENSE_ACCEPTED=accept \
  -v teamspeak-data:/var/tsserver \
  teamspeaksystems/teamspeak6-server:latest
```

<figure><img src="https://docs.f3cloud.com/img/teamspeak6-docker-run.png" alt="Starting the teamspeak-server container with the teamspeaksystems/teamspeak6-server image"><figcaption><p>The TeamSpeak 6 container is running</p></figcaption></figure>

The server prints the privilege key and the ServerQuery password on the first start just like version 3 does, only you need to look for them in the container log.

```bash
docker logs teamspeak-server 2>&1 | grep -E "loginname|apikey|token="
```

<figure><img src="https://docs.f3cloud.com/img/teamspeak6-credentials.png" alt="Container log lines with the ServerQuery password, the API key and the privilege key, the values are hidden"><figcaption><p>The key and the password in the container log (the values are hidden in the screenshot)</p></figcaption></figure>

The container is updated by replacing the image. We tested this procedure, and after it the data stayed in the volume and no new key or password was created.

```bash
docker pull teamspeaksystems/teamspeak6-server:latest
docker stop teamspeak-server
docker rm teamspeak-server
```

After that, repeat the `docker run` command from this section. If you change the file transfer port, add the `TSSERVER_FILE_TRANSFER_PORT` variable with the same number and publish the same port number on the host, because clients connect to this port directly. We tested this on port 30034.

> **Docker opens ports bypassing UFW.**
>
> Docker opens the ports published with `-p` by itself, and UFW rules do not apply to them. We started the container on ports 9988 and 30034 without a single rule in UFW, and both ports responded from another computer. Publish only the ports that should be open to everyone.

> **What you need to know about the beta.**
>
> The README of the server says that this is a beta and some features are not ready yet. The built-in licence for 32 slots is renewed with new builds, in our build it is valid until 1 December 2026, so you will have to update the server. TeamSpeak 3 licences do not work with it, and there is no data migration between versions. If versions 3 and 6 are installed on the same server, they need different ports.

***

## Frequently asked questions

<details>

<summary>Please set the environment variable TS3SERVER_LICENSE to "accept" in order to accept the license agreement</summary>

The server did not find the licence acceptance and exited. We got this message on the first manual start. Create an empty `.ts3server_license_accepted` file in the working folder of the server, as shown in step 2, and make sure the systemd service has `WorkingDirectory=/opt/teamspeak`, because the file is looked for exactly in the working folder.

</details>

<details>

<summary>local accounting reports an already running instance, instance will shutdown</summary>

Without a licence key, TeamSpeak allows only one server to run on one machine. We got this line when we started a second copy while the service was running, and the second copy stopped immediately. Most often it means that you start the server manually while the systemd service is already running. Stop the extra copy or manage the server only through `systemctl`.

</details>

<details>

<summary>error id=520 msg=invalid\sloginname\sor\spassword</summary>

The ServerQuery password did not fit. The `\s` characters in the reply mean a space, that is how ServerQuery writes spaces. Take the password from the journal, as in step 4. If the password is lost, it can be reset. Stop the service and start the server manually once with the `serveradmin_password` parameter, and when it prints the startup lines, stop it with <kbd>Ctrl</kbd> + <kbd>C</kbd> and start the service again.

```bash
systemctl stop teamspeak
cd /opt/teamspeak
runuser -u teamspeak -- ./ts3server serveradmin_password=NEW-PASSWORD
systemctl start teamspeak
```

We tested this method, and after it the old password stopped working and the new one worked. Keep in mind that the password will stay in the command history, so the TeamSpeak documentation advises running the `clientsetserverquerylogin client_login_name=serveradmin` command after logging in. The server will print a new password, and it will no longer be in the history.

</details>

<details>

<summary>error id=3329 msg=connection\sfailed,\syou\sare\sbanned extra_msg=you\smay\sretry\sin\s600\sseconds</summary>

The ServerQuery protection against password guessing was triggered. We got this reply after three wrong passwords in a row, and the address was blocked for 600 seconds. Wait that long or restart the service with the `systemctl restart teamspeak` command, and we checked that a restart lifts the block. The protection does not touch the addresses from the `query_ip_allowlist.txt` file, and by default it contains `127.0.0.1` and `::1`. Adding an address to this file takes effect immediately, but it does not lift a block that has already been applied, and for that you need a restart.

</details>

<details>

<summary>No reply from server or Connection Error [0x705]</summary>

The client did not get a reply from the server. The TeamSpeak documentation names the common causes, which are a wrong address or port, a server that is not running and a firewall that cuts the traffic. Check in order.

1. The service is running, and `systemctl status teamspeak` shows active (running).
2. Port **9987/udp** is open, and `ufw status` contains a rule for it.
3. The check from step 6 responds. When we deliberately removed the rule for 9987/udp, the script reported that there was no reply, and after the `ufw allow 9987/udp` command the reply came back.
4. If the server does not run on port 9987, the address in the client has to be written in the form `IP:PORT`.

</details>

<details>

<summary>The privilege key is lost or already used</summary>

A new key is created with a ServerQuery command. Open the console right on the server, because the password guessing protection does not block the address `127.0.0.1`, and you do not need to open the port in the firewall.

```bash
nc 127.0.0.1 10011
```

Enter three commands in turn, and replace `PASSWORD` with the ServerQuery password.

```text
login serveradmin PASSWORD
use 1
servergrouplist
```

In the list of groups find the line `name=Server\sAdmin` with the `type=1` mark. The line with `type=0` has a different purpose, it is a template for future servers. On our server the group we needed had the number 6. Substitute your own number in the next command.

```text
privilegekeyadd tokentype=0 tokenid1=6 tokenid2=0 tokendescription=new\sadmin
```

The server will reply with a `token=…` line, and that is the new key. We tested the command, the key was created and appeared in the list of the `privilegekeylist` command. You can leave the console with the `quit` command.

</details>

<details>

<summary>Unable to open licensekey.dat, falling back to limited functionality</summary>

This is not an error but a warning that the server runs without a purchased licence. Next to it in the log you can see that the licence is called **No License**, and it allows one virtual server and 32 slots. For a personal server this is enough.

</details>

<details>

<summary>Please set the environment variable TSSERVER_LICENSE_ACCEPTED to "accept" in order to accept the license agreement</summary>

This is how the TeamSpeak 6 container behaves if you start it without the variable that accepts the licence, and this is exactly how we got this message. Add the `-e TSSERVER_LICENSE_ACCEPTED=accept` parameter to the `docker run` command.

</details>

***

## Our resources

**Telegram channel:** [https://t.me/f3cloud_news](https://t.me/f3cloud_news)\
**F3 Cloud:** [https://f3cloud.com](https://f3cloud.com/en)