> The full list of articles is in [llms.txt](https://docs.f3cloud.com/llms.txt). Every page has a Markdown version: add .md to its address. This page as Markdown: [https://docs.f3cloud.com/en/games/project-zomboid-server.md](https://docs.f3cloud.com/en/games/project-zomboid-server.md).

# Project Zomboid server on a VPS – installing with SteamCMD, autostart and backups

How to create a Project Zomboid server on a VPS. Installing with SteamCMD, limiting Java memory, the first launch and the administrator password, the servertest.ini settings, opening ports 16261 and 16262 over UDP, autostart with systemd that saves the world on stop, updating and backups. Tested on Debian 12 with Project Zomboid Build 42.21.

Your own Project Zomboid server on a VPS runs around the clock, and your friends can join the shared world at any time without waiting for someone's computer to be switched on. You decide how many players there will be, whether PVP is on and who is allowed in. In this article we will install a dedicated server with SteamCMD, limit its memory, open the required ports, and set up autostart with a safe shutdown and world backups. We repeated every step on a test server with Debian 12. At the time of testing, the current game version was **Build 42.21**.

***

## How the Project Zomboid server works

The Project Zomboid server is a separate free program that Valve distributes through Steam under app number **380870**. You need neither a Steam account nor a purchased copy of the game to install it, because it can be downloaded anonymously, and the console client **SteamCMD** does that. The game is written in Java, and the server ships with its own Java 25 in the `jre64` folder, so you do not need to install it separately. The program and its data are kept in different places. The game files are in the server folder, while the world, player accounts, settings and logs are stored in the `Zomboid` folder in the user's home folder. Because of this, updating through SteamCMD replaces the game itself and does not touch your world.

Players connect over the UDP protocol. At startup the server writes to its log that it is listening on port 16261 for Steam connections and on port 16262 for RakNet connections, and it advises clients to use port 16261. We checked both ports from the outside. On 16261 the server answers Steam queries about its name and player count, and on 16262 it answers the RakNet service ping, so you need to open both ports in the firewall. If the ports are closed, UDP packets are simply dropped and the server stays silent, because nothing reaches it. That is exactly how our server looked to an outside check until UFW had the rule.

Memory is the server's main resource. In the `ProjectZomboid64.json` file the default Java memory limit is **-Xmx8g**, that is 8 GB, which is too much for a small VPS. We set 3 GB. The process takes more than the stated limit, because Java's own overhead memory is added to the heap. On our server with `-Xmx3g` the process took about 4 GB, and with `-Xmx2g` about 2.9 GB, that is the limit plus roughly 0.9 GB. The server uses the ZGC garbage collector (the `-XX:+UseZGC` option in the same file), and used memory is not released when the server is idle. Six minutes after startup with no players at all, the process still took the same 3.9 GB, so leave some headroom when you count memory.

> **Build 42 and Build 41.**
>
> The `public` branch in SteamCMD, which you get by default, currently contains Build 42. Our startup log says `version=42.21.0`, and in the official Steam announcements version 42.21 is called stable. Besides it, SteamCMD has the `unstable` branch for testing, `legacy41` with Build 41.78.21 and `42.19` with Build 42.19.2. You can pick a branch with the `-beta` option, for example `+app_update 380870 -beta legacy41 validate`. We checked that SteamCMD accepts this option and starts downloading the Build 41 version, which takes about 5 GB. The players' client version must match the server version. We did not run the game on a Build 41 server and did not test switching between branches, so make a copy of your world before doing it.

***

## What you need

* **A server** with Debian 12 and **at least 6 GB of memory**, for example the **DE-RZ9-3** plan. With `-Xmx3g` the process takes about 4 GB, and you also need about 7 GB on disk. If you do not have a server yet, order one using the [guide](https://docs.f3cloud.com/en/client-area/order-vps.md). On the **DE-RZ9-2** plan with 4 GB the server starts with `-Xmx2g`, but the margin is small, and we did not test running under player load.
* **An SSH connection**, for example via [Termius](https://docs.f3cloud.com/en/vps/termius-connection.md). Commands are run as `root` unless stated otherwise.
* **The Project Zomboid game** for each player, the same version as the server.

> **What we tested and what we did not.**
>
> We did not run the game client and did not join the server as a player. We tested something else. The server starts, listens on ports 16261 and 16262 over UDP and answers Steam and RakNet queries from another computer. Stopping, restarting, updating and backups work. We did not test player load, mods or how the server shows up in the in-game server list.

***

## Step 1. Install libraries and create a user

SteamCMD is a 32-bit program, and on 64-bit Debian it needs two libraries. While you are at it, install `screen`, which you will need for the server console.

```bash
apt update
apt install -y screen curl ca-certificates lib32gcc-s1 lib32stdc++6
```

Running the server as `root` is not safe, so we will create a separate user `zomboid` for it with the home folder `/opt/zomboid`. You can read more about users in the article on [Linux users](https://docs.f3cloud.com/en/linux/linux-users.md).

```bash
useradd -r -m -d /opt/zomboid -s /bin/bash zomboid
```

***

## Step 2. Install SteamCMD

Log in as the `zomboid` user and download SteamCMD from Valve's server. The commands in steps 2 to 5 are run as this user.

```bash
su - zomboid
mkdir ~/steamcmd && cd ~/steamcmd
curl -fsSL https://steamcdn-a.akamaihd.net/client/installer/steamcmd_linux.tar.gz | tar zxf -
```

This is a small loader, and the full program is downloaded on first launch.

***

## Step 3. Download the server

The command below logs in to Steam anonymously and downloads app 380870 into the `/opt/zomboid/server` folder. On first launch SteamCMD first updates itself, about 41 MB, and then starts downloading the server.

```bash
./steamcmd.sh +force_install_dir /opt/zomboid/server +login anonymous +app_update 380870 validate +quit
```

On our server about 2 GB was downloaded, and the server took about 7 GB on disk. The installation took about three minutes. At the end SteamCMD prints **Success! App '380870' fully installed.**

The server folder now contains the startup script `start-server.sh`, its own Java in `jre64` and the `ProjectZomboid64.json` file with the memory settings.

***

## Step 4. Limit the memory

In `ProjectZomboid64.json`, replace the 8 GB limit with 3 GB. If your plan has 4 GB, set `-Xmx2g`.

```bash
sed -i 's/-Xmx8g/-Xmx3g/' ~/server/ProjectZomboid64.json
grep Xmx ~/server/ProjectZomboid64.json
```

The output should contain the line `"-Xmx3g",`. It is better not to touch the other parameters in the file.

> **File verification resets this setting.**
>
> If you run SteamCMD with the `validate` option, it returns `ProjectZomboid64.json` to its original state, and the limit becomes 8 GB again. We checked this on the test server. How to update the server without losing the limit is shown in the update section below.

***

## Step 5. Start the server for the first time

You need to do the first launch by hand, because the server will ask for the administrator password.

```bash
cd ~/server
./start-server.sh
```

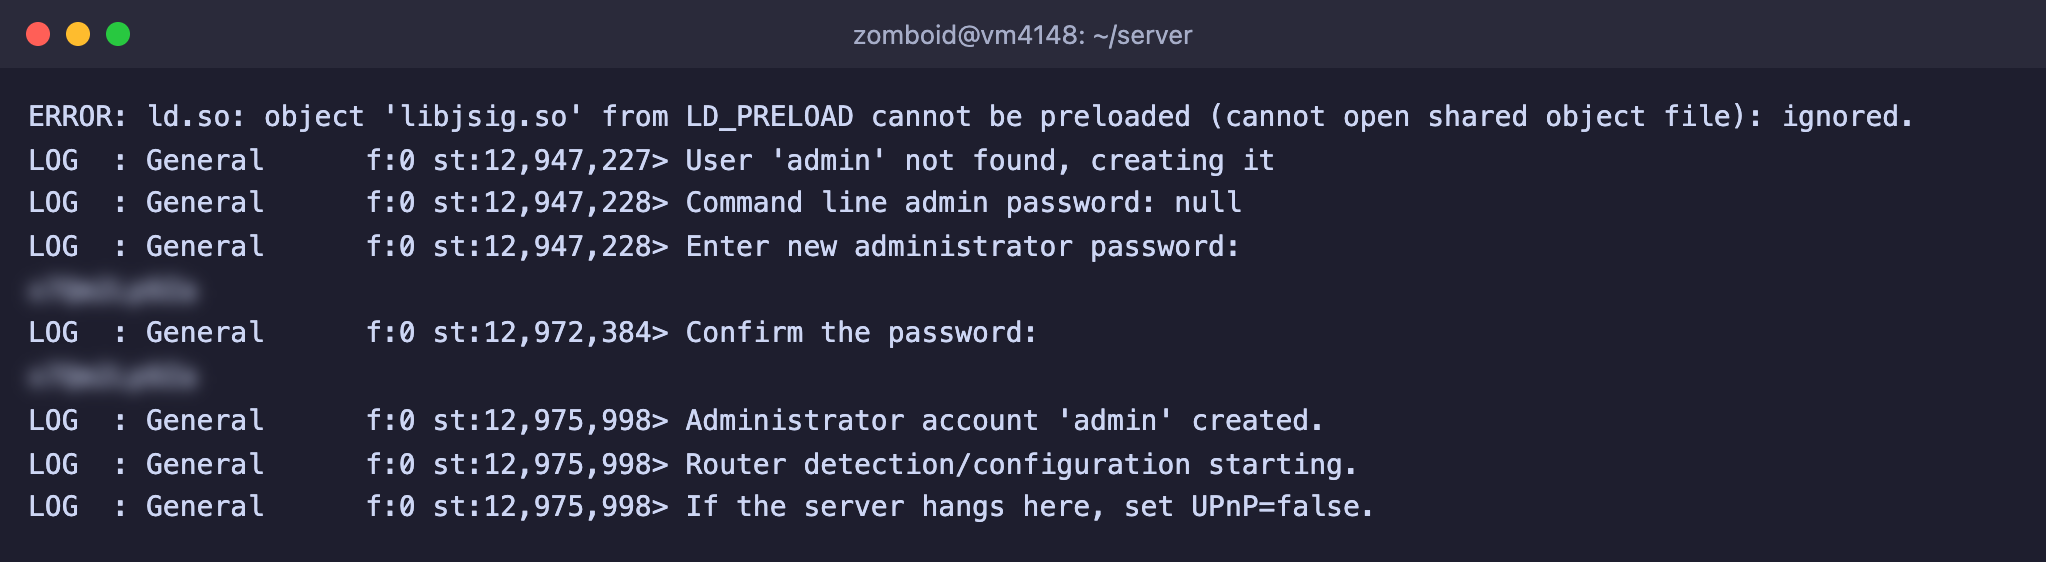
First the server prints many lines about loading the game. Then the lines **Enter new administrator password** and **Confirm the password** appear. Enter a password you have chosen and press <kbd>Enter</kbd>, then repeat it to confirm. After that the server reports **Administrator account 'admin' created.** This creates the `admin` account that you will use to log in to the game as an administrator.

<figure><img src="https://docs.f3cloud.com/img/zomboid-admin-password.png" alt="First launch of the Project Zomboid server, the administrator password prompt and the message Administrator account 'admin' created"><figcaption><p>The server asks for the administrator password on first launch, passwords are hidden on the screen</p></figcaption></figure>

> **The password is visible while you type it.**
>
> In our terminal the entered password was shown on screen in plain text. Make sure no one is standing behind you and do not take screenshots of this window. It is better to generate the password in a password manager and paste it. Do not use the `-adminpassword` option in the startup script, because the password would then stay in plain text in the file.

Next the server creates the world. After the password was entered, this took us about 50 seconds. When the line **SERVER STARTED** appears in the log, the server is ready.

<figure><img src="https://docs.f3cloud.com/img/zomboid-server-started.png" alt="The Project Zomboid server is running, the SERVER STARTED message and the line about ports 16261 and 16262"><figcaption><p>The server listens on ports 16261 and 16262</p></figcaption></figure>

Stop the server with the `quit` command, entering it in the same window. It saves the world and shuts the server down, which took us about 10 seconds. After stopping, return to `root`. From here on the server will start by itself.

```bash
exit
```

The settings and the world were created in the `/opt/zomboid/Zomboid` folder. These are the main things in there.

* `Server/servertest.ini` with the main server settings.
* `Server/servertest_SandboxVars.lua` with the world rules, for example the number of zombies and the speed of the day and night cycle.
* `Saves/Multiplayer/servertest` with the world itself.
* `db/servertest.db` with the player accounts.
* `Logs` with the server logs.

The name `servertest` is the default server name, and all these files are named after it.

***

## Step 6. Configure the server

Open the settings file. Edit it while the server is stopped, because the server rewrites this file at startup.

```bash
nano /opt/zomboid/Zomboid/Server/servertest.ini
```

Next to each parameter in the file there is a comment in English. We collected the most important ones in a table, and the default values are taken from the created file.

| Parameter | Default | What it means |
| --- | --- | --- |
| `PublicName` | My PZ Server | The server name in the game and Steam lists |
| `Password` | empty | The password you need to know to join the server |
| `MaxPlayers` | 32 | How many players can be on the server at the same time, administrators are not counted |
| `PVP` | true | Players can hurt and kill each other |
| `Open` | true | A player can join without a pre-created account, and it is created on first login |
| `Public` | false | Show the server in the game's server list |
| `PauseEmpty` | true | Game time stands still while nobody is on the server |
| `SaveWorldEveryMinutes` | 0 | How often to save the world. At zero the map is saved mostly when players leave a loaded area |
| `UPnP` | true | Tries to configure the router automatically. A VPS has no router, so set it to false |

For a server with friends we changed a few values. We tested these lines on the test server.

```ini
PublicName=Friends Server
Password=your_password
MaxPlayers=8
PVP=false
UPnP=false
SaveWorldEveryMinutes=15
```

After starting the server we checked that the settings were picked up. The `showoptions` command in the console showed the new values, and a Steam query from another computer returned the server name, 8 slots and a flag saying that a password is required.

> **Server password and a closed list.**
>
> For a group of friends it is enough to set `Password`, and you just tell this password to your friends. If you need strict control, set `Open=false`. Then you create the player accounts yourself with the `adduser Name Password` command in the server console. We tested this command, and the server replied that the user was created.

***

## Step 7. Open ports 16261 and 16262

Open both ports in the UFW firewall. The ports are needed specifically over UDP.

```bash
ufw allow 16261:16262/udp
```

You can read more about the firewall in the article on [UFW](https://docs.f3cloud.com/en/vps/security/firewall.md).

You need to check the server from the internet, that is, from another computer. For this we wrote a small Python 3 script that sends the server a standard Steam server info request (A2S_INFO). Save it to a file named `pz-check.py` on your own computer.

```python
import socket, sys

host, port = sys.argv[1], 16261
req = b"\xff\xff\xff\xffTSource Engine Query\x00"
s = socket.socket(socket.AF_INET, socket.SOCK_DGRAM)
s.settimeout(3)
try:
    s.sendto(req, (host, port))
    data, _ = s.recvfrom(4096)
    if data[4:5] == b"A":  # the server asks to repeat the request with a challenge code
        s.sendto(req + data[5:9], (host, port))
        data, _ = s.recvfrom(4096)
    print("Server responds, name:", data[6:data.index(0, 6)].decode())
except socket.timeout:
    print("No response, the port is closed or the server is not running")
```

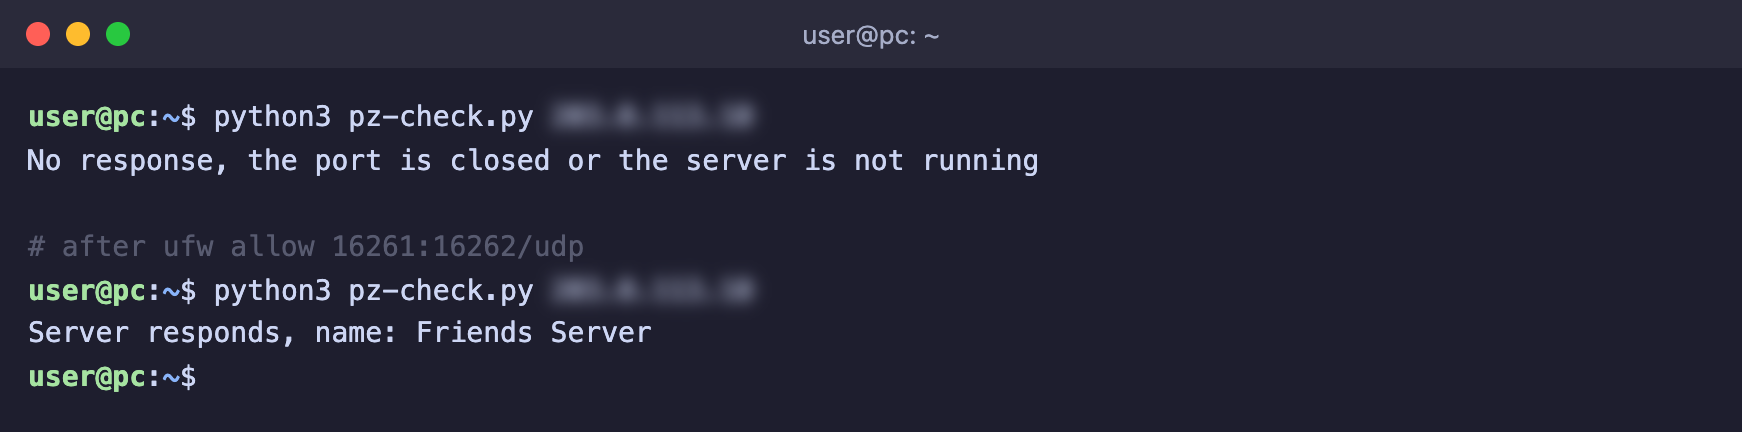
Run it, specifying the IP address of your VPS. We ran the script twice, before and after the UFW rule.

```bash
python3 pz-check.py server-IP
```

<figure><img src="https://docs.f3cloud.com/img/zomboid-udp-check-en.png" alt="Checking port 16261 over UDP, at first there is no response, after the UFW rule the server responds and gives its name"><figcaption><p>While the port is closed there is no response. After the UFW rule the server gives its name</p></figcaption></figure>

If you see the server name, port 16261 is reachable from the internet. We checked port 16262 separately with a RakNet service ping, and it answered too.

***

## Step 8. Set up autostart

To make the server run in the background, start together with the VPS and come back up after a crash, we will set it up as a systemd service. How services work is described in detail in the article on [systemd](https://docs.f3cloud.com/en/linux/systemd-services.md). As in the article on the [Minecraft server](https://docs.f3cloud.com/en/games/minecraft-server.md), we will run the server console inside `screen`. Through it the server receives commands, including the save and stop command.

First create the stop script. It sends the `quit` command to the console so that the server saves the world, and waits until the server exits.

```bash
nano /opt/zomboid/stop.sh
```

```bash
#!/bin/sh
# Sends the quit command to the server console and waits until the server saves the world and exits
screen -p 0 -S zomboid -X stuff "quit$(printf '\r')"
while kill -0 "$MAINPID" 2>/dev/null; do sleep 1; done
```

Make the script executable and create the service.

```bash
chmod +x /opt/zomboid/stop.sh
chown zomboid:zomboid /opt/zomboid/stop.sh
nano /etc/systemd/system/zomboid.service
```

```ini
[Unit]
Description=Project Zomboid server
After=network-online.target
Wants=network-online.target

[Service]
User=zomboid
WorkingDirectory=/opt/zomboid/server
ExecStart=/usr/bin/screen -DmS zomboid /opt/zomboid/server/start-server.sh
ExecStop=/opt/zomboid/stop.sh
Restart=always
RestartSec=10
TimeoutStopSec=120

[Install]
WantedBy=multi-user.target
```

Enable autostart and start the server.

```bash
systemctl daemon-reload
systemctl enable --now zomboid
systemctl status zomboid
```

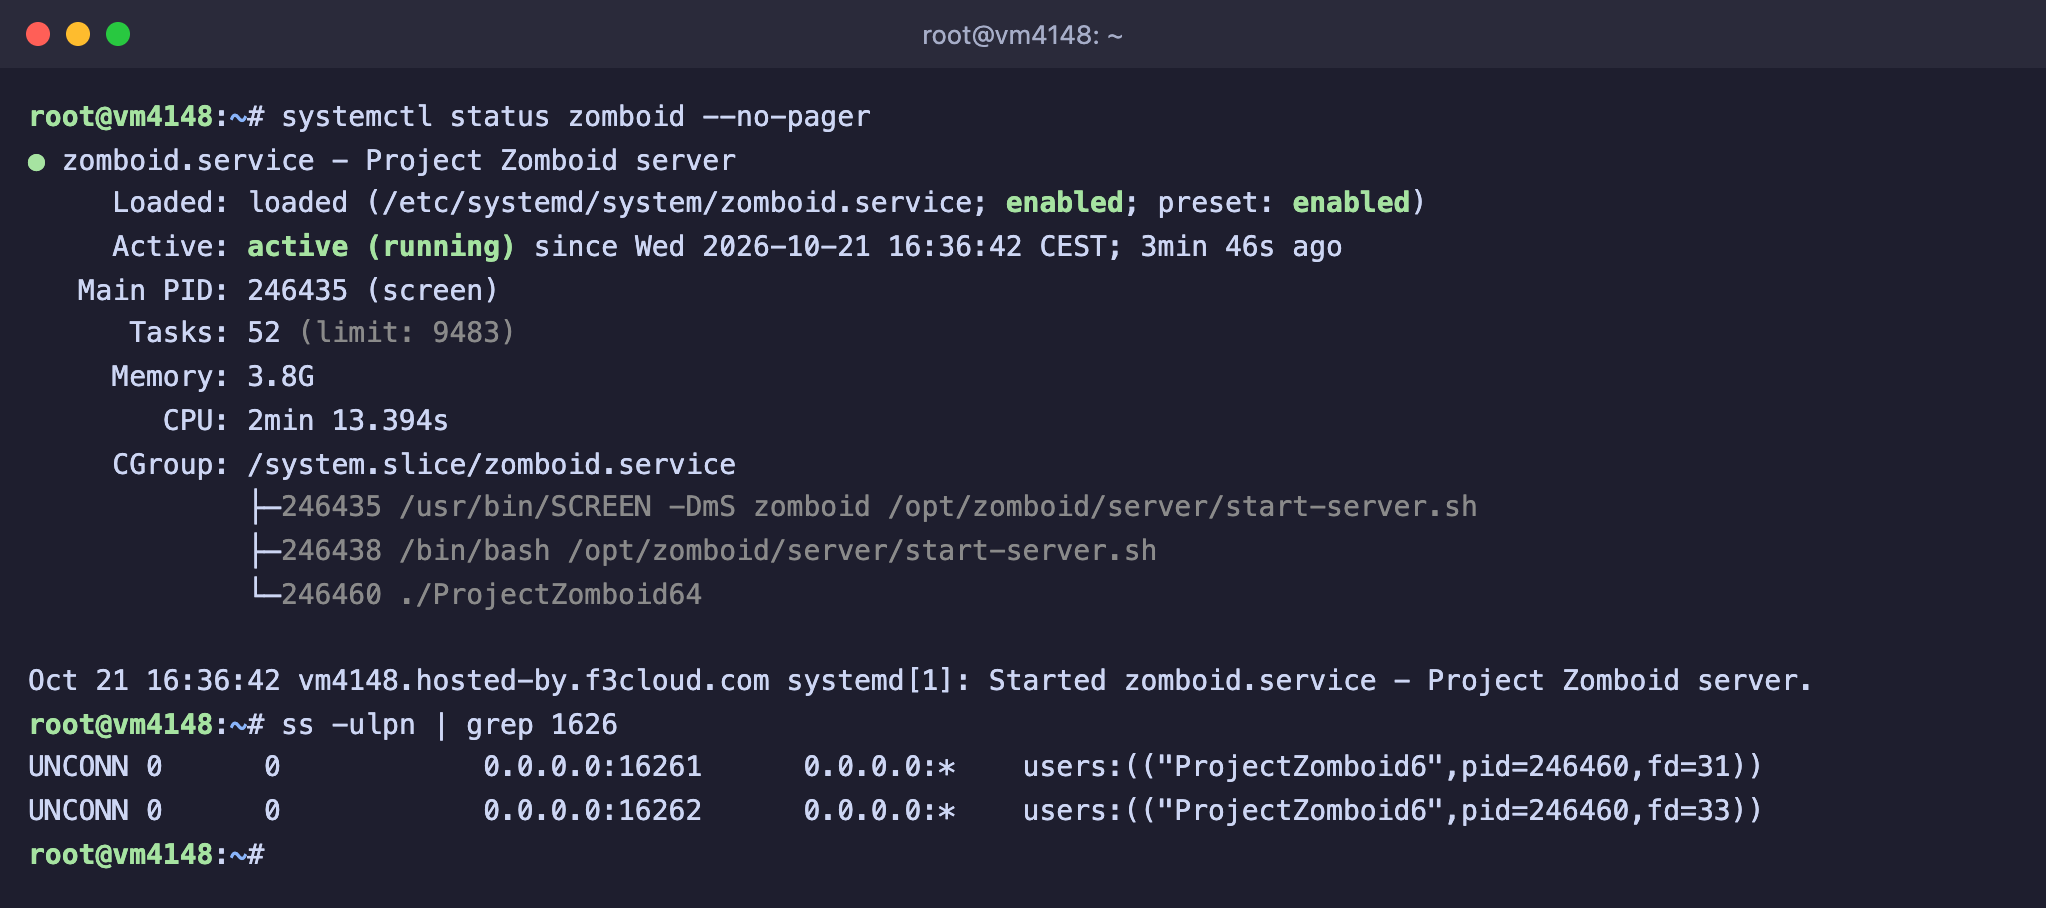
<figure><img src="https://docs.f3cloud.com/img/zomboid-systemd-status.png" alt="systemctl status zomboid, the service is active (running), the screen and ProjectZomboid64 processes and UDP ports 16261 and 16262"><figcaption><p>The service is running, and the server listens on both ports</p></figcaption></figure>

After the service starts, the server takes about 40 seconds to load and then begins answering queries. From now on you manage it through systemd.

* `systemctl stop zomboid` saves the world and shuts the server down.
* `systemctl restart zomboid` restarts the server.
* `systemctl start zomboid` starts the server.

We tested how the service behaves in different situations.

* Stopping with `systemctl stop zomboid` took about 10 seconds, and the server log showed entries about the `quit` command and about saving the world.
* When we forcibly killed Java, systemd brought the server back up after 10 seconds. The `start-server.sh` script exits with code 0 even after such a crash, which is why `Restart=always` is needed.
* The `quit` command entered directly in the console also leads to a restart rather than a shutdown. To shut the server down, use `systemctl stop zomboid`.

Game messages do not end up in `journalctl`, because the server writes them to the console inside `screen`. The logs are in `/opt/zomboid/Zomboid/Logs`, and the last launch is recorded in the `/opt/zomboid/Zomboid/server-console.txt` file. You can read more about logs in the article on [Linux logs](https://docs.f3cloud.com/en/linux/linux-logs.md).

***

## Step 9. The server console and connecting players

To open the server console, attach to the `screen` session.

```bash
su - zomboid -c "screen -r zomboid"
```

You can leave the console and keep the server running with <kbd>Ctrl</kbd> + <kbd>A</kbd>, then <kbd>D</kbd>. You can read more about working with `screen` in a [separate article](https://docs.f3cloud.com/en/linux/screen-linux-tool.md). The `help` command prints the list of all commands. These are the ones we tested.

* `players` shows the connected players.
* `save` saves the world immediately.
* `servermsg "Text"` sends a message to all players.
* `adduser Name Password` creates a player account.
* `quit` saves the world and stops the server, after which the service starts it again.

Players need to enter the IP address of the VPS in the game, port **16261**, the server password if you set one, and then the name and password of their character. On an open server with `Open=true` the account is created on first login. Instead of an IP address it is convenient to use a domain, and how to do this is described in the article on [linking a domain](https://docs.f3cloud.com/en/vps/domain-to-vps.md). To log in as an administrator, use the name `admin` and the password from step 5.

***

## Updating the server

When a new version of the game is released, clients update through Steam on their own, and the server version must match it. In update 42.21 the developers added a notice for players who try to join a server of a different version. The server is updated separately. We put together a script that stops the server, updates it, restores the memory limit and starts it again.

```bash
nano /usr/local/bin/zomboid-update.sh
```

```bash
#!/bin/sh
# Stops the server, updates it via SteamCMD, restores the memory limit and starts it again
systemctl stop zomboid
su - zomboid -c "~/steamcmd/steamcmd.sh +force_install_dir /opt/zomboid/server +login anonymous +app_update 380870 +quit"
su - zomboid -c "sed -i 's/-Xmx[0-9]*[gGmM]/-Xmx3g/' /opt/zomboid/server/ProjectZomboid64.json"
systemctl start zomboid
```

If you chose a different memory limit, replace `3g` in the script. Make the script executable and run it whenever you need to update.

```bash
chmod +x /usr/local/bin/zomboid-update.sh
zomboid-update.sh
```

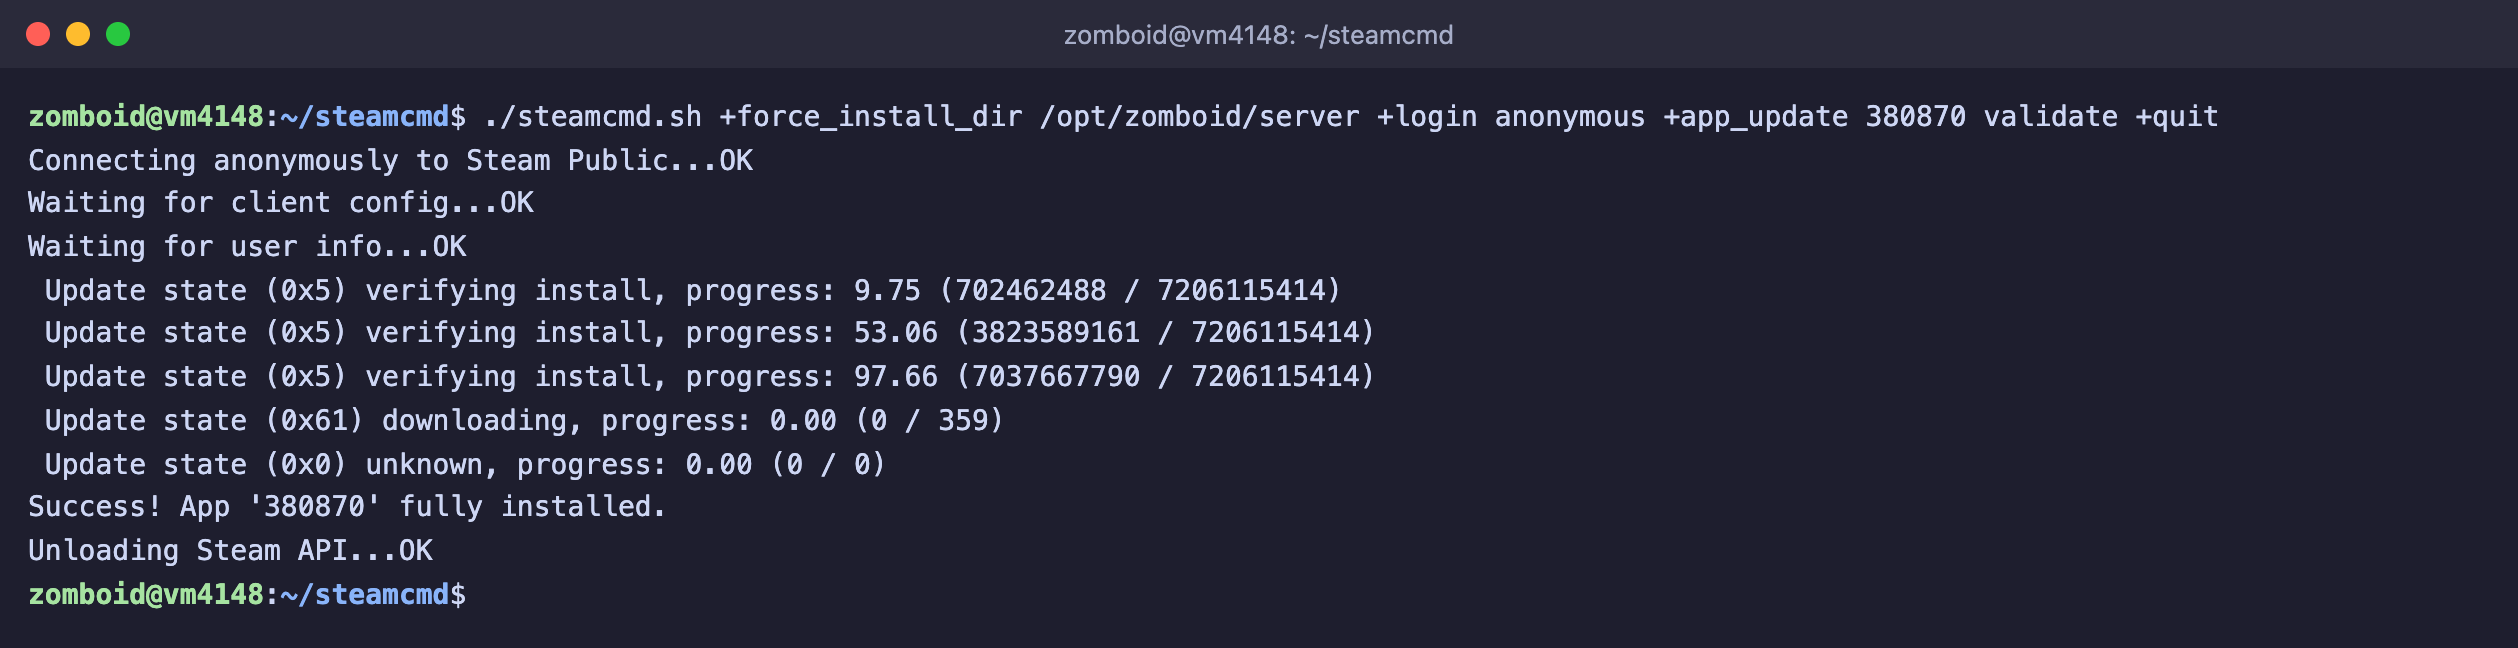
When there are no updates, SteamCMD prints **Success! App '380870' already up to date.** The whole script ran in 14 seconds for us. The script deliberately has no `validate` option. We checked that a normal update does not touch the modified `ProjectZomboid64.json`, while a file check with `validate` puts 8 GB back in it.

<figure><img src="https://docs.f3cloud.com/img/zomboid-steamcmd-validate.png" alt="SteamCMD with the validate option checked 7 GB of files and downloaded 359 bytes, that is, replaced ProjectZomboid64.json"><figcaption><p>The file check took about a minute and replaced one small file with the memory settings</p></figcaption></figure>

`validate` is only needed for repairs, for example if the game files got corrupted. After it, run the command from step 4 again.

***

## World backups

The world is in `/opt/zomboid/Zomboid/Saves` and the player accounts are in `/opt/zomboid/Zomboid/db`. The server makes copies itself at startup and on a version change and puts them in `/opt/zomboid/Zomboid/backups`, keeping five copies by default (the `BackupsCount` parameter). But they sit on the same disk as the world. For reliability we will add our own script. It saves the world with the `save` command, packs the world, the accounts and the settings into an archive in the `/opt/zomboid/archives` folder and keeps the 7 latest archives. The server is not stopped during copying.

```bash
nano /opt/zomboid/backup.sh
```

```bash
#!/bin/sh
# Saves the world, archives it together with the settings and keeps the 7 latest archives
cd /opt/zomboid || exit 1
screen -p 0 -S zomboid -X stuff "save$(printf '\r')"
sleep 10
mkdir -p archives
tar -czf "archives/zomboid-$(date +%F-%H%M).tar.gz" Zomboid/Saves Zomboid/db Zomboid/Server
ls -1t archives/zomboid-*.tar.gz | tail -n +8 | xargs -r rm --
```

Make the script executable and add it to the schedule of the `zomboid` user, for example every night at 4:00.

```bash
chmod +x /opt/zomboid/backup.sh
chown zomboid:zomboid /opt/zomboid/backup.sh
echo "0 4 * * * /opt/zomboid/backup.sh" | crontab -u zomboid -
```

We tested the script manually and on schedule, and the archive appeared both times. In a fresh world the archive took less than 1 MB, and in a real game it will grow along with the world. You can read more about scheduling in the article on [cron](https://docs.f3cloud.com/en/linux/cron-linux.md). Copies on the same server will not help if the server itself is lost, so download the archives to your own computer from time to time or send them to another server, for example with the [rsync](https://docs.f3cloud.com/en/linux/rsync-linux.md) command.

To restore the world, stop the server, unpack the archive you need over the `/opt/zomboid` folder and start the server. We tested restoring, and the server started after it.

```bash
systemctl stop zomboid
su - zomboid -c "tar -xzf /opt/zomboid/archives/ARCHIVE-NAME.tar.gz -C /opt/zomboid"
systemctl start zomboid
```

***

## Frequently asked questions

<details>

<summary>./steamcmd.sh: cannot execute: required file not found</summary>

The full message looks like `./steamcmd.sh: line 85: /opt/zomboid/steamcmd/linux32/steamcmd: cannot execute: required file not found`. The 32-bit libraries are missing. We got this message when we removed `lib32gcc-s1` and `lib32stdc++6`. Install them as described in step 1.

</details>

<details>

<summary>The service is running but the server does not respond, the console says Enter new administrator password</summary>

On first launch the server waits for the administrator password, and in a service there is nobody to enter it. We reproduced this with a new server name. The service stayed `active`, but nobody was listening on ports 16261 and 16262, and the outside check got no response. Stop the service with `systemctl stop zomboid`, do step 5 by hand, enter the password and wait for **SERVER STARTED**, then stop the server with the `quit` command and start the service again.

</details>

<details>

<summary>Red ERRORs at startup, libjsig.so and Property Name not found</summary>

In the startup log we saw two groups of lines with errors, and both are harmless.

* **ERROR: ld.so: object 'libjsig.so' from LD_PRELOAD cannot be preloaded** appears at startup. At the end of the line the server says that it skipped this library (`ignored`), and it keeps running.
* **IsoPropertyType.lookupOrDefaultStr> Exception thrown** with text like `Property Name not found: ladderW` and a long call stack appears several times when a new world is created.

If the log has the line **SERVER STARTED** after them, everything is fine.

</details>

<details>

<summary>If the server hangs here, set UPnP=false</summary>

This is a line from the startup log, and it comes right after the message **Router detection/configuration starting**. While the `UPnP` parameter is `true`, the server looks for a router on the network to open ports. A VPS has no router. On our server startup waited about 12 seconds and wrote **No UPnP-enabled Internet gateway found**, after which it started. Set `UPnP=false` in `servertest.ini`, and startup will be faster by that much time.

</details>

<details>

<summary>No response, the port is closed or the server is not running</summary>

This is how our `pz-check.py` script answers when no reply comes from another computer. We got this message while UFW had no rule for UDP. Check that the service is running with `systemctl status zomboid`, that the rule exists with `ufw status`, and that the ports are listening with `ss -ulpn | grep 1626`. Open specifically **UDP**, because a TCP rule will not help.

</details>

<details>

<summary>Killed process (ProjectZomboid6) in the kernel log</summary>

The server suddenly exited with no messages in the console. This happens when the process takes more memory than the server has or than is allotted to the service, and the kernel protects the system from running out of memory. Check with `journalctl -k | grep -i "killed process"`. We reproduced this by limiting the service to 2 GB of memory with a Java limit of 3 GB, and the kernel wrote `Memory cgroup out of memory: Killed process … (ProjectZomboid6)`. Reduce `-Xmx` in `ProjectZomboid64.json` or take a plan with more memory.

</details>

<details>

<summary>After an update the server takes 8 GB again</summary>

You ran SteamCMD with the `validate` option, and it returned `ProjectZomboid64.json` to its original state. We got this when we verified the files, SteamCMD downloaded 359 bytes, and `-Xmx8g` appeared in the file again. Restore the limit with the command from step 4 and update the server with the script from the update section.

</details>

***

## Our resources

**Telegram channel:** [https://t.me/f3cloud_news](https://t.me/f3cloud_news)\
**F3 Cloud:** [https://f3cloud.com](https://f3cloud.com/en)