> The full list of articles is in [llms.txt](https://docs.f3cloud.com/llms.txt). Every page has a Markdown version: add .md to its address. This page as Markdown: [https://docs.f3cloud.com/en/docker/telegram-bot-vps.md](https://docs.f3cloud.com/en/docker/telegram-bot-vps.md).

# Telegram bot on a VPS – running it on Python, autostart with systemd and common errors

How to run a Telegram bot on a VPS. Creating a bot in BotFather, Python and aiogram in a virtual environment, storing the token safely, autostart with systemd, logs and the common Unauthorized and Conflict errors. Tested on Debian 12 with Python 3.11 and aiogram 3.31.

While a bot runs on your home computer, it only answers when the computer is turned on. On a VPS the bot works around the clock, survives reboots and does not depend on your internet connection. In this article we will create a bot in Telegram, run it on a server with Python and the **aiogram** library, set up autostart with systemd and go through the errors you are most likely to meet. As an example we will use a simple bot that says hello and repeats your messages, and later you can put your own code in its place. We tested every step on a test server with Debian 12, Python **3.11** and aiogram **3.31**.

***

## How a bot receives messages

A Telegram bot is an ordinary program that talks to Telegram servers through the Bot API. A user writes to the bot, the message reaches Telegram servers and waits there until the bot program picks it up. According to the Telegram documentation, there are two ways to receive such messages, and you can use only one of them at a time. The first one is called **polling**. The bot itself keeps asking Telegram whether there are new messages. The second one, **webhook**, works the other way around. Telegram itself sends every message to the address of your server, and this requires a domain with HTTPS.

Polling is the easiest option for a bot on a VPS. It needs no domain, no certificate and no open ports, because the connection is always started by the bot. On our test server the UFW firewall was enabled without a single rule for the bot, and the bot worked. Messages that arrived while the bot was switched off are stored by Telegram for up to 24 hours, so after a short restart the bot will receive them.

Access to the bot is given by the **token**, a long string issued by BotFather. Whoever knows the token has full control of the bot. That is why the token is not written directly into the code and is not published together with it on GitHub. It is kept in a separate file that only root can read.

***

## What you will need

* A **server** with Debian 12 or Ubuntu 24.04. The smallest plan is enough for a simple bot, for example **DE-Promo**. If you do not have a server yet, order one by following the [guide](https://docs.f3cloud.com/en/client-area/order-vps.md).
* An **SSH connection**, for example through [Termius](https://docs.f3cloud.com/en/vps/termius-connection.md). The commands are run as `root`.
* A **Telegram account** to create the bot.

***

## Step 1. Create a bot in BotFather

1. Open the **@BotFather** bot in Telegram and send it the `/newbot` command.
2. Enter the name of the bot. Users will see it, and it can be anything.
3. Enter the username of the bot. It must end with `bot`, for example `my_shop_bot`.
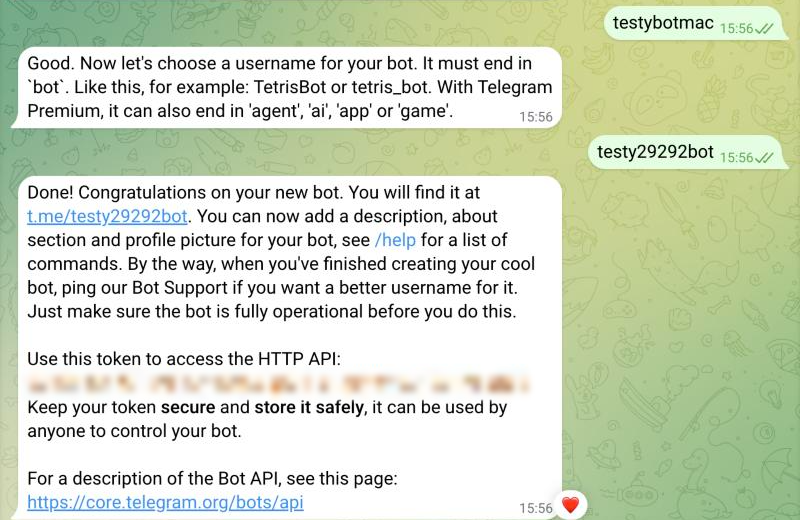
4. BotFather will send you a link to the bot and the **token** under the line **Use this token to access the HTTP API**. Copy the token and do not show it to anyone.

<figure><img src="https://docs.f3cloud.com/img/telegram-botfather-token.png" alt="BotFather's reply after the bot is created, the link to the bot and the token, the token is hidden"><figcaption><p>The bot is created, the token is hidden</p></figcaption></figure>

> **If the token has fallen into the wrong hands.**
>
> Revoke it with the `/revoke` command in BotFather, then replace the token on the server in the `/etc/tgbot.env` file and restart the bot.

***

## Step 2. Prepare the server

Create a separate user for the bot. If there is a bug in the bot code that lets someone run foreign commands, an attacker will get the rights of this user only, not of `root`.

```bash
useradd -r -m -d /opt/tgbot -s /bin/bash tgbot
apt install -y python3-venv
```

The `python3-venv` package is needed for a virtual environment, a separate folder with libraries just for this bot. In our Debian 12 image it is not installed by default.

Switch to the bot user, create the environment and install aiogram.

```bash
su - tgbot
python3 -m venv venv
venv/bin/pip install aiogram
```

At the end of the installation you will see the line **Successfully installed** with a list of packages, including `aiogram`.

***

## Step 3. Write the bot code

Create a file for the code.

```bash
nano bot.py
```

Paste the example below into it and save with <kbd>Ctrl</kbd> + <kbd>O</kbd>, then <kbd>Enter</kbd>, and exit with <kbd>Ctrl</kbd> + <kbd>X</kbd>.

```python
import asyncio
import logging
import os

from aiogram import Bot, Dispatcher
from aiogram.filters import CommandStart
from aiogram.types import Message

dp = Dispatcher()

@dp.message(CommandStart())
async def start(message: Message):
    # reply to the /start command
    await message.answer(f"Hi, {message.from_user.first_name}! I run on a VPS. Write something and I will repeat it.")

@dp.message()
async def echo(message: Message):
    # repeat any other message
    await message.send_copy(chat_id=message.chat.id)

async def main():
    bot = Bot(token=os.environ["BOT_TOKEN"])
    await dp.start_polling(bot)

if __name__ == "__main__":
    logging.basicConfig(level=logging.INFO)
    asyncio.run(main())
```

Notice that there is no token in the code. The bot takes it from the `BOT_TOKEN` environment variable.

***

## Step 4. Test the bot manually

Before you set up autostart, make sure the bot works. The `read -s` command will ask for the token and will not show it on the screen, so it will not stay in the command history. Paste the token and press <kbd>Enter</kbd>.

```bash
read -s -p "Token: " BOT_TOKEN; export BOT_TOKEN
venv/bin/python bot.py
```

If everything is fine, you will see the lines **Start polling** and **Run polling for bot** with the address of your bot.

<figure><img src="https://docs.f3cloud.com/img/telegram-bot-run.png" alt="The aiogram bot is running, the lines Start polling and Run polling for bot, two messages handled"><figcaption><p>The bot is running and has handled two messages</p></figcaption></figure>

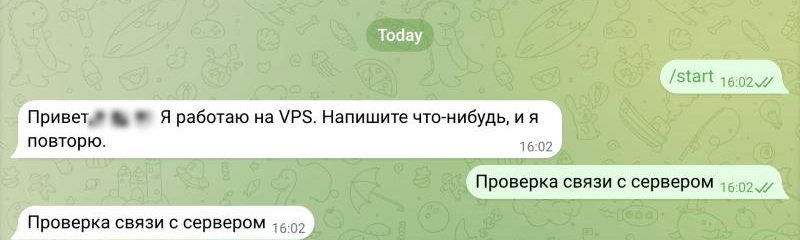
Open the bot in Telegram using the link from BotFather, send it `/start` and then any message.

<figure><img src="https://docs.f3cloud.com/img/telegram-bot-chat.png" alt="A chat with the bot in Telegram, the bot said hello and repeated the message"><figcaption><p>The bot replies to /start and repeats messages</p></figcaption></figure>

Stop the bot with <kbd>Ctrl</kbd> + <kbd>C</kbd> and return to `root` with the `exit` command.

***

## Step 5. Set up autostart

Right now the bot works only while the terminal is open. Let us turn it into a systemd service, so that it starts together with the server and comes back up after failures. You can read more about services in the article about [systemd](https://docs.f3cloud.com/en/linux/systemd-services.md).

First, save the token to a file that only `root` can read. Replace `YOUR_TOKEN` with the token from BotFather.

```bash
echo "BOT_TOKEN=YOUR_TOKEN" > /etc/tgbot.env
chmod 600 /etc/tgbot.env
```

Then create the service.

```bash
nano /etc/systemd/system/tgbot.service
```

```ini
[Unit]
Description=Telegram bot
After=network-online.target
Wants=network-online.target

[Service]
User=tgbot
WorkingDirectory=/opt/tgbot
EnvironmentFile=/etc/tgbot.env
ExecStart=/opt/tgbot/venv/bin/python bot.py
Restart=always
RestartSec=5

[Install]
WantedBy=multi-user.target
```

The `EnvironmentFile` line passes the token from the file to the bot. systemd reads this file as `root` before the bot starts, so the `tgbot` user itself does not need access to it.

Enable autostart and start the bot.

```bash
systemctl daemon-reload
systemctl enable --now tgbot
systemctl status tgbot
```

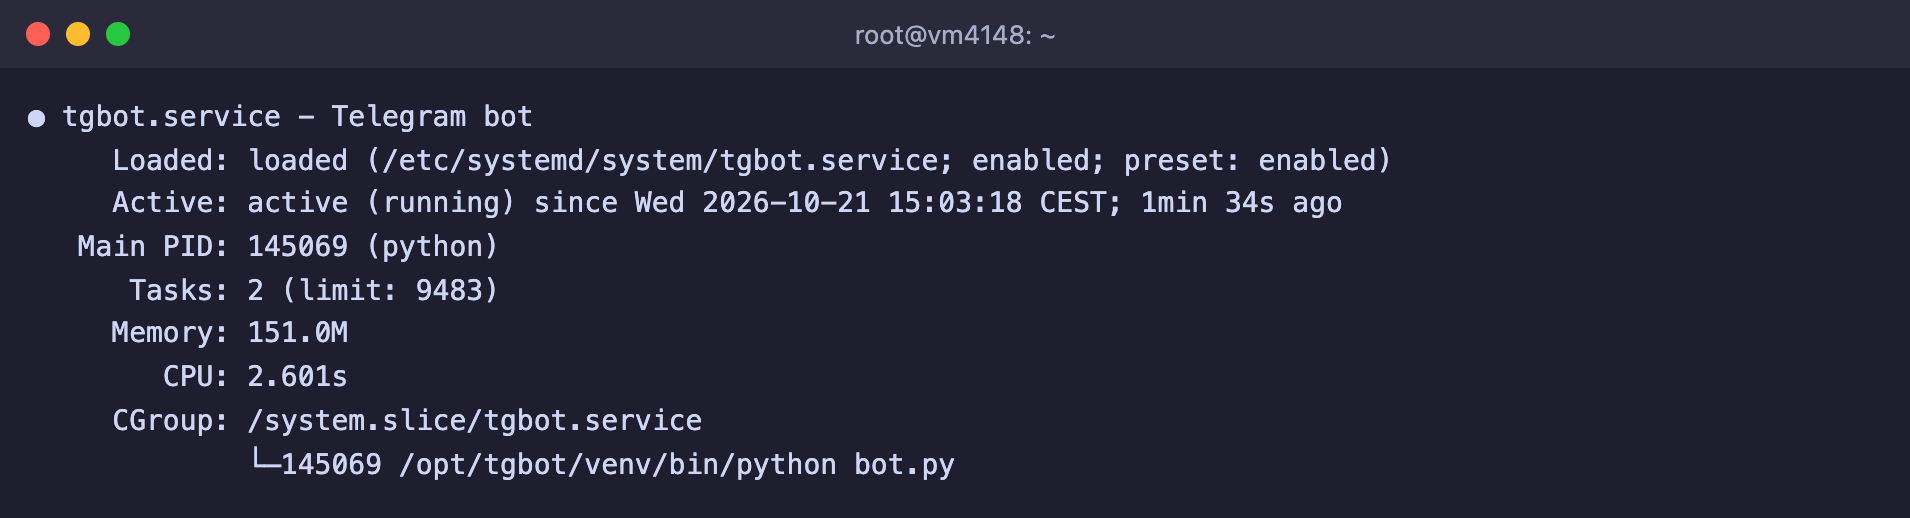
<figure><img src="https://docs.f3cloud.com/img/telegram-bot-status.png" alt="systemctl status tgbot, the service is active (running), the python bot.py process"><figcaption><p>The bot is running as a service</p></figcaption></figure>

On our server the service with this bot used about 150 MB of memory according to `systemctl status`.

***

## How to update the bot and view logs

* **You changed the code.** Edit `/opt/tgbot/bot.py` and restart the service with `systemctl restart tgbot`.
* **You added a library.** Install it into the bot's environment with `su - tgbot -c "venv/bin/pip install name"` and restart the service.
* **Logs.** Everything the bot prints to the console goes to the journal. `journalctl -u tgbot -n 50` shows the last lines, and you can follow it in real time with `journalctl -u tgbot -f`. You can read more about the journal in the article about [Linux logs](https://docs.f3cloud.com/en/linux/linux-logs.md).

***

## Frequently asked questions

<details>

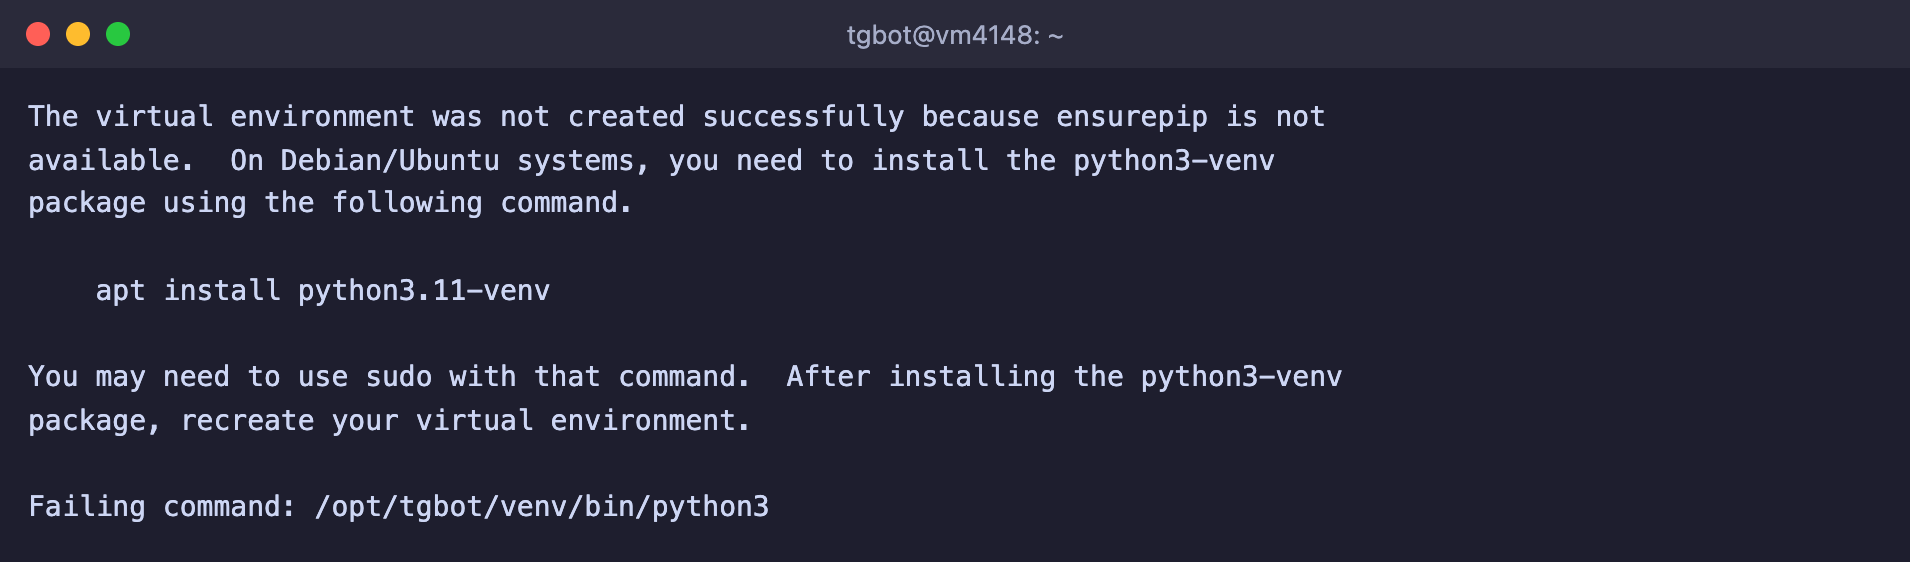
<summary>The virtual environment was not created successfully because ensurepip is not available</summary>

The `python3-venv` package is not installed. We got this error on a clean Debian 12. Install the package with `apt install -y python3-venv`, delete the failed folder with `rm -rf venv` and create the environment again.

<figure><img src="https://docs.f3cloud.com/img/telegram-bot-venv-error.png" alt="The python3 -m venv error: ensurepip is not available, python3-venv must be installed"><figcaption><p>Python tells you which package to install</p></figcaption></figure>

</details>

<details>

<summary>TelegramUnauthorizedError: Telegram server says - Unauthorized</summary>

Telegram did not accept the token. Most likely it was copied incompletely or with an extra space, or it was revoked with the `/revoke` command. Check the line in `/etc/tgbot.env` or get a new token from BotFather.

<figure><img src="https://docs.f3cloud.com/img/telegram-bot-unauthorized.png" alt="The aiogram error TelegramUnauthorizedError: Telegram server says - Unauthorized"><figcaption><p>This is how Telegram responds to a wrong token</p></figcaption></figure>

</details>

<details>

<summary>TelegramConflictError: terminated by other getUpdates request</summary>

Two copies of the bot are running with the same token at the same time. We got this error when we started the bot manually while the service was running. Usually the second copy is left in another terminal window, in `screen` or on another server. Stop the extra copy. Once it was stopped, the service on our server reconnected on its own.

<figure><img src="https://docs.f3cloud.com/img/telegram-bot-conflict.png" alt="The TelegramConflictError error: make sure that only one bot instance is running"><figcaption><p>Telegram requires that only one copy of the bot is running</p></figcaption></figure>

</details>

<details>

<summary>ModuleNotFoundError: No module named 'aiogram'</summary>

The bot was started with the system Python instead of the Python from the environment. We got this error when we started the bot with `python3 bot.py`. Start it with `venv/bin/python bot.py`, and in the service specify the full path `/opt/tgbot/venv/bin/python`.

</details>

<details>

<summary>The bot does not respond</summary>

1. Check that the service is running with `systemctl status tgbot`.
2. Look at the last lines of the journal with `journalctl -u tgbot -n 50`. The error that stopped the bot will be there.
3. Make sure that a second copy of the bot with the same token is not running.

</details>

***

## Our resources

**Telegram channel:** [https://t.me/f3cloud_news](https://t.me/f3cloud_news)\
**F3 Cloud:** [https://f3cloud.com](https://f3cloud.com/en)